13+ Creative Ceramic Test Tile Ideas
Ceramic Test Tile Ideas ,Every ceramic artist faces the same dilemma. You spend hours crafting the perfect piece, apply what you think will be the ideal glaze, and then watch in dismay as it emerges from the kiln looking nothing like you imagined. The glaze runs too much, pools incorrectly, or produces an entirely unexpected color. This scenario happens far too often, and it represents wasted time, materials, and creative energy.
Test tiles solve this problem. These small clay samples allow you to experiment with glazes, underglazes, and surface treatments without risking your finished work. Whether you are a beginning potter or an experienced ceramic artist, developing a robust test tile system transforms your practice. Rather than guessing how a glaze will perform, you gain concrete evidence of its behavior under specific firing conditions.
The beauty of test tiles lies in their versatility. You can create them in countless shapes, sizes, and configurations, each designed to reveal different information about your glazes and clay bodies. From simple flat squares to complex three-dimensional forms, each test tile design serves a specific purpose in your glaze development journey.
Understanding the Purpose of Test Tiles
Before diving into specific designs, it helps to understand what makes an effective test tile. The goal is not simply to see a glaze color. A well-designed test tile reveals how a glaze flows on vertical surfaces, how it pools in recessed areas, how it breaks over texture, and how it interacts with different clay bodies. Your test tile should mirror the conditions your actual pottery will experience in the kiln.
Consider the forms you typically create. If you make mugs and bowls with vertical walls, your test tiles need vertical surfaces. If you create plates and platters, you need to understand how glazes behave on horizontal surfaces. If you incorporate carved designs or stamped patterns, your test tiles should include texture. The most useful test tiles replicate the surfaces and angles found in your finished work.
Many ceramic artists make the mistake of creating test tiles that fire flat in the kiln. While these tiles provide basic color information, they fail to show how gravity affects glaze movement during firing. A glaze that appears perfect when fired horizontally might run excessively on a vertical mug wall. Building dimension into your test tiles prevents this disappointing discovery.
Classic Flat Slab Test Tiles
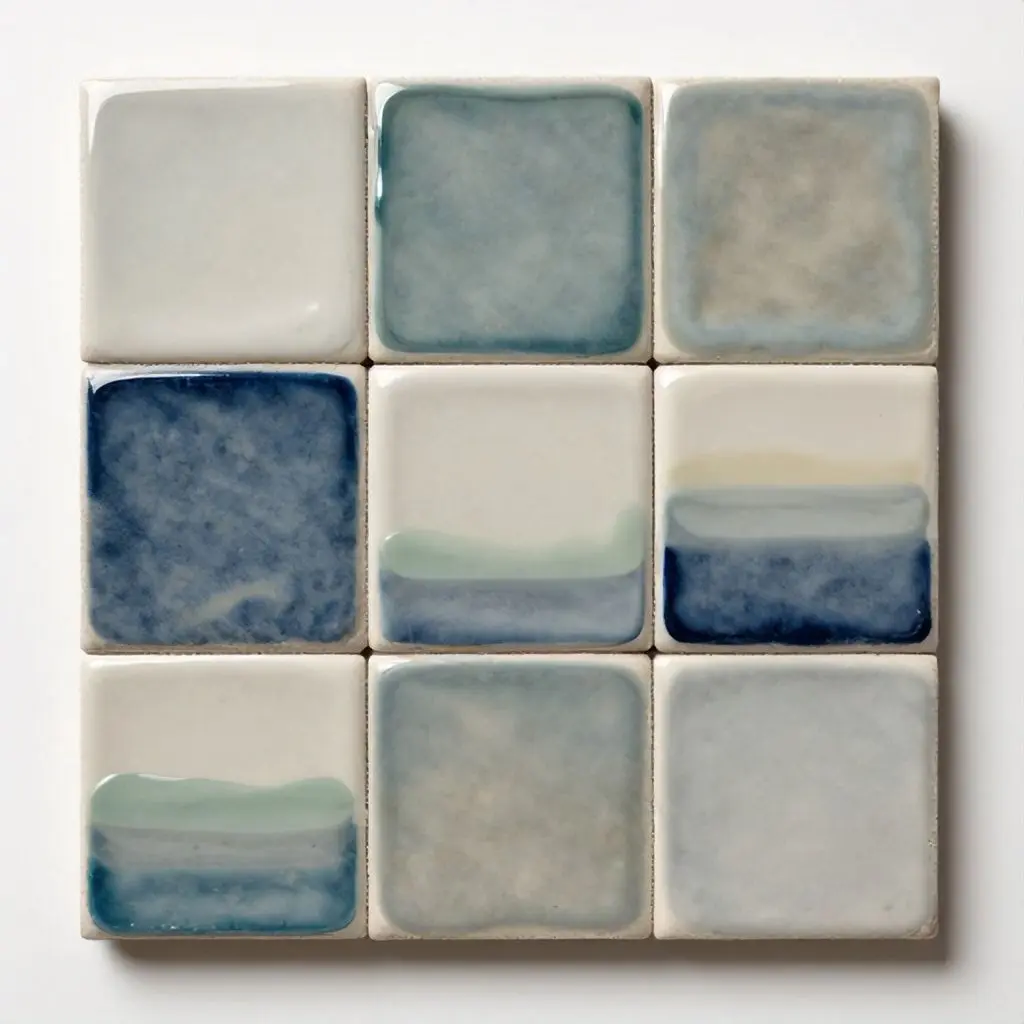
The simplest approach involves rolling out a clay slab and cutting it into uniform squares or rectangles. These tiles typically measure between two and three inches on each side, though dimensions vary based on personal preference. The process takes minimal time and produces consistent results.
To add value to flat slab tiles, incorporate texture on one half while leaving the other half smooth. This allows you to observe how your glaze behaves over both conditions. Use stamps, carved patterns, or impressed designs to create the textured section. The contrast between smooth and textured areas reveals whether a glaze will settle into crevices or break over raised surfaces.
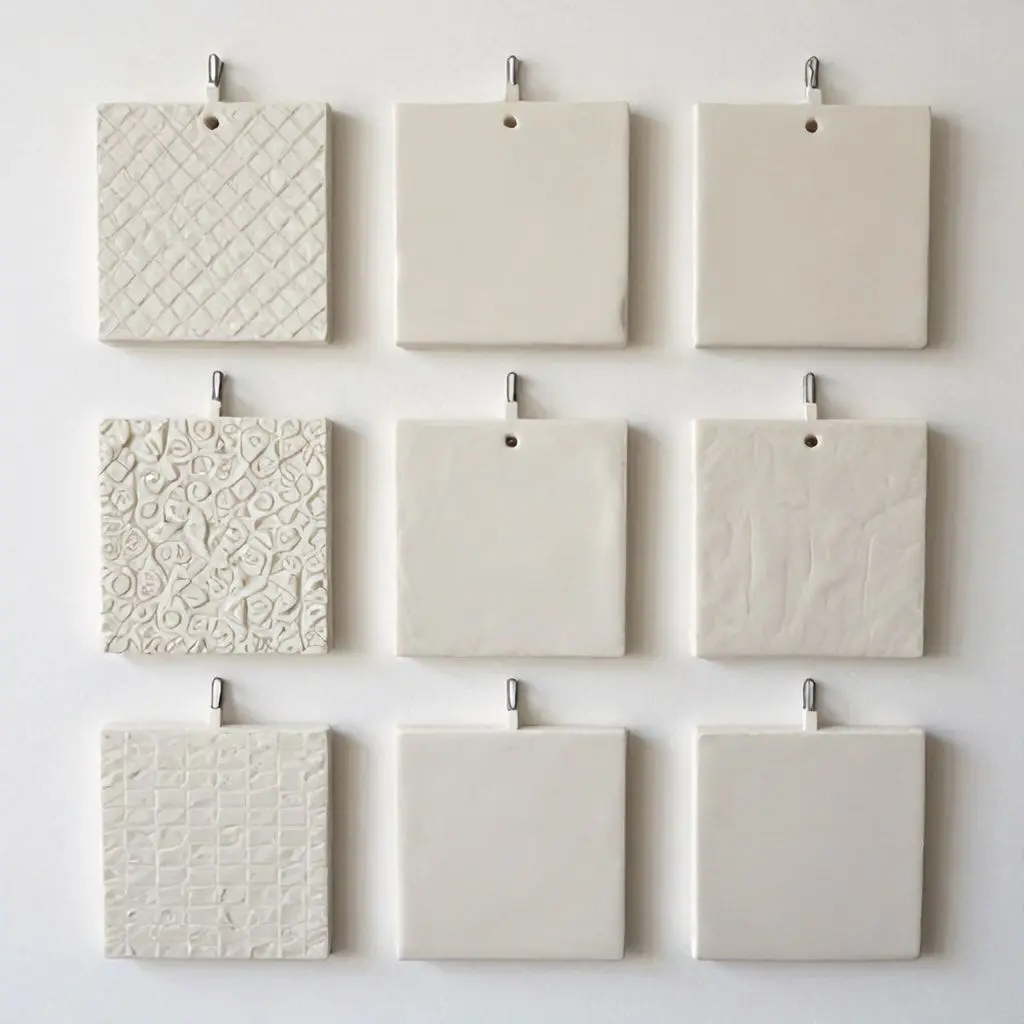
Adding a small hole near the top edge of each flat tile enables easy storage and display. You can hang finished tiles on a pegboard, string them together by glaze family, or attach them directly to glaze bucket handles for quick reference. This organizational system keeps your testing library accessible and prevents lost information.
Press flat tiles into firm foam while still in the leather hard stage to create gently curved edges. This subtle modification helps capture light reflections in photographs and provides a better sense of surface glossiness. The technique requires only a few seconds per tile but significantly improves the visual information each test provides.
L-Shaped Tiles for Comprehensive Testing
L-shaped test tiles revolutionized glaze testing when ceramic artists discovered their potential. These tiles feature both a vertical and horizontal surface joined at a right angle, allowing you to observe glaze behavior in both orientations simultaneously. The vertical section shows how far a glaze will run or drip, while the horizontal base catches any excess flow and demonstrates pooling characteristics.
Creating L-shaped tiles requires forming a flat slab approximately one quarter inch thick, then carefully bending it at a right angle while the clay remains at the leather hard stage. Support the vertical section with a small triangular buttress attached to the back, ensuring stability during drying and firing. The buttress also provides a flat surface for writing glaze information with an underglaze pencil.
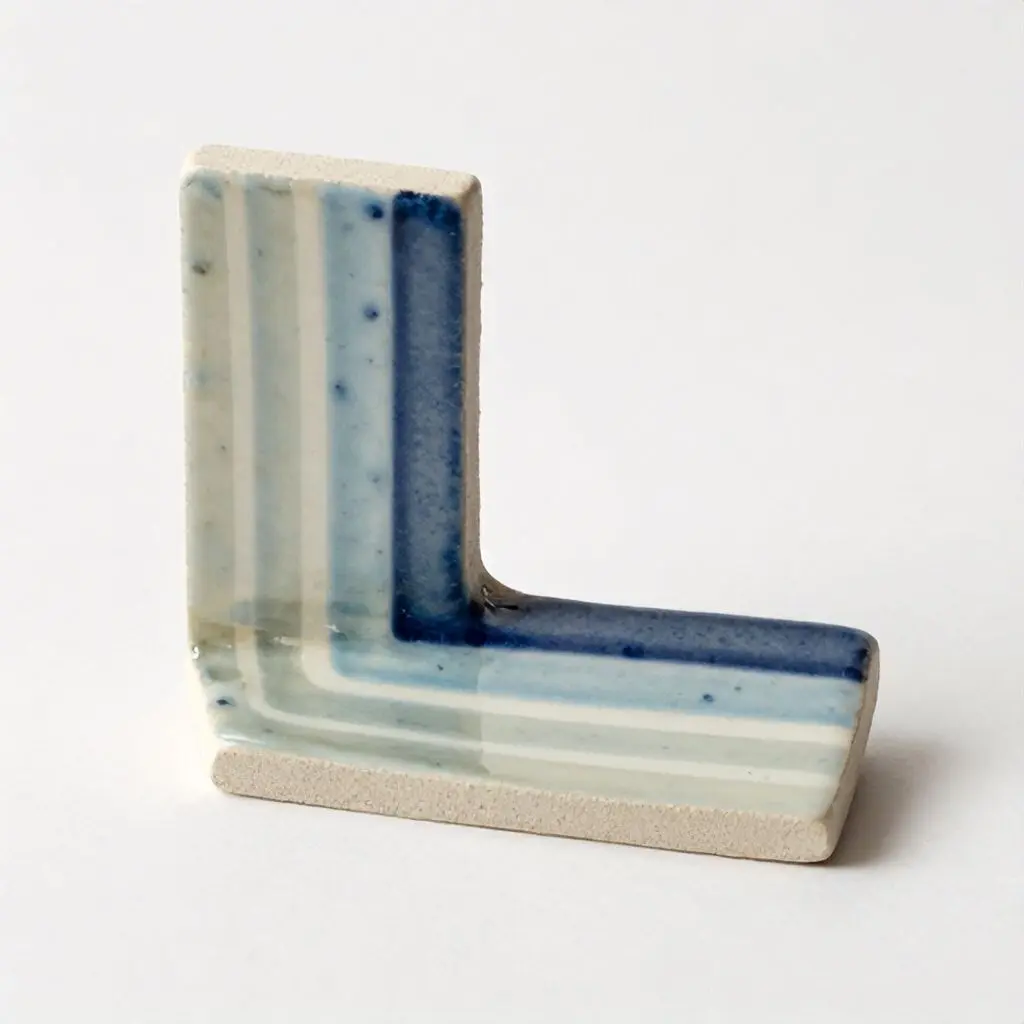
The vertical surface of an L-shaped tile offers space for multiple glaze applications. You can brush five different glaze variations in horizontal stripes, testing incremental additions of colorants or flux materials. This technique reveals exactly how each ingredient affects the final result, all on a single tile. After firing, you can compare the stripes side by side and select the most appealing combination.https://casolia.com/ceramic-test-tiles-ideas/
Professional ceramic artists often add texture to one half of the vertical surface while keeping the other half smooth. This dual surface treatment shows how the same glaze responds to different clay conditions. Carved lines, stamped patterns, or scratched surfaces all interact differently with glazes, producing varied visual effects that may enhance or detract from your desired outcome.
Vertical Cylinder Tiles from the Wheel
Wheel-thrown test tiles provide the most accurate representation of how glazes perform on actual pottery. The process involves throwing a bottomless cylinder approximately five inches in diameter and two to three inches tall. Once removed from the wheel, cut this cylinder into vertical sections that stand upright during firing.
These curved tile sections replicate the exact surface angle found on mugs, bowls, and vases. The glaze experiences the same gravitational pull it would encounter on finished ware, providing reliable predictions of its behavior. This method particularly benefits ceramic artists who primarily create wheel-thrown functional pottery.
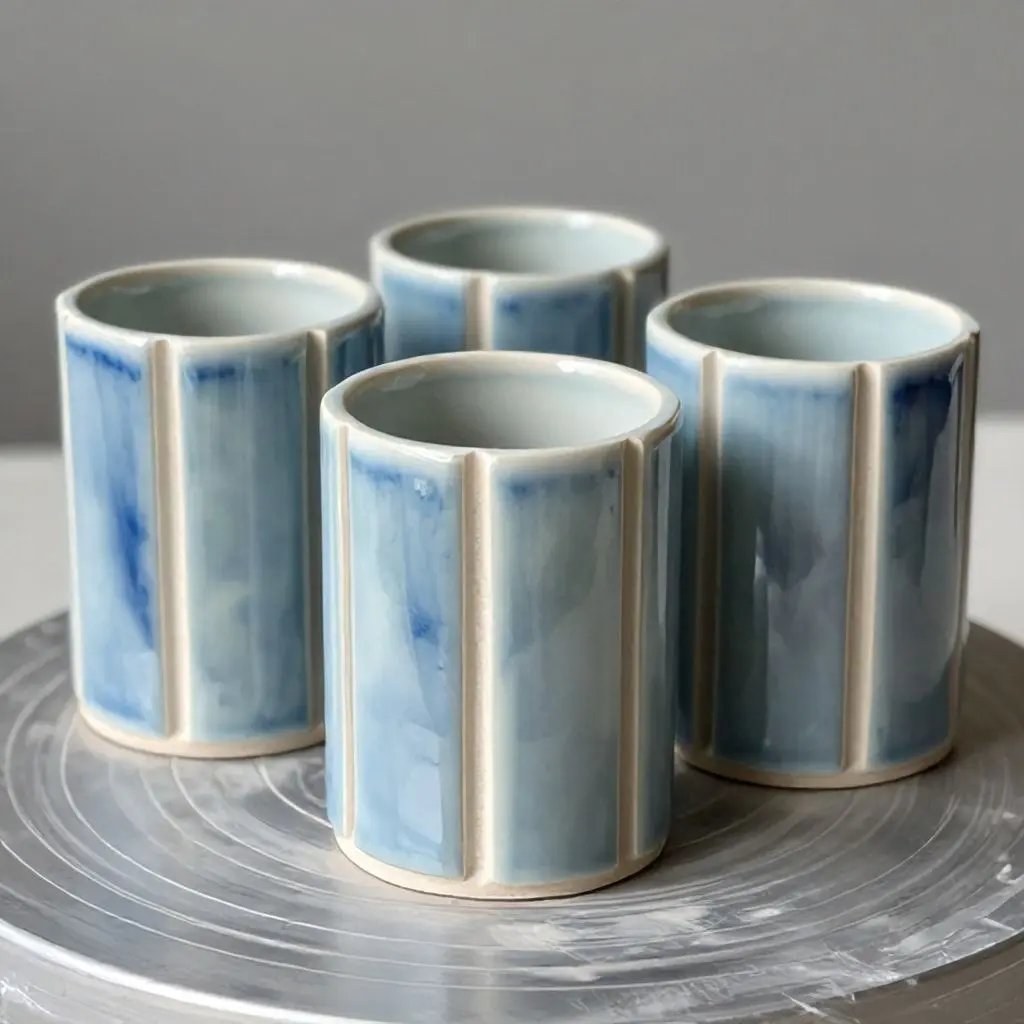
Interior and exterior surfaces of thrown cylinders offer testing opportunities for contrasting glaze combinations. Apply one glaze to the inside and another to the outside, or layer multiple glazes to observe their interactions. The curved form allows glaze overlap at the rim, demonstrating edge characteristics that flat tiles cannot reveal.
Some potters prefer throwing tiles directly onto bats, eliminating the need to wire them off the wheel head. This approach speeds production and reduces handling. After throwing multiple cylinders, simply remove the bats and allow the forms to stiffen before cutting them into individual test sections. Store uncut cylinders leather hard wrapped in plastic until you are ready to produce a new batch of test tiles.
Extruded Multi-Surface Tiles
Clay extruders open extraordinary possibilities for test tile creation. By pushing clay through custom dies, you can produce hollow forms with multiple flat surfaces in seconds. Hexagonal and square tubes work particularly well, offering four to six distinct testing surfaces on each section.
Cut extruded tubes into three-inch lengths while the clay remains leather hard. Each segment stands vertically in the kiln, maximizing space efficiency. The multiple surfaces allow different treatment options: leave one side smooth, texture another with serrated ribs, apply underglaze to a third, and scratch oxide lines into the fourth. This comprehensive approach provides maximum information from minimal kiln real estate.
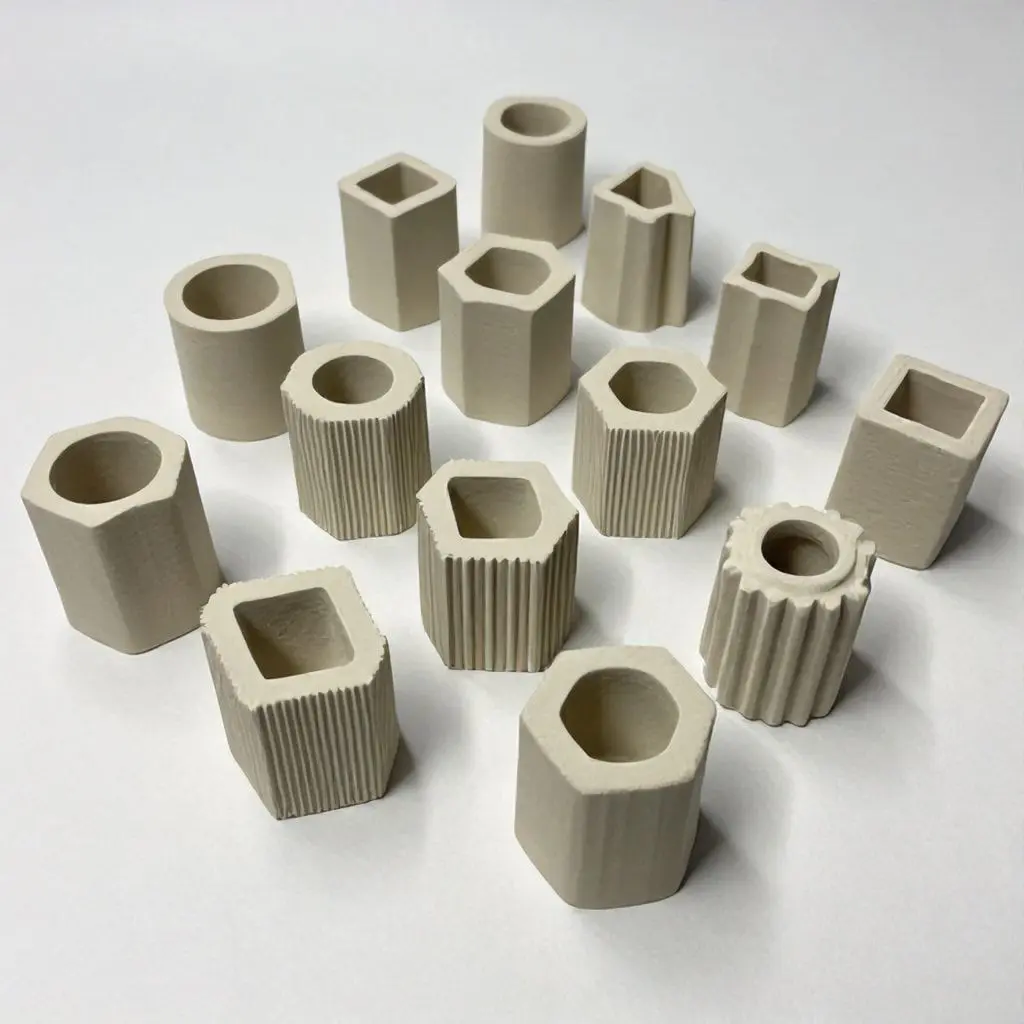
Extruded tiles with embossed ridges or raised edges help demonstrate how glazes break over lips and rims. Many functional pots feature similar edge treatments, making this information directly applicable to finished work. The raised areas also catch excess glaze, preventing it from running onto kiln shelves and causing adhesion problems.
Store extruded dies carefully and label them by shape. Once you settle on a preferred test tile design, consistency becomes important for comparing results across multiple firings. Using the same tile shape, size, and surface treatment for all tests creates a standardized reference library that grows increasingly valuable over time.
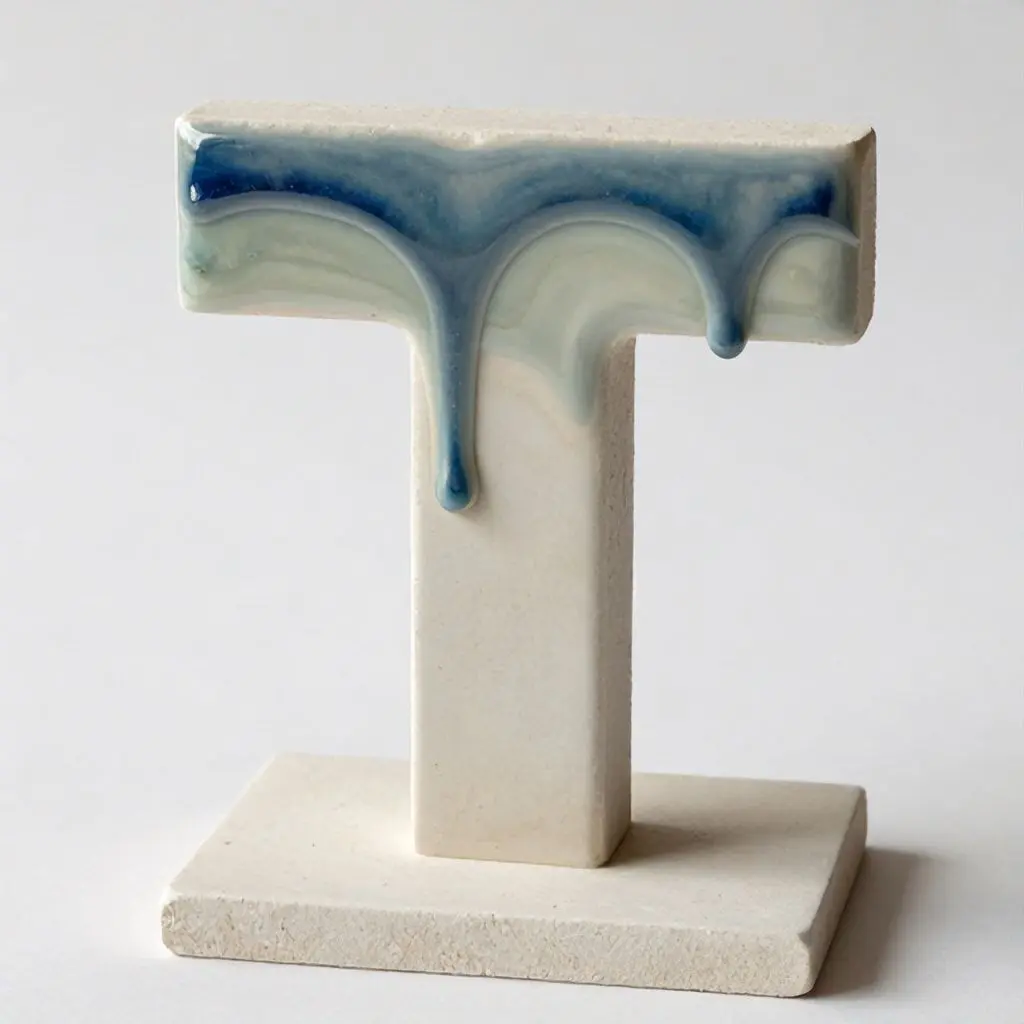
T-Shaped Tiles for Layered Glaze Testing
T-shaped test tiles excel at demonstrating layered glaze effects. The vertical stem of the T receives three successive dips in different glazes, while the horizontal top catches any drips and shows pooling behavior. This design emerged from the need to understand how multiple glaze layers interact during firing.
Form T-shaped tiles by cutting them from slabs or extruding them through specially designed dies. The vertical portion should measure approximately three inches tall, while the horizontal section extends about two inches in each direction. This proportion provides adequate surface area for observing glaze interactions without consuming excessive clay or kiln space.
Apply texture to one side of the vertical stem and leave the other side smooth. When you dip the tile in successive glazes, you observe how each layer responds to both surface conditions. Some glazes enhance texture while others obscure it, and this information influences decisions about surface preparation on your finished pottery.
Fire T-shaped tiles upside down, resting on the horizontal bar. This orientation allows any runny glazes to flow downward and collect on the horizontal surface rather than dripping onto kiln shelves. The catch platform prevents frustrating cleanup and preserves both your kiln furniture and test tile for future reference.
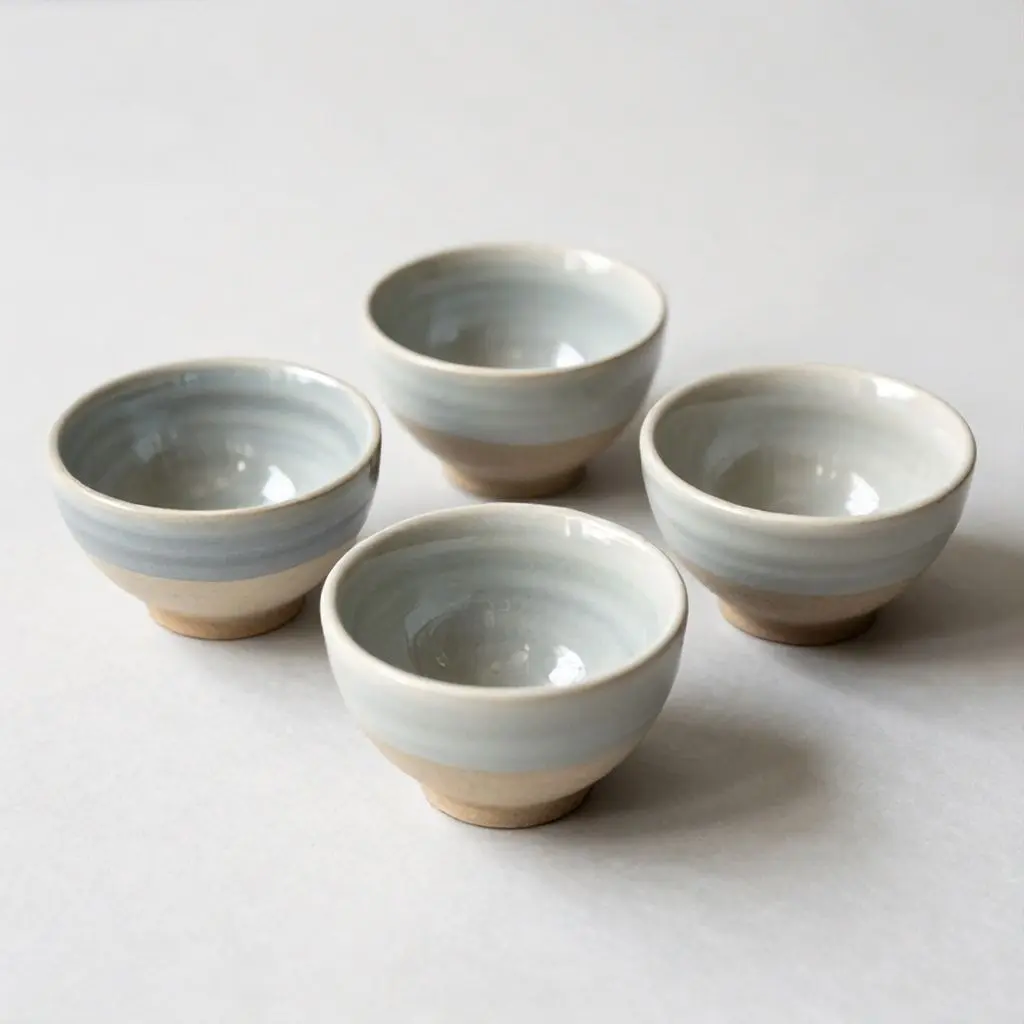
Small Test Bowls and Three-Dimensional Forms
Sometimes flat or vertical surfaces fail to provide sufficient information. Small test bowls offer three-dimensional testing that closely approximates actual pottery forms. Pinch small bowls from walnut-sized clay balls, or throw them off the hump for speed and consistency.
These miniature bowls allow you to test glaze application on interior and exterior curved surfaces simultaneously. Apply the same glaze to both surfaces and observe any differences in color, texture, or thickness. Many glazes perform stone differently depending on whether they face inward or outward during firing due to variations in heat distribution and atmospheric conditions.
Test bowls fit efficiently into kiln loads, nestling between larger pieces without creating gaps. Their compact size means you can fire multiple glaze tests alongside regular production work, avoiding dedicated test firings. This integration makes testing a natural part of your studio practice rather than a separate, time-consuming task.
Cone-shaped test forms slow glaze movement through their gradually changing angle. As the sides become more vertical toward the rim, the glaze has greater opportunity to run. This provides insight into the transition zones on your pottery where vertical walls meet horizontal bases. Understanding these transition behaviors helps you control glaze application more precisely.
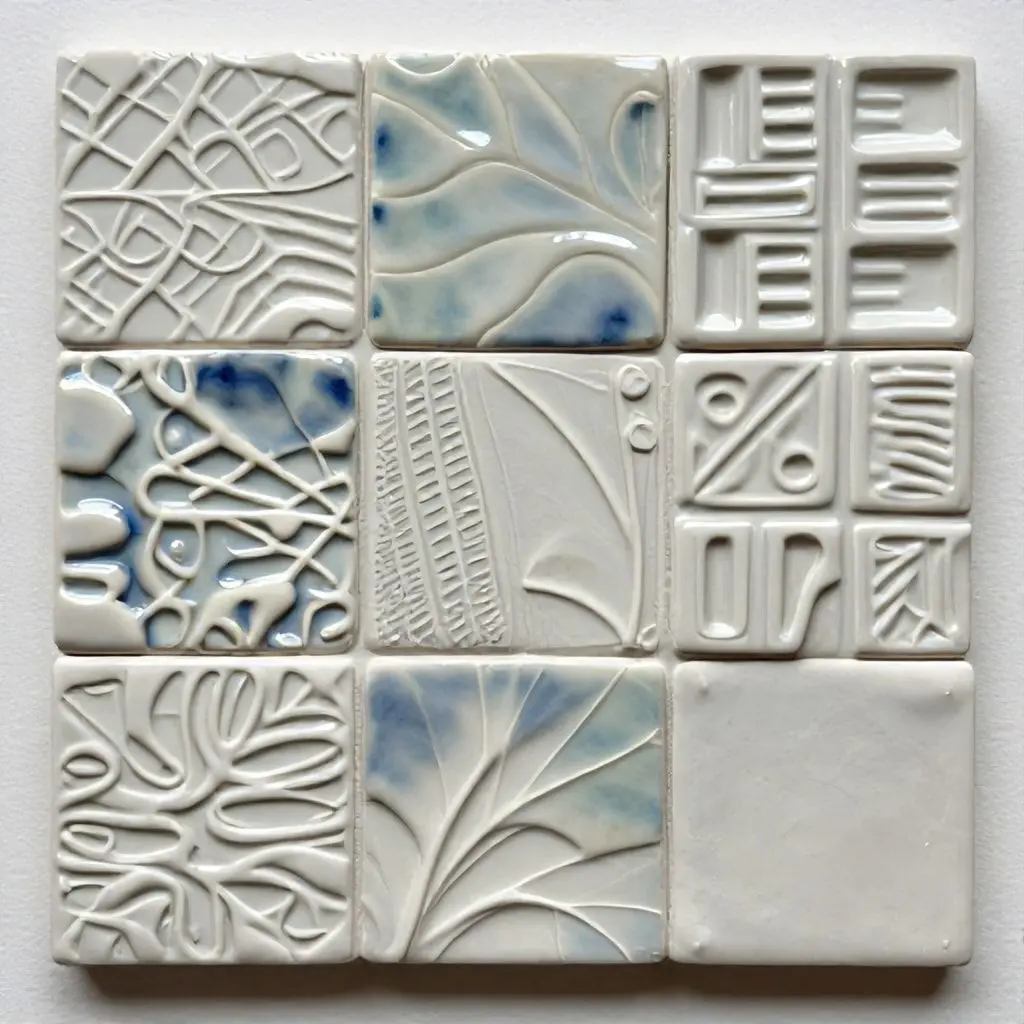
Cookie Cutter Round Tiles with Texture Variation
Using cookie cutters to create round test tiles produces uniform, attractive samples that store and display beautifully. Cut three to four-inch diameter circles from rolled slabs, then add design elements that enhance their testing capabilities.
Divide each round tile in half visually. Keep one half smooth and flat, then add raised patterns to the other half using stamps, texture rollers, or carved designs. This split personality reveals how your glaze responds to contrasting surface treatments within the same firing conditions and clay body.

Punch a hole near the edge of each tile before it dries, positioning it carefully so the tile hangs level when suspended. Round tiles strung on cord or wire create attractive reference displays that double as studio decoration. Group them by color family, firing temperature, or clay body for quick visual reference during glaze selection.
The circular shape eliminates sharp corners that can chip during handling and storage. Round tiles also roll less readily than rectangular ones, reducing breakage risk. These practical advantages combine with aesthetic appeal to make round test tiles popular among ceramic artists who value both function and visual harmony.
Textured and Carved Surface Tiles
Surface decoration defines much ceramic work, and understanding how glazes interact with carved, stamped, or impressed surfaces becomes crucial. Create test tiles that feature the specific decorative techniques you use in your pottery, replicating carving depths, stamp patterns, or impressed designs.
Deep carving reveals whether glazes will pool in recessed areas or break attractively over raised surfaces. Some glazes flow readily into carved lines, accentuating the design, while others resist settling and create interesting textural contrasts. Testing eliminates guesswork and prevents disappointing results on finished pieces.
Experiment with various carving tools on test tiles to discover how different depths and widths affect glaze behavior. Shallow scratches produce subtle effects that suit delicate work, while deep gouges create dramatic variations in glaze thickness and color. Document your findings with clear photographs and detailed notes.
Stamped patterns require similar testing. Commercial stamps, handmade clay stamps, or found objects all impress differently into clay surfaces. Apply your standard glazes to stamped test tiles and observe whether the pattern enhances or competes with the glaze effect. Sometimes a beautiful stamp and a stunning glaze clash visually, and discovering this on a test tile prevents ruining important work.
Test Tiles for Multiple Clay Bodies
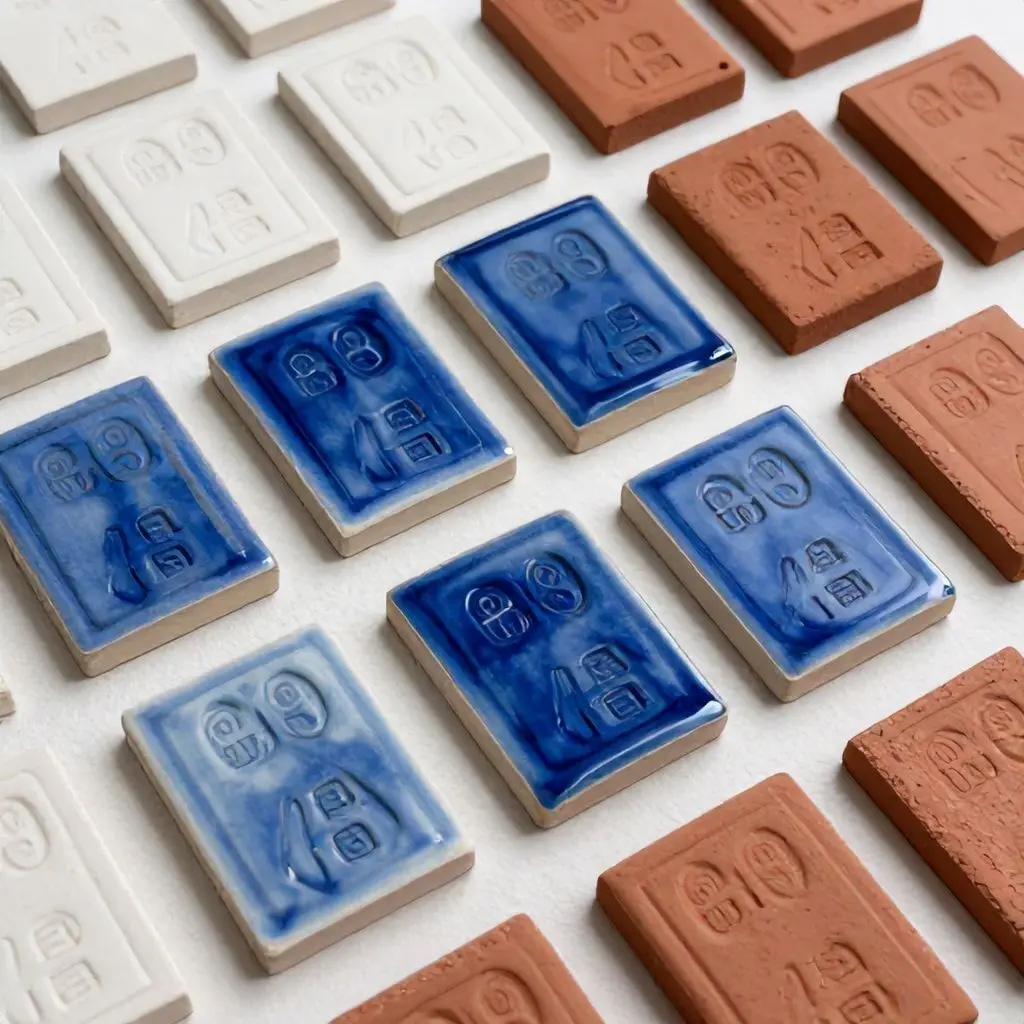
Professional ceramic studios often work with several clay bodies simultaneously. Porcelain, stoneware, terracotta, and other clay types each respond differently to the same glaze. What appears vibrant blue on porcelain might look muddy brown on red clay. Creating test tiles from each clay body you use provides essential comparative information.
Stamp or carve the clay body identifier into each test tile before bisque firing. Use a simple numbering system or abbreviations that remain legible after glazing and firing. This permanent marking prevents confusion when examining old test tiles months or years later.
Store test tiles organized by clay body, keeping all porcelain tests together and all stoneware tests together. This organization method allows quick comparisons and helps you recognize patterns in how different clays affect glaze colors and textures. Over time, you develop intuitive understanding of these relationships.
Some ceramic artists create matched sets of test tiles, producing identical samples in each clay body they use. When testing a new glaze, they prepare one tile of each clay type and fire them together. This simultaneous testing provides direct comparison under identical firing conditions, eliminating variables that could skew results.
Glaze Combination and Layering Tiles
Applying multiple glazes in layers creates countless color and texture variations from a limited glaze palette. Test tiles designed specifically for layering experiments help you explore these possibilities systematically. Divide the tile surface into sections, applying different glaze combinations to each area.
Document the application order carefully. Layer A over layer B produces different results than layer B over layer A due to chemical interactions during firing. Record this information on the tile back or in a companion notebook, creating a permanent reference for future use.
Vary the thickness of each layer during testing. Thin applications produce subtle effects, while heavy applications create bold results. Some glaze combinations only work when applied in specific thicknesses, and discovering these requirements during testing saves frustration later. Use test tiles to find the sweet spot for each combination.
Create a systematic approach to layering tests by selecting three to five base glazes and testing them over and under each other. This matrix approach generates many variations quickly, helping you identify particularly successful combinations worth further exploration. The investment in test tiles yields exponential returns in glaze options.
Specialized Testing for Crystalline and Runny Glazes
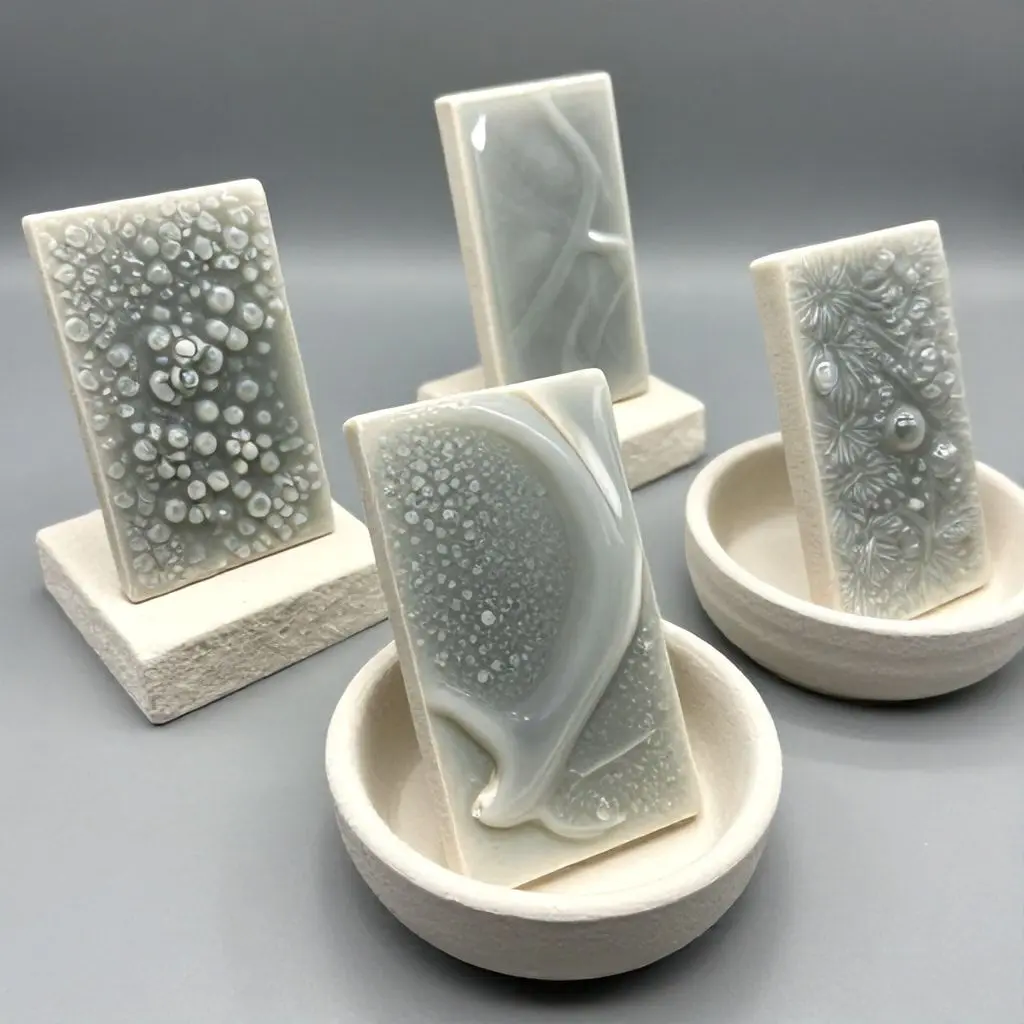
Certain glaze types require specialized test tile designs. Crystalline glazes, which produce dramatic crystal formations during slow cooling, need tiles that accommodate significant glaze flow. Design these tiles with deep catch basins or place them in small bowls during firing to contain runny glaze.
Test crystalline glazes on vertical tiles positioned over unglazed clay pedestals or in shallow dishes filled with alumina hydrate. This setup catches flowing glaze without allowing it to reach kiln shelves. The pedestal or dish becomes disposable, protecting your kiln furniture while still providing valuable test results.
Ash glazes and other high-flux formulas also benefit from specialized test approaches. These glazes move considerably during firing, and standard test tiles may not capture their full range of behavior. Position test tiles at various angles to observe how dramatically the glaze flows and where it stabilizes.
Document the firing schedule used for these specialty tests. Crystalline glazes particularly depend on specific cooling rates to form crystals, and reproducing successful results requires precise repetition of both temperature and time. Note the schedule directly on the test tile or maintain detailed firing logs.
Organizing and Storing Your Test Tile Library
Creating test tiles provides value only if you can find and reference them later. Develop an organization system from the beginning, preventing the chaos of hundreds of unmarked tiles scattered throughout your studio. Several effective approaches exist, and you should choose one that matches your working style.
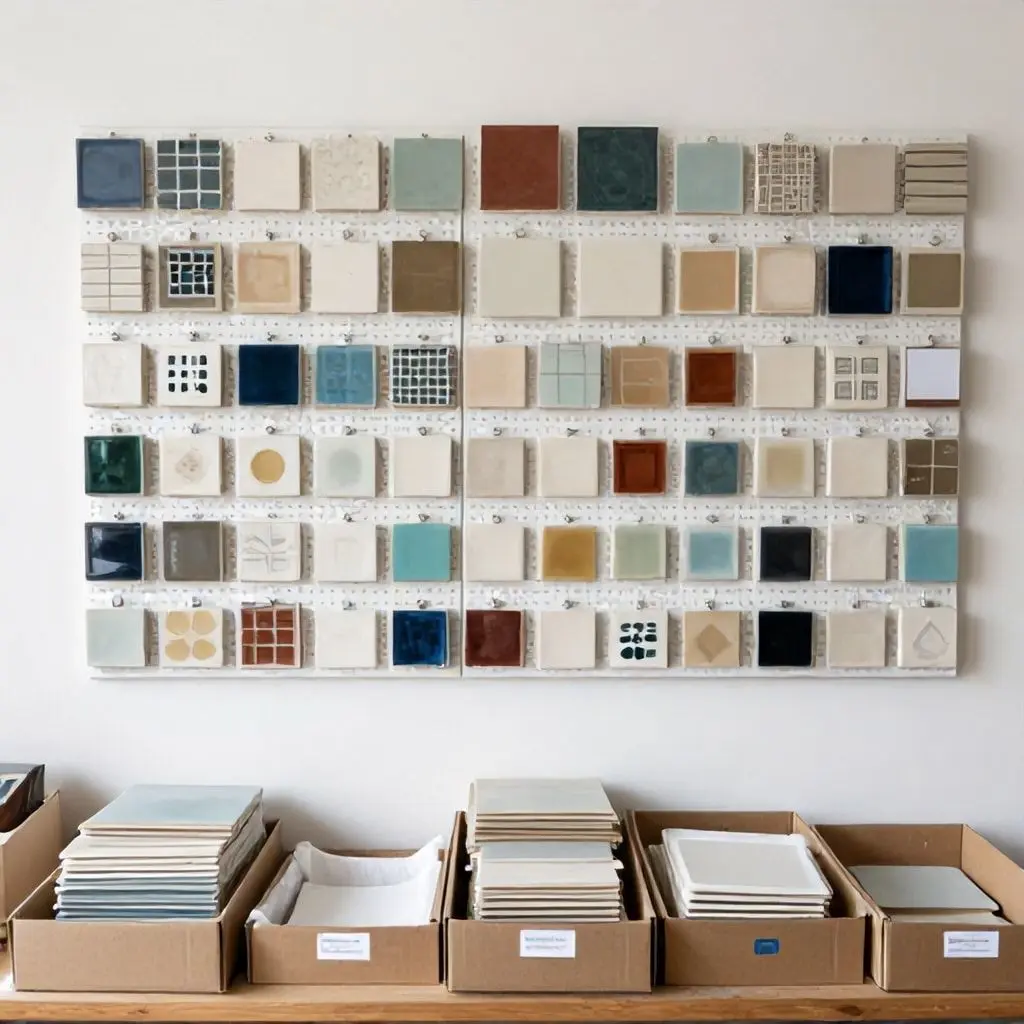
Wall-mounted pegboards offer visual organization that makes finding specific tests quick and intuitive. Hang tiles by color family, glaze type, or clay body. The display also serves as inspiration, reminding you of successful combinations and encouraging new experiments. Dedicate sufficient wall space for your growing collection.
Alternatively, store tiles in labeled boxes organized by category. This approach protects tiles from dust and damage while maintaining organization. Use acid-free cardboard boxes and separate tiles with bubble wrap or tissue paper to prevent chipping. Label boxes clearly and maintain an index system for quick retrieval.
Some ceramic artists photograph all test tiles and maintain digital records alongside physical samples. This belt-and-suspenders approach ensures that even if a tile breaks, the information remains accessible. Digital files are easily searchable and can include detailed notes about firing conditions, glaze application methods, and clay body specifications.
Consider attaching small labels to tiles using waterproof markers or underglaze pencils. Include the glaze name, firing cone, clay body, and date. This information stays with the tile permanently, preventing the common problem of mystery tiles whose origins nobody remembers. The few extra seconds spent labeling saves hours of frustration later.
Making Test Tiles Part of Your Studio Routine
The most successful ceramic artists integrate test tile creation into their regular studio workflow. Rather than treating testing as a separate activity, they produce test tiles during normal work sessions and include them in every firing. This approach builds comprehensive glaze knowledge gradually without requiring dedicated testing time.
Keep prepared test tiles near your glazing area, ready for experimentation. When mixing a new glaze batch, testing a color variation, or trying a different application technique, grab a test tile rather than using finished work. This habit costs nothing in time or effort but prevents countless disappointments.
Fire at least three test tiles per firing, even if you are not conducting formal experiments. Use these tiles to verify that standard glazes perform consistently, test slight variations in application thickness, or explore new combinations that occur to you. The accumulated knowledge from consistent testing compounds over time.
Join or create a test tile exchange with other ceramic artists. Share successful combinations, trade samples, and learn from collective experience. These exchanges expose you to glaze possibilities you might never explore independently while building community connections with fellow artists. The collaborative approach accelerates everyone’s learning.
Conclusion
Ceramic test tiles represent an investment that pays continuous dividends throughout your artistic career. These small clay samples eliminate guesswork, prevent wasted work, and expand creative possibilities. From simple flat squares to complex three-dimensional forms, each test tile design serves specific purposes in understanding glaze behavior.
The variety of test tile options means you can customize your approach to match your specific pottery practice. Functional potters benefit from wheel-thrown vertical tiles, while sculptors might prefer hand-built forms. The key lies not in using every possible test tile design but in selecting methods that provide relevant information for your work.
Start simple with basic flat tiles, then expand your testing repertoire as your needs evolve. Develop organizational systems from the beginning to prevent overwhelming chaos later. Most importantly, make testing a regular part of your studio practice rather than an occasional special project. The ceramic artists who test consistently develop the deepest glaze knowledge and produce the most successful work.
Your test tile library becomes a personal encyclopedia of ceramic chemistry, documenting years of experiments and discoveries. This resource grows increasingly valuable over time, helping you solve problems, inspire new directions, and maintain consistent quality in your finished pottery. The small effort required to create and maintain test tiles yields extraordinary returns in artistic confidence and technical mastery.
Frequently Asked Questions
What size should ceramic test tiles be?
Most ceramic artists create test tiles between two and four inches in their longest dimension. This size provides adequate surface area for meaningful glaze observation while using minimal clay and kiln space. Larger tiles consume more resources without offering proportionally more information, while smaller tiles often prove too cramped for proper testing. Choose a size that balances practicality with visibility for your specific needs.
How many test tiles do I need before starting to test glazes?
Begin with at least twenty to thirty prepared test tiles in your primary clay body. This quantity allows you to test multiple glazes and combinations without constantly stopping to make more tiles. As you develop your testing practice, maintain a reserve of fifty to one hundred bisque-fired tiles ready for immediate use. Having tiles prepared encourages spontaneous experimentation and makes testing feel effortless rather than burdensome.
Should test tiles always include texture?
Including texture on at least half of each test tile provides valuable information about how glazes break over raised surfaces and settle into recessed areas. However, if your pottery features primarily smooth surfaces, you might choose to make some tiles entirely smooth. The ideal approach involves creating tiles that mirror the surface conditions of your actual work, ensuring test results accurately predict real-world performance.
Can I use test tiles from different clay bodies interchangeably?
No, test results from one clay body do not reliably predict how the same glaze will perform on a different clay body. Iron content, particle size, and chemical composition vary significantly between clay types, all affecting glaze color and behavior. Always create separate test tiles for each clay body you use, clearly marking each tile to prevent confusion when reviewing your test library.
What information should I record about each test tile?
Document the glaze name or recipe number, clay body type, firing temperature and cone, date fired, and application method on each test tile. Additional notes about firing atmosphere, cooling schedule, and any special circumstances help you reproduce successful results later. Write this information on the tile back with an underglaze pencil before bisque firing, ensuring permanent legibility even after glaze application and firing.