13+ Creative DIY Stepping Stone Ideas
DIY Stepping Stone Ideas ,Transforming your garden or backyard into a stunning outdoor sanctuary doesn’t require hiring expensive landscapers or purchasing costly materials. Creating your own stepping stones offers an affordable, creative way to add personality and functionality to your outdoor space while enjoying a rewarding hands-on project. Whether you’re a seasoned crafter or a complete beginner, these DIY stepping stone ideas will help you design beautiful pathways that reflect your unique style and enhance your landscape’s visual appeal.
Stepping stones serve multiple purposes beyond mere decoration. They protect your lawn from wear patterns, provide stable footing during wet weather, guide visitors through your garden, and create defined spaces within your outdoor areas. The best part about making them yourself is the unlimited creative freedom you have to match your home’s aesthetic, incorporate meaningful designs, or involve family members in a memorable project.
Classic Concrete Stepping Stones
The foundation of most DIY stepping stone projects begins with basic concrete work. Concrete stepping stones offer durability, versatility, and affordability that make them perfect for beginners and experienced crafters alike. To create basic concrete stepping stones, you’ll need quick-setting concrete mix, plastic molds or forms, and water. Mix your concrete according to package directions until it reaches a thick, pourable consistency similar to brownie batter.
Pour the mixture into your chosen molds, which can be purchased stepping stone forms, repurposed cake pans, or custom-built wooden frames. Tap the sides gently to release air bubbles, then smooth the surface with a trowel. Allow the concrete to set for about 30 minutes before adding decorative elements or textures. Complete curing typically takes 24 to 48 hours, after which you can remove the stones from their molds and let them cure for an additional week before placing them in high-traffic areas.
The beauty of concrete stepping stones lies in their adaptability. You can adjust the thickness for different weight requirements, create custom shapes using homemade molds, and modify the surface texture from smooth to rough depending on your preference and intended use.
Mosaic Masterpiece Stepping Stones
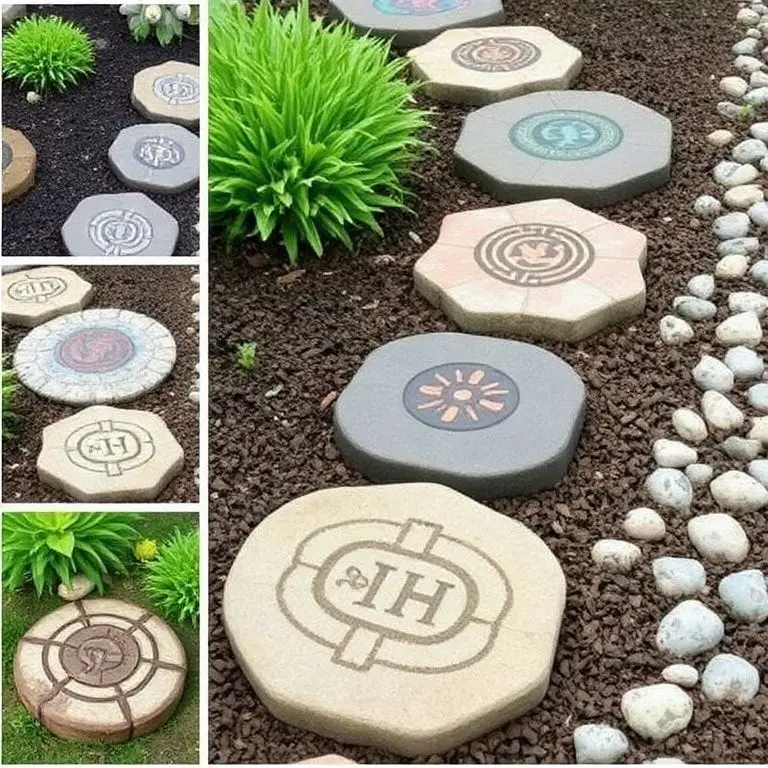
Mosaic stepping stones represent one of the most visually striking options for garden pathways. This technique involves embedding colorful glass pieces, broken tiles, ceramic fragments, or decorative pebbles into wet concrete to create intricate patterns and designs. The artistic possibilities are truly endless, limited only by your imagination and available materials.
Begin by preparing your concrete base as described above. Once the concrete reaches a semi-firm consistency where it holds impressions but remains workable, start pressing your mosaic materials into the surface. Plan your design beforehand by arranging pieces on paper or directly in the mold before pouring concrete. Popular mosaic patterns include sunbursts, spirals, geometric shapes, floral designs, and abstract compositions. https://thenymelrosefamily.com/diy-stepping-stone-ideas/
Consider using contrasting colors to make your design pop, or stick with a monochromatic scheme for elegant simplicity. Smooth glass pieces from broken bottles work beautifully when safety edges are filed down. Broken ceramic tiles from renovation projects provide vibrant colors and interesting textures. Natural pebbles and river rocks offer an organic, earthy aesthetic that blends seamlessly with garden environments. Press pieces firmly into the concrete, ensuring they’re embedded deep enough to stay secure but visible enough to showcase their beauty.
Leaf-Imprinted Natural Designs
Bringing organic elements into your stepping stone designs creates a harmonious connection between your pathway and the surrounding landscape. Leaf-imprinted stepping stones capture the intricate beauty of nature’s patterns while providing a sophisticated, artistic touch to your garden. Large leaves from hostas, rhubarb, elephant ears, or maple trees work exceptionally well for this technique.
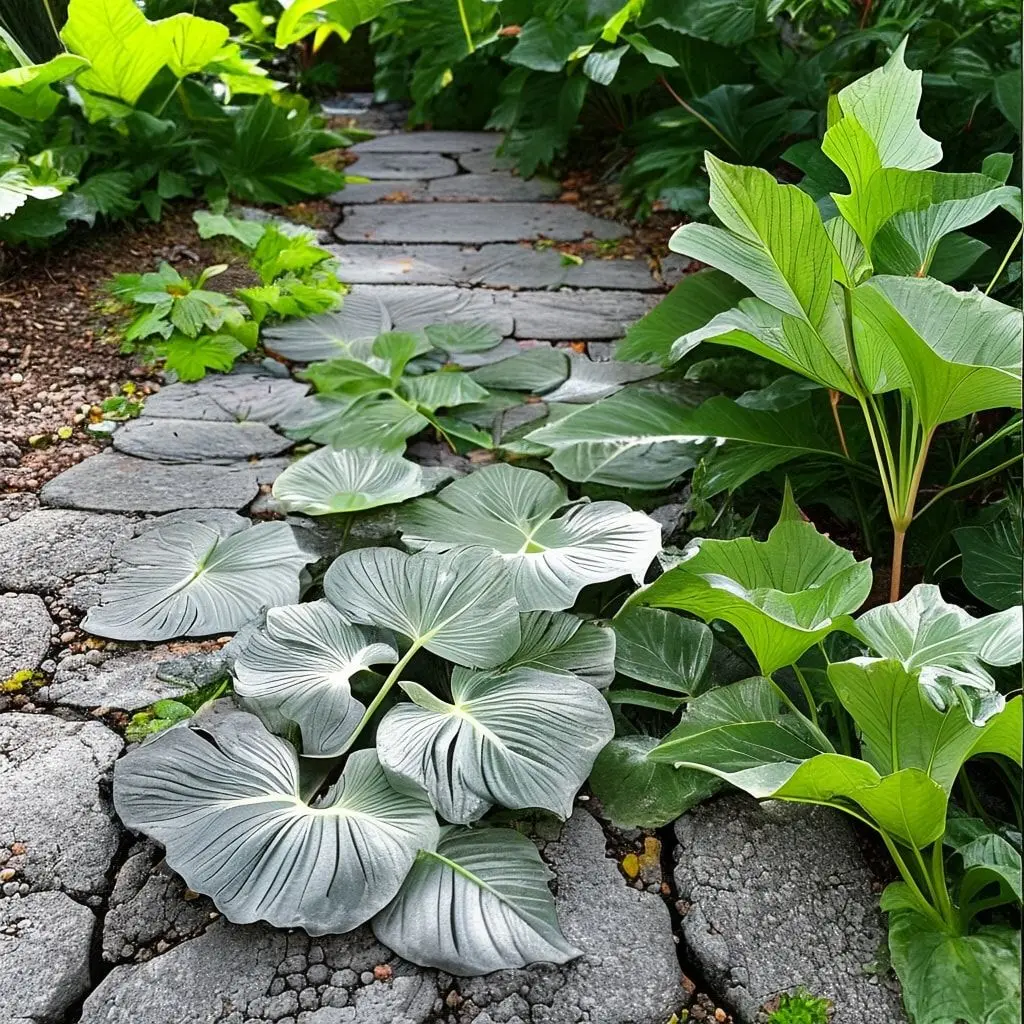
After pouring concrete into your mold and smoothing the surface, press a fresh leaf face-down into the semi-wet concrete. Use your hands or a roller to ensure the entire leaf surface makes contact with the concrete, capturing every vein and edge detail. Allow the concrete to set until firm but not completely hardened, then carefully peel away the leaf to reveal its impression. The resulting negative space creates a beautiful relief pattern that catches light and shadow throughout the day.
You can enhance leaf impressions by brushing concrete dust from the crevices once fully cured, painting the recessed areas with contrasting colors, or leaving them natural for subtle elegance. Multiple smaller leaves can be arranged to create complex compositions, or a single dramatic leaf can serve as a bold focal point.
Hand and Footprint Memory Stones
Few DIY projects create more meaningful keepsakes than personalized stepping stones featuring family handprints or footprints. These memory stones document growth, commemorate special occasions, and add deeply personal touches to your outdoor space. Children especially enjoy participating in this project, making it a wonderful family activity that produces lasting memories.
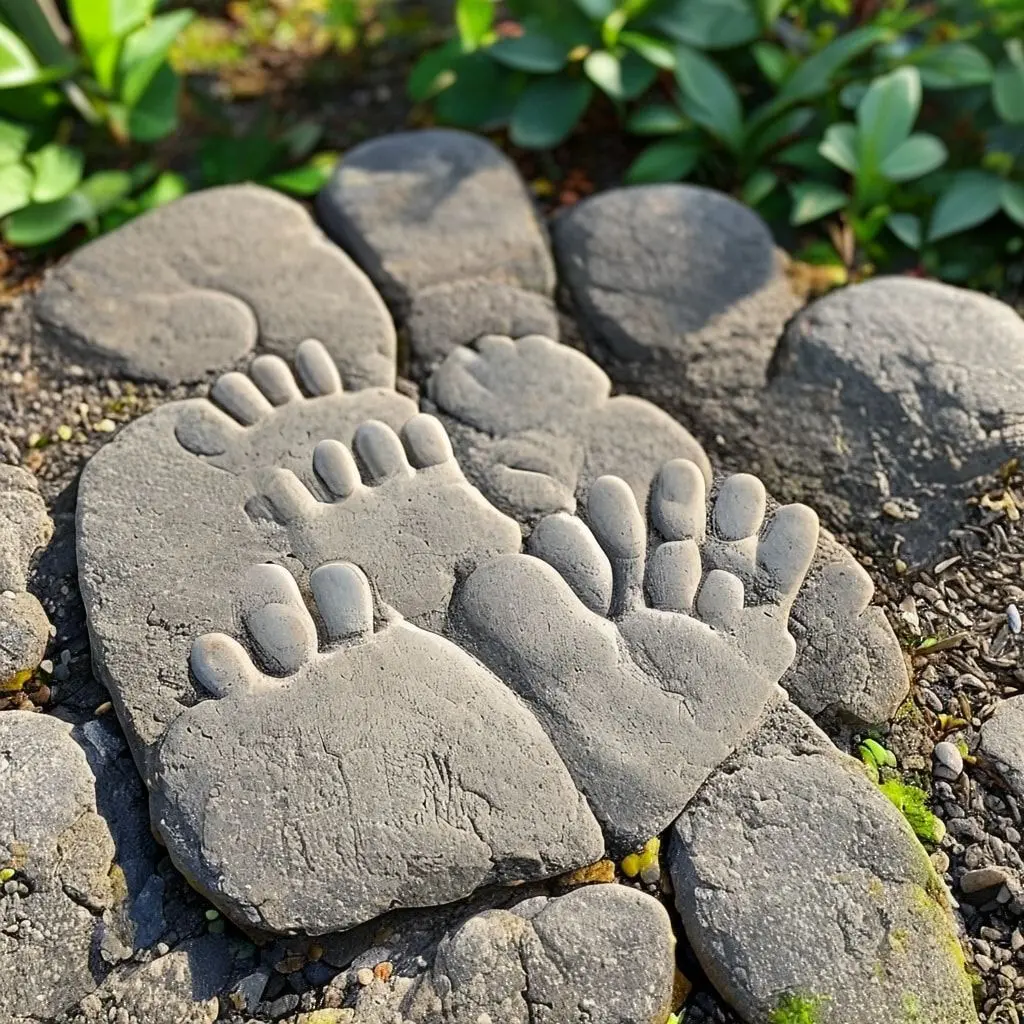
Prepare your concrete mixture slightly thicker than standard to ensure prints hold their definition. Pour into molds and smooth the surface completely. When the concrete reaches the right consistency, have family members press their hands or feet firmly into the surface, applying even pressure to capture detailed prints. Younger children may need assistance to keep still long enough for clear impressions.
Add names, dates, or special messages by pressing letter stamps into the concrete around the prints, or by scratching information into the surface with a stick or sculpting tool. Some families create annual stepping stones to track children’s growth, while others make commemorative stones for graduations, weddings, or new home celebrations. These personalized stones become treasured garden features that spark conversations and preserve precious moments.
Painted and Stenciled Artistic Stones
For those who prefer working with color and design after the concrete cures, painted stepping stones offer incredible creative flexibility without the time pressure of working with wet concrete. This approach allows you to plan designs carefully, make corrections, and achieve professional-looking results even without advanced artistic skills.
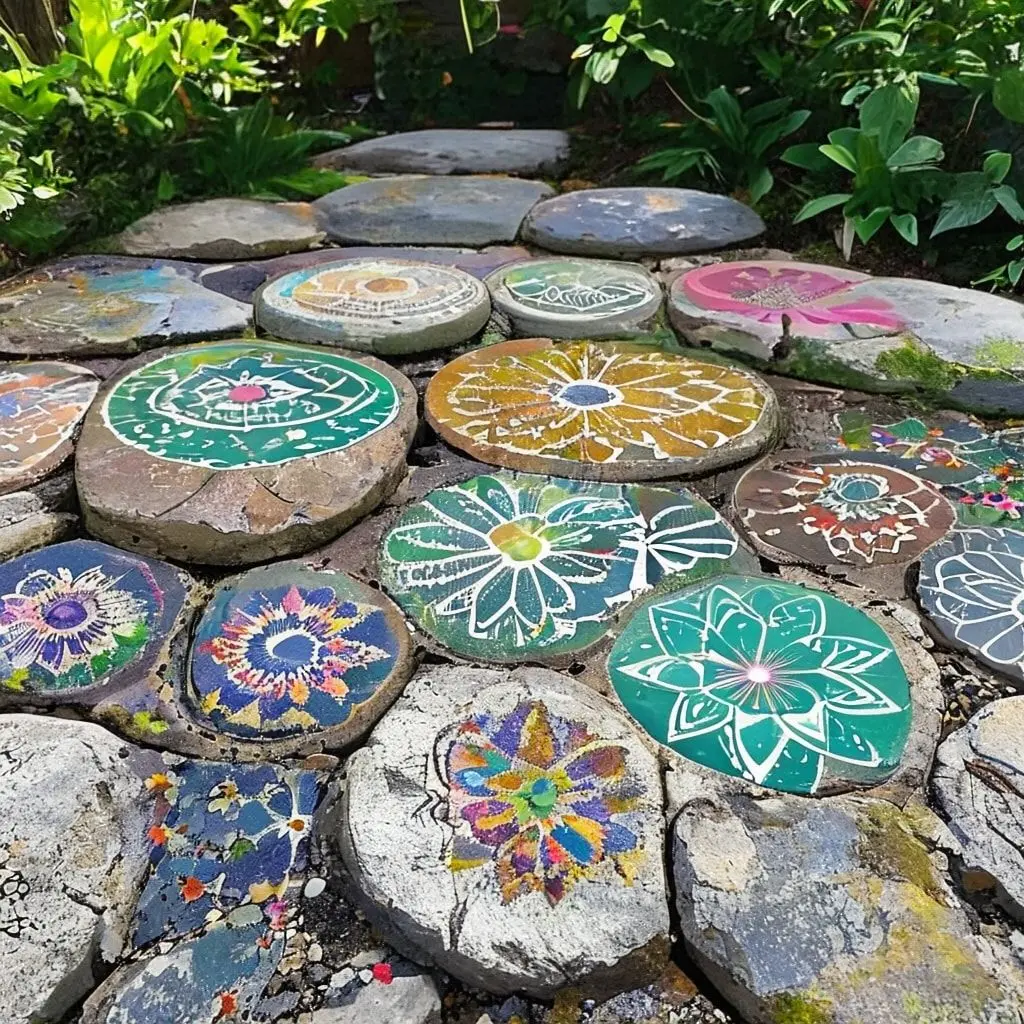
Start with plain, fully cured concrete stepping stones. Clean the surface thoroughly and allow it to dry completely. Apply a concrete primer or base coat if desired, though many outdoor paints adhere well directly to concrete. Acrylic paints formulated for outdoor use provide excellent coverage and weather resistance. Use stencils to create precise patterns, geometric designs, or lettering. Freehand painting works beautifully for more organic, artistic expressions.
Popular painted designs include faux tile patterns, mandala-inspired circular motifs, garden-themed imagery like flowers and butterflies, inspirational words or quotes, and decorative borders with central focal points. After completing your design, seal the stones with multiple coats of outdoor polyurethane or concrete sealer to protect your artwork from weather, foot traffic, and UV fading. Properly sealed painted stepping stones can maintain their beauty for many years with minimal maintenance.
River Rock and Pebble Embedded Designs
Creating stepping stones with embedded river rocks and pebbles produces a textured, natural appearance that complements garden settings beautifully. This technique combines the durability of concrete with the organic beauty of natural stones, resulting in pathways that feel like they’ve always been part of the landscape.
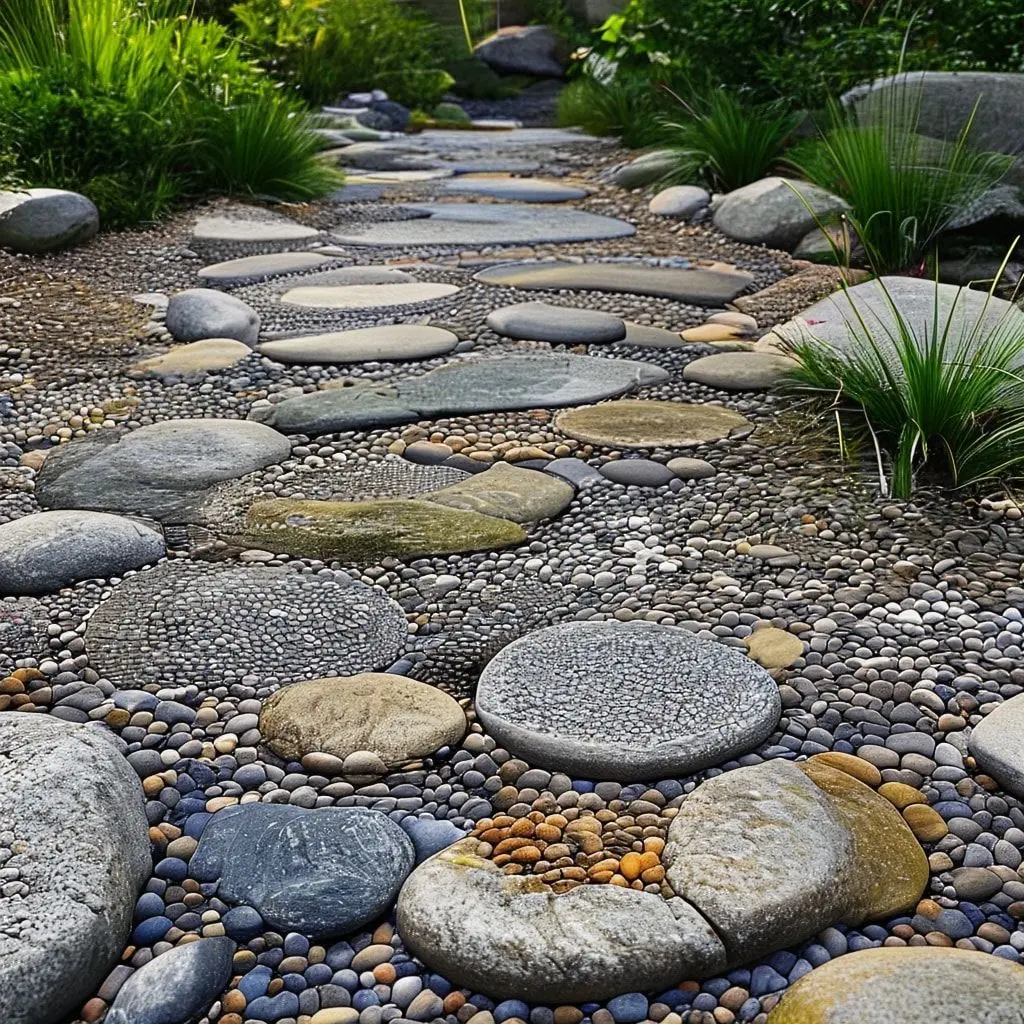
Select pebbles and river rocks in complementary colors and sizes. Sorting materials beforehand makes the design process smoother. Pour concrete into your mold as usual, but leave the surface slightly below the rim to accommodate stone thickness. As the concrete begins to set, press stones into the surface in your chosen pattern. Concentric circles, radiating designs, color gradients, and random natural arrangements all create striking effects.
For best results, ensure stones are pressed deep enough to be secure but leave approximately one-third of each stone exposed above the concrete surface. This creates visual interest while maintaining the textural benefits of the stone surfaces. The varied heights and textures make these stepping stones particularly attractive and provide excellent traction even when wet.
Broken China and Dishware Mosaic Stones
Repurposing broken dishes, teacups, and decorative china into stepping stones transforms accidents or thrift store finds into garden art. This sustainable approach to crafting gives new life to damaged items while creating unique, colorful pathways that showcase interesting patterns and vintage charm.

Collect broken or chipped dishes over time, or intentionally break pieces you’ve selected specifically for this project. Always wear safety glasses and gloves when breaking dishes, and place items in a heavy cloth bag before tapping with a hammer to contain shards safely. Look for pieces with interesting patterns, colors, or text that will create visual interest in your final design.
The application process mirrors other mosaic techniques. Pour and partially set your concrete, then arrange china pieces to create your design. Mix different patterns for eclectic charm, or use pieces from a matching set for cohesive elegance. The curved surfaces of dishware add dimensional interest that flat tiles cannot provide. Once fully cured, grout between pieces if desired, though many crafters prefer leaving concrete exposed between china fragments for a more rustic appearance.
Glow-in-the-Dark Pathway Stones
Adding luminescent elements to stepping stones creates magical nighttime garden pathways that enhance safety while providing enchanting ambiance. Glow-in-the-dark stepping stones charge during daylight hours and emit a soft glow after sunset, guiding visitors along pathways without requiring electricity or solar panels.
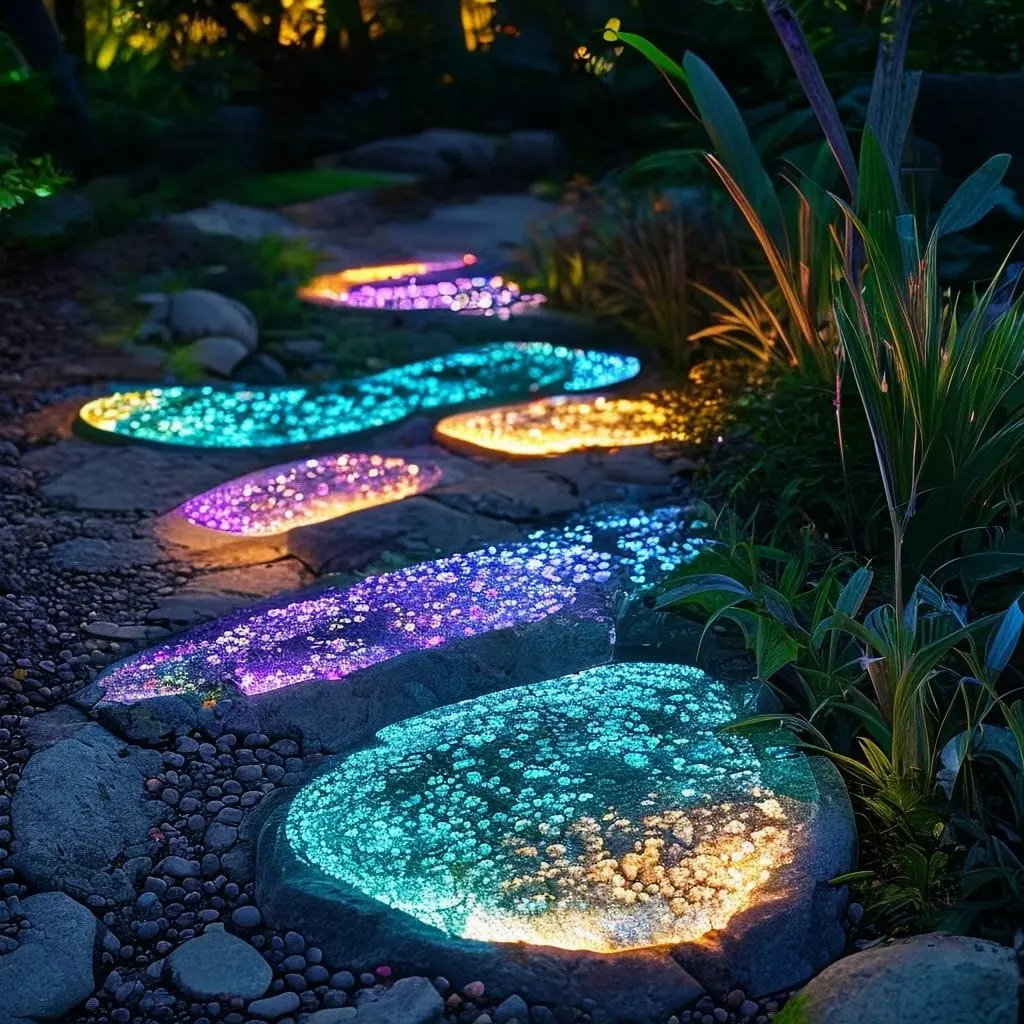
Incorporate glow-in-the-dark materials using several methods. Mix glow powder directly into a portion of your concrete before pouring, creating stones that glow uniformly throughout. Press glow-in-the-dark glass pieces or specially formulated pebbles into wet concrete for scattered points of light. Paint cured stones with glow-in-the-dark outdoor paint in patterns or designs that reveal themselves after dark.
The intensity and duration of the glow depend on the quality of luminescent materials used and the amount of light exposure the stones receive during the day. Position these stones in areas that receive good sunlight for maximum nighttime effect. The soft illumination they provide creates a whimsical atmosphere in gardens while serving the practical purpose of pathway visibility during evening hours.
Textured and Stamped Designs
Creating texture and patterns in wet concrete produces sophisticated stepping stones that resemble expensive manufactured pavers at a fraction of the cost. Texture adds visual interest, improves traction, and allows you to mimic natural materials like slate, cobblestone, or weathered rock.
Use commercially available concrete stamps designed specifically for this purpose, or create your own stamping tools from everyday objects. Rubber stamps, textured rubber mats, carved wooden blocks, and even crumpled plastic bags can all create interesting surface patterns. Press stamps firmly into semi-set concrete and remove carefully to avoid smearing the impression.
For realistic stone textures, use a combination of stamping and hand-sculpting techniques. After stamping the basic pattern, use sculpting tools to refine edges, deepen crevices, and add natural-looking irregularities. Color washing or staining can enhance textured surfaces by settling into recesses and highlighting raised areas, creating depth and dimension that make patterns more pronounced.
Hypertufa Rustic Garden Stones
Hypertufa stepping stones offer a lightweight alternative to solid concrete while providing a weathered, rustic appearance that resembles natural limestone or tufa rock. This material has been used by gardeners for decades to create planters, troughs, and decorative elements that blend seamlessly with natural landscapes.
Create hypertufa by mixing equal parts Portland cement, peat moss, and perlite or vermiculite with enough water to achieve a thick, moldable consistency. This mixture weighs significantly less than standard concrete and develops an attractive, porous surface texture as it cures. Pour into molds as you would regular concrete, but note that hypertufa requires gentle handling during the first few days of curing.
The porous nature of hypertufa allows it to weather naturally, developing moss and lichen growth that enhances its organic appearance over time. These stones work particularly well in cottage gardens, woodland settings, and naturalistic landscapes where a softer, aged aesthetic is desired. The lighter weight also makes hypertufa stones easier to reposition if you decide to modify your pathway layout.
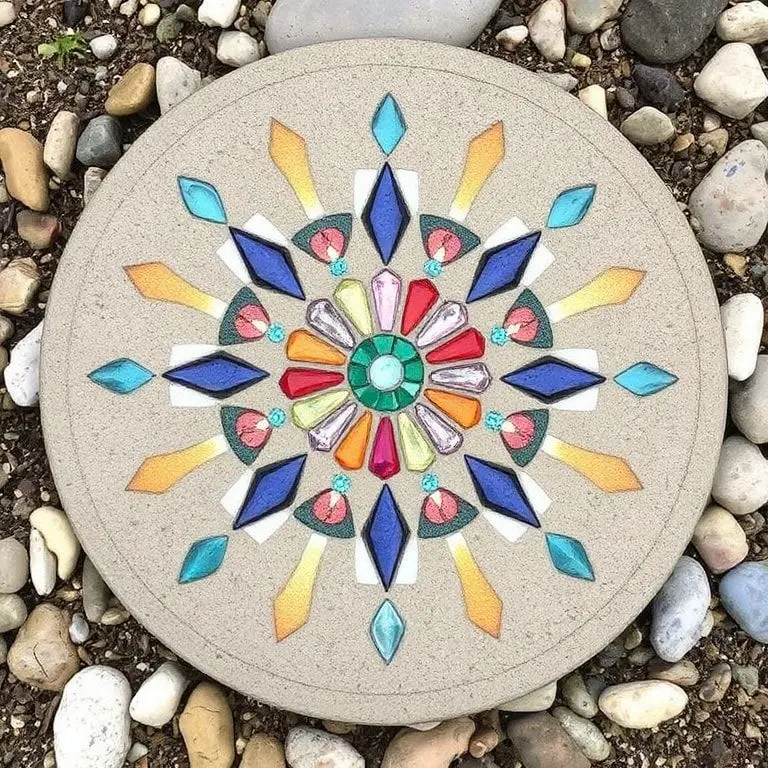
Glass Gem and Marble Embedded Stones
Incorporating glass gems and marbles into stepping stones creates jewel-like accents that catch sunlight and add sparkle to garden pathways. These decorative elements are widely available at craft stores, dollar stores, and online retailers in countless colors, sizes, and finishes, making them accessible for any budget.
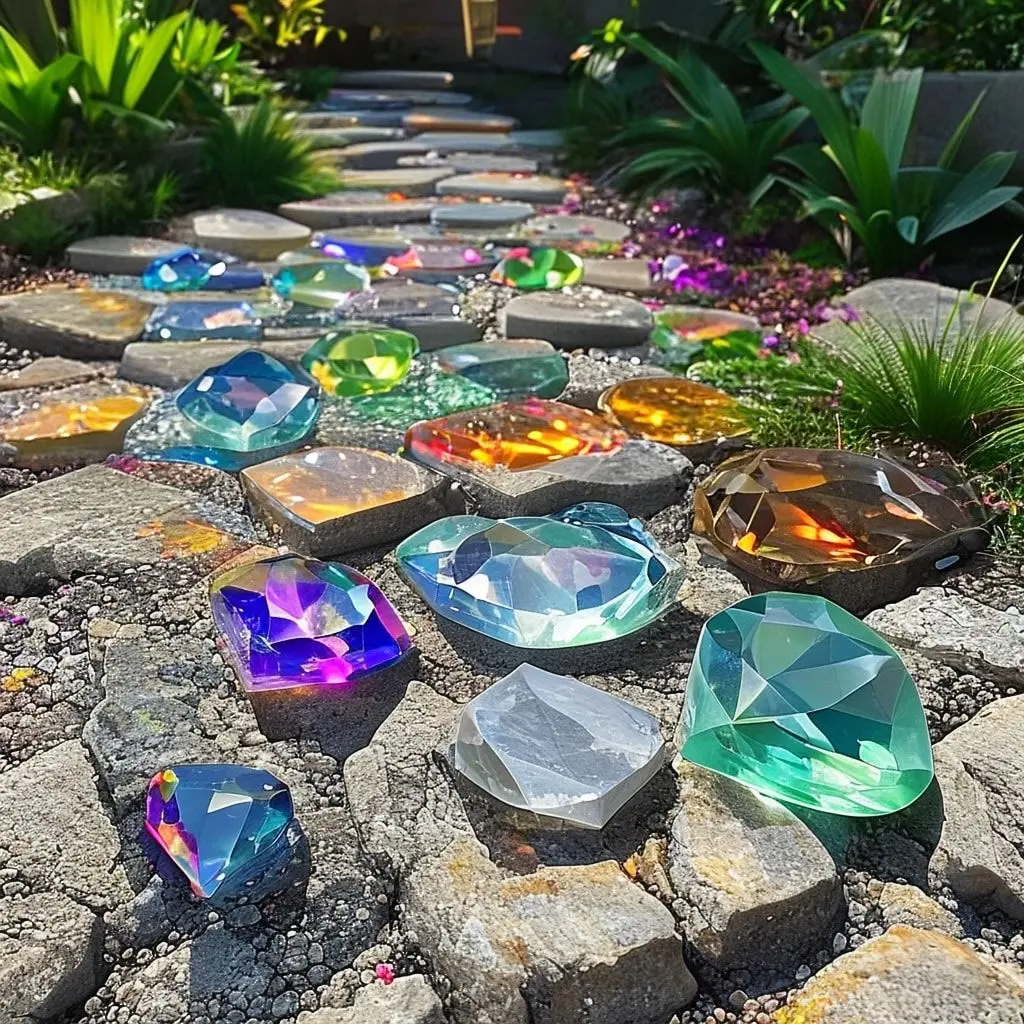
Flat-backed glass gems work best as they sit securely in concrete without rolling. Arrange gems in patterns before pouring concrete, or press them into partially set concrete for more spontaneous designs. Popular arrangements include border patterns around stone edges, central medallion designs, scattered random placement for subtle sparkle, and color-graded patterns that create ombre effects.
Clear and transparent gems allow light to pass through, creating interesting effects when sunlight hits them at different angles throughout the day. Opaque and iridescent gems provide solid pops of color and reflective surfaces. Combining different gem sizes and colors within a single stone creates complex, layered designs. Ensure gems are pressed firmly into the concrete so they sit flush or slightly recessed to prevent them from becoming dislodged over time.
Personalized Message and Quote Stones
Embedding words, phrases, or meaningful quotes into stepping stones adds inspirational or navigational elements to your garden pathways. These message stones can mark special garden areas, commemorate loved ones, share favorite sayings, or simply add whimsical charm to outdoor spaces.
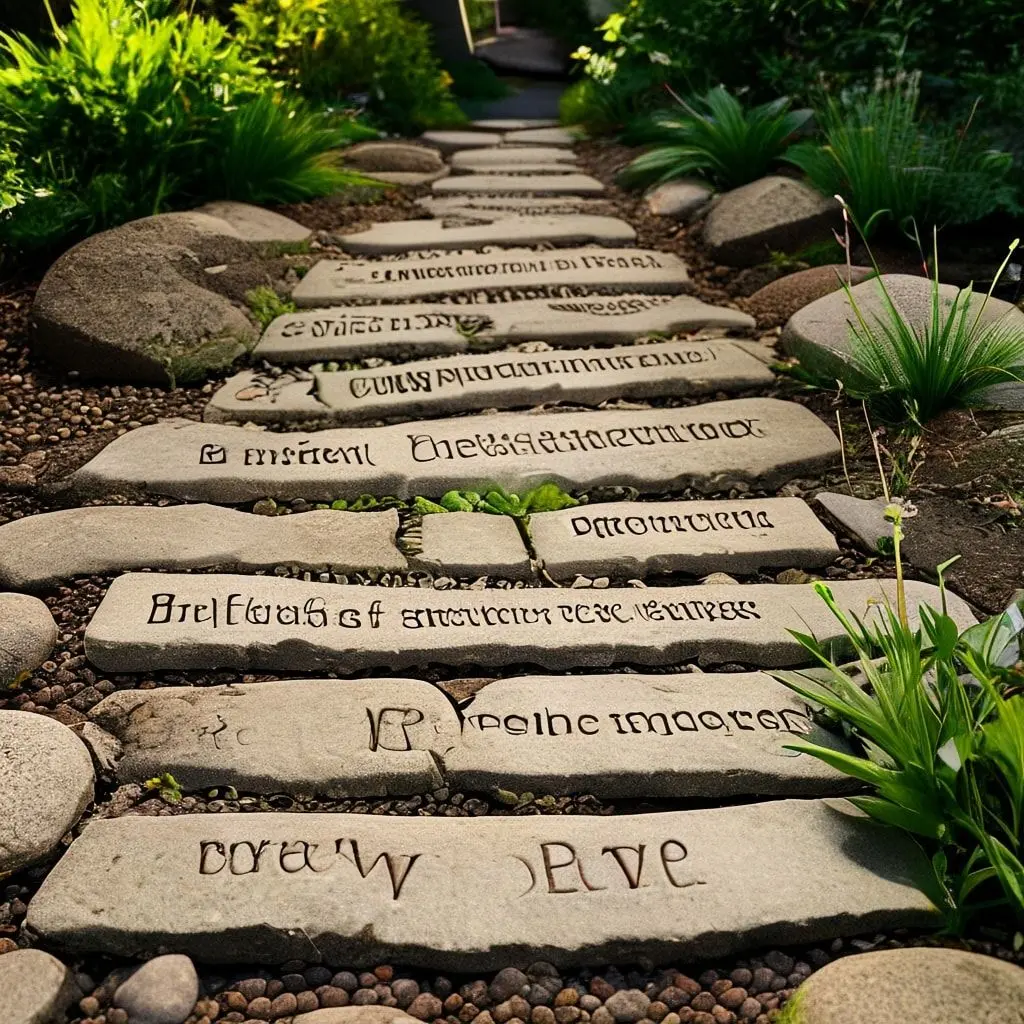
Create lettering using several techniques. Letter stamps designed for concrete provide clean, professional-looking text. Press stamps into semi-set concrete at consistent depth for uniform appearance. Hand-carving letters into wet concrete using sculpting tools offers a more organic, handcrafted look. Stencils combined with paint allow you to add text to fully cured stones in various fonts and colors.
Consider the message placement carefully. Center short phrases or single words for maximum impact. For longer quotes, plan the text layout before beginning to ensure proper spacing and sizing. Some gardeners create series of stones that form complete quotes when read in sequence along a pathway. Others prefer single-word stones with uplifting messages like “Breathe,” “Grow,” “Dream,” or “Peace” scattered throughout garden beds.
Geometric and Modern Design Stones
Contemporary gardens benefit from stepping stones featuring clean lines, geometric patterns, and modern aesthetic elements. These designs complement minimalist landscaping, modern architecture, and structured garden layouts while maintaining functionality and durability.
Create geometric patterns using tape as guides for painted designs, arranging tiles or stones in precise formations, or casting concrete in custom geometric molds. Popular modern designs include hexagonal shapes, triangular patterns, linear striping, color blocking with bold contrasts, and repeating tessellations.
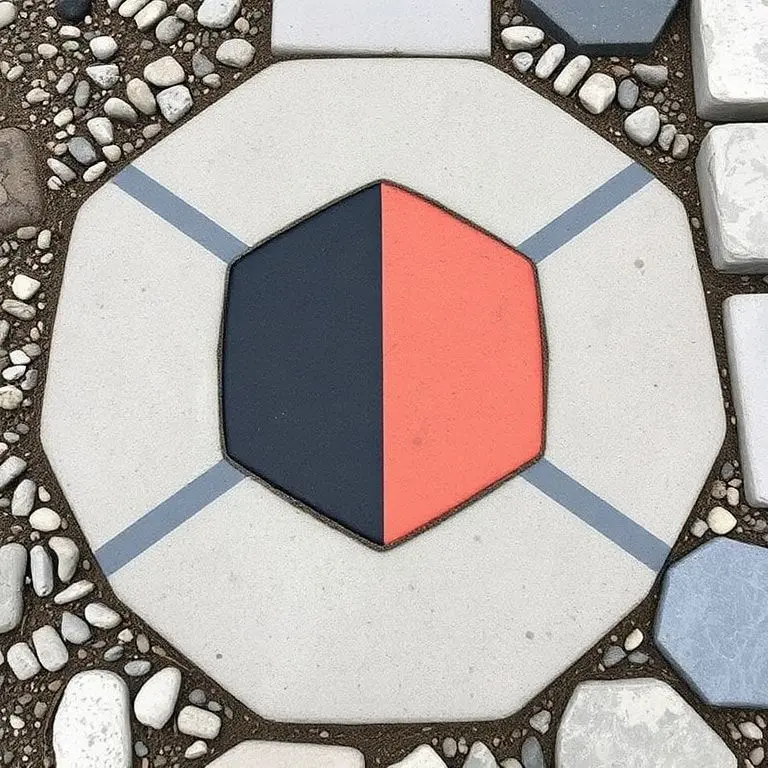
The key to successful geometric designs lies in precision and consistency. Use measuring tools, levels, and guides to ensure patterns align correctly. When creating multiple stones for a pathway, maintain consistent dimensions and pattern placement so stones relate visually to one another. Modern stepping stones often feature monochromatic color schemes with occasional accent colors, smooth surfaces rather than heavy textures, and deliberate negative space as part of the design composition.
Natural Stone Aggregate Finish
Exposing the aggregate in concrete stepping stones creates a terrazzo-like finish that showcases beautiful natural stones embedded throughout the surface. This technique produces durable, slip-resistant stones with unique appearances determined by the aggregate materials you choose.
Mix decorative aggregate materials like colored gravel, small polished stones, or crushed glass into your concrete before pouring. Use a higher ratio of aggregate to cement than standard concrete for maximum visual impact. After pouring and initial setting, wash away the top layer of cement to expose the embedded stones. Use a gentle spray of water and a soft brush to remove surface cement while leaving aggregate pieces securely embedded.
The exposed aggregate finish provides excellent traction, making these stones particularly suitable for areas that may become slippery when wet. The natural variations in stone colors and sizes ensure that no two stepping stones look exactly alike, adding organic interest to pathways. This finish also ages gracefully, developing character over time as weather and use polish the exposed stones.
Conclusion
Creating DIY stepping stones offers a perfect blend of practical functionality and creative expression for your outdoor spaces. From simple concrete basics to elaborate mosaic masterpieces, these projects accommodate every skill level, budget, and aesthetic preference. The process itself provides therapeutic benefits, allowing you to disconnect from daily stresses while producing tangible, lasting improvements to your home’s landscape.
The stepping stones you create today will serve your garden for years to come, weathering seasons while maintaining their beauty and purpose. Each stone you craft carries a piece of your personal creativity and effort, transforming ordinary pathways into meaningful expressions of your style and vision. Whether you choose classic designs or experimental techniques, the satisfaction of walking on pathways you’ve created yourself adds immeasurable value to your outdoor experience.
Start with a simple project to build your confidence and skills, then gradually experiment with more complex techniques as you discover which methods you enjoy most. Your garden deserves the unique character that only handcrafted elements can provide, and stepping stones offer an accessible entry point into the rewarding world of landscape DIY projects.
Frequently Asked Questions:
How long do DIY stepping stones need to cure before use?
DIY stepping stones require at least 48 hours before removing from molds, but should cure for a full seven days before placing in pathways and allowing foot traffic. Full strength develops over 28 days, though stones become functional much sooner. Quick-setting concrete formulas may accelerate this timeline slightly, but patience ensures maximum durability and prevents cracking from premature use.
What is the best concrete mix for making stepping stones?
Quick-setting concrete mix or standard concrete mix both work well for stepping stones. Quick-setting formulas cure faster but provide less working time for decorative elements. Standard concrete offers more flexibility for intricate designs. For most projects, a basic concrete mix with a ratio that produces thick, workable consistency provides the best balance of strength, workability, and affordability.
How thick should homemade stepping stones be?
Stepping stones should be at least two inches thick for durability and stability. Thinner stones risk cracking under weight and weather stress, while stones between two and three inches provide excellent longevity for typical garden pathway use. High-traffic areas benefit from thicker stones approaching three inches, while decorative stones in low-traffic areas can be slightly thinner.
Can you make stepping stones without molds?
You can create stepping stones without commercial molds by using household items like cake pans, pie tins, or plastic containers, or by building custom wooden forms from scrap lumber. Another approach involves digging shallow depressions directly in sand or soil and pouring concrete into these natural molds. This freeform method creates organic, irregular shapes that complement naturalistic garden designs.
How do you prevent stepping stones from sinking into the ground?
Prevent stepping stone sinking by preparing a stable base before installation. Excavate areas slightly deeper than stone thickness, add two to three inches of compacted gravel or sand for drainage and stability, level the base carefully, then set stones firmly into place. This preparation distributes weight properly and prevents settling over time, keeping stones level and functional for years.