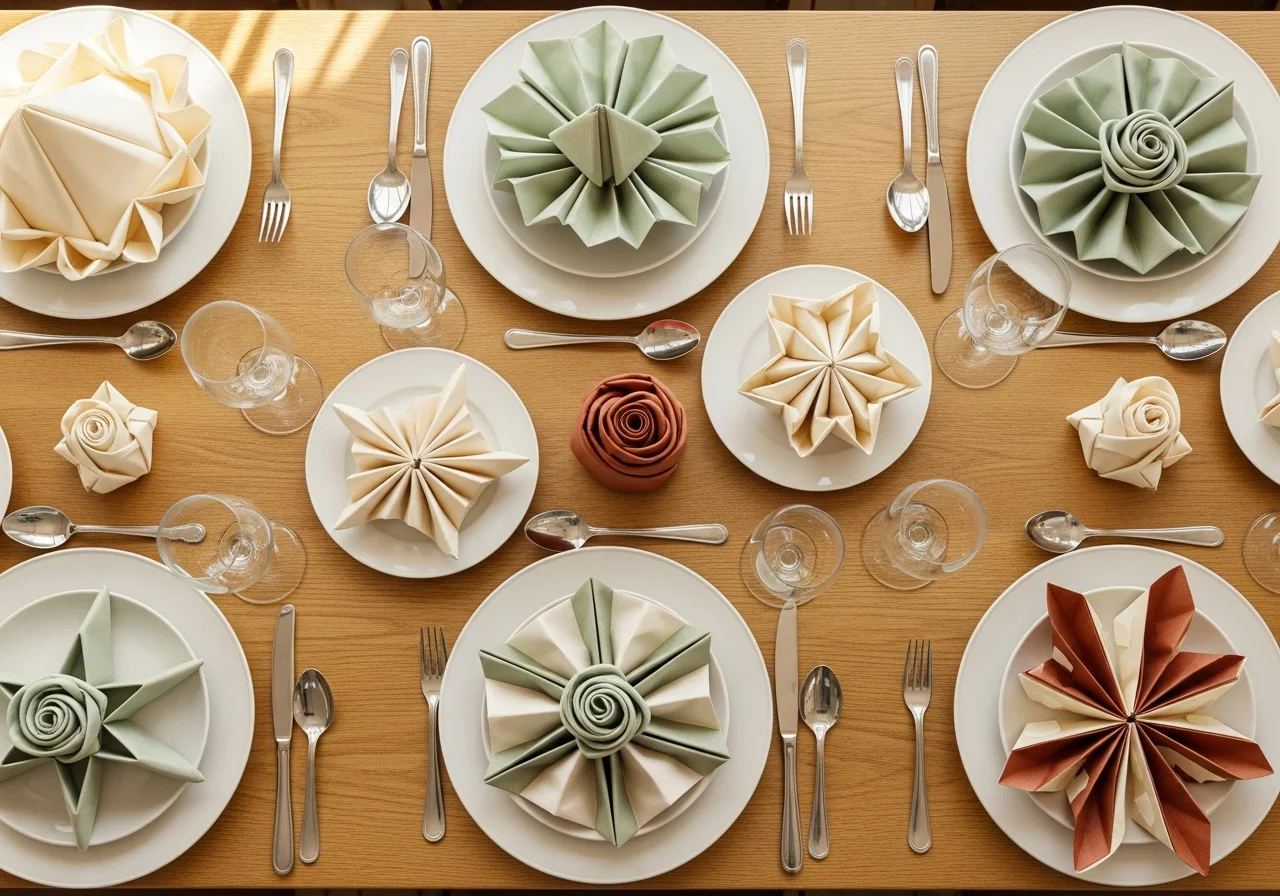
15+ Creative Paper Napkin Folding Ideas
The art of paper napkin folding transforms an ordinary table setting into something extraordinary. Whether you’re hosting an intimate dinner party, celebrating a special occasion, or simply wanting to elevate your everyday meals, mastering a few napkin folding techniques can make a remarkable difference in your table presentation. While many people reserve decorative napkins for cloth varieties, paper napkins offer surprising versatility and can be folded into stunning designs that rival their fabric counterparts.
Paper napkin folding has evolved from a simple practical skill into a creative expression that adds personality and elegance to any dining experience. The beauty of working with paper napkins lies in their accessibility and affordability. You don’t need expensive linens or professional training to create impressive table decorations. For more table decor ideas visit Homeliaa.
With a few simple techniques and a bit of practice, anyone can master the art of napkin folding and bring a touch of sophistication to their table settings.
This comprehensive guide will walk you through more than fifteen creative paper napkin folding ideas, ranging from simple designs perfect for beginners to more intricate patterns that will impress your guests. Each technique has been selected for its visual impact and practical application, ensuring that you’ll find the perfect fold for every occasion.
Understanding Paper Napkin Folding Basics
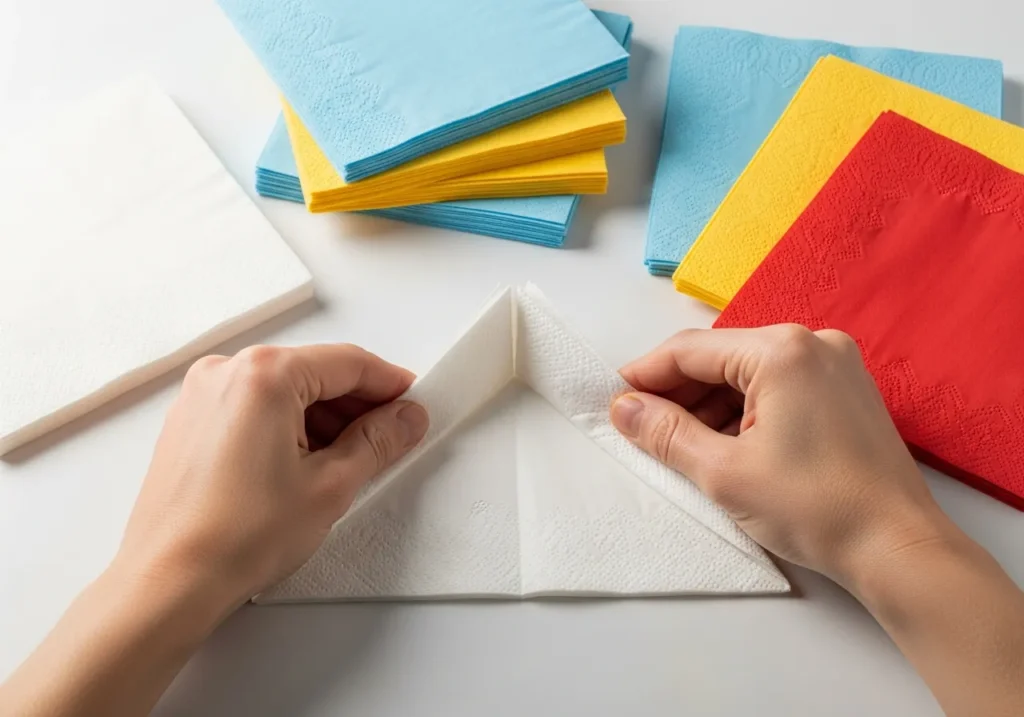
Before diving into specific folding techniques, it’s important to understand the fundamentals that will set you up for success. Paper napkins come in various sizes, with standard cocktail napkins measuring approximately 5 inches square and dinner napkins ranging from 6.5 to 8 inches square. The size and quality of your napkins will significantly impact the final result of your folds.
When selecting paper napkins for folding, opt for those with a higher ply count. Two-ply or three-ply napkins hold their shape better and create more defined creases than single-ply varieties. Additionally, napkins with a slightly stiffer texture will maintain their form throughout the meal, preventing your carefully crafted designs from wilting before dinner is served.
The key to successful paper napkin folding lies in creating crisp, clean creases. Take your time with each fold, pressing firmly along the edges to ensure sharp lines. Working on a flat, smooth surface will help you achieve professional-looking results. Many folders find that lightly dampening their fingertips can help create more precise folds, though this technique works better with higher-quality napkins.
The Classic Pyramid Fold
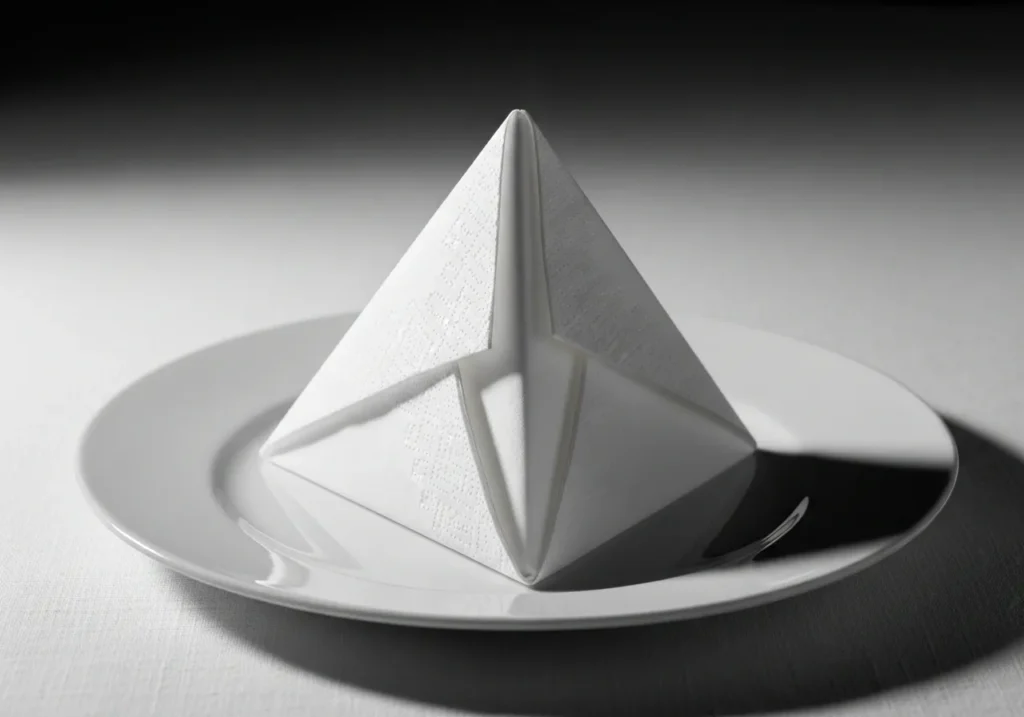
The pyramid fold stands as one of the most timeless and elegant napkin folding techniques. This three-dimensional design adds height to your table setting and works beautifully for both casual and formal occasions. To create this fold, start with your napkin fully opened and positioned as a diamond shape with one corner pointing toward you.
Fold the napkin in half to create a triangle, bringing the bottom corner up to meet the top corner. Next, take the left corner and fold it up to meet the top point, creating a smaller diamond shape. Repeat this process with the right corner. You should now have a square shape with a vertical center line.
Flip the napkin over while maintaining its orientation. Fold the napkin in half by bringing the bottom point up to meet the top point, creating a triangle once again. Finally, stand the napkin upright by pulling the two base corners apart slightly and tucking one corner into the pocket of the other. The result is a stunning pyramid that stands proudly on each plate.
The Elegant Pocket Fold

The pocket fold combines functionality with style, creating a convenient space to tuck in utensils, place cards, or small decorative elements like flowers or herbs. This versatile design works particularly well for buffet-style dining or casual gatherings where guests will be picking up their own place settings.
Begin with your napkin opened completely and positioned as a square. Fold the napkin in half horizontally, bringing the top edge down to meet the bottom edge. Fold it in half again horizontally, creating a long rectangular shape. You should now have a rectangle with the open edges at the top.
Take the top layer of the napkin and fold it down about two-thirds of the way toward the bottom edge. Fold the second layer down, stopping about an inch above the first fold to create a layered pocket effect. Flip the napkin over and fold both sides toward the center, creating a neat rectangular pocket. Turn it back over, and you have a practical and attractive pocket fold ready to hold your flatware.
The Beautiful Rose Fold
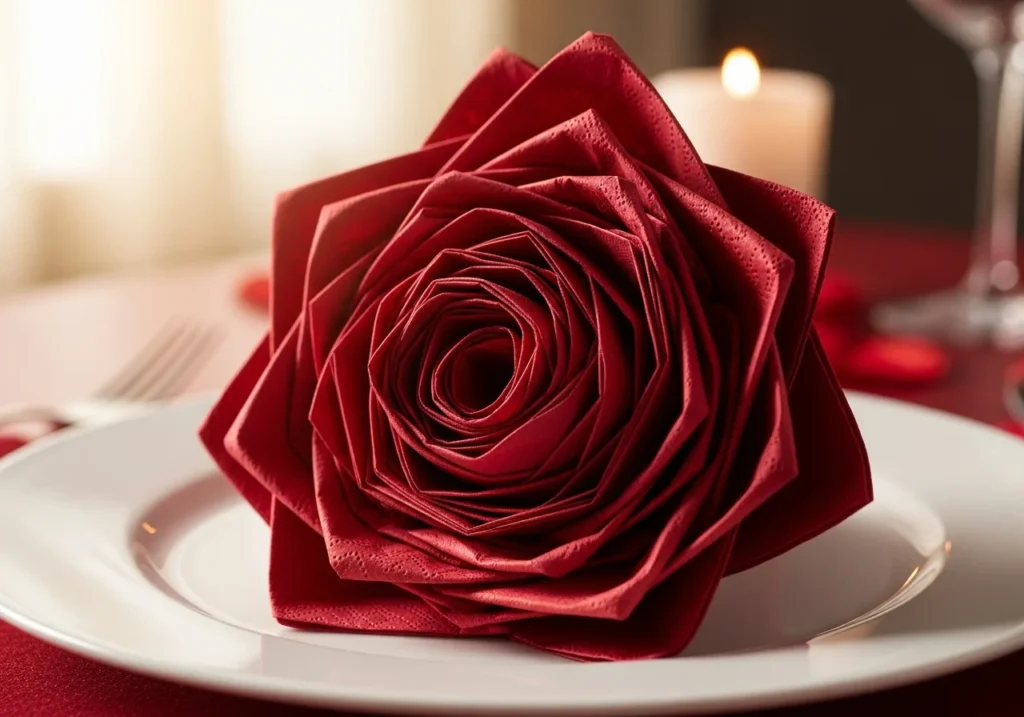
The rose fold represents one of the most romantic and visually striking paper napkin designs. While it requires a bit more patience than simpler folds, the stunning result makes it perfect for weddings, anniversary dinners, or Valentine’s Day celebrations. This design works best with larger dinner napkins and benefits from napkins in red, pink, or white colors.
Start with your napkin fully opened and lying flat. Place your index finger in the center of the napkin and begin gathering the napkin around your finger, creating loose folds and pleats as you work your way around in a circular motion. Once you’ve gathered the entire napkin around your finger, carefully remove your finger while maintaining the gathered shape.
Holding the gathered napkin firmly near the top, begin twisting the bottom portion to create the stem of the rose. Continue twisting until you’ve formed a tight stem about two to three inches long. Gently pull out and arrange the top layers of the napkin to create the petals of the rose, adjusting them until you achieve the desired flower shape. The result is a beautiful rose that can be placed directly on the plate or positioned in a wine glass for added drama.
The Simple Fan Fold
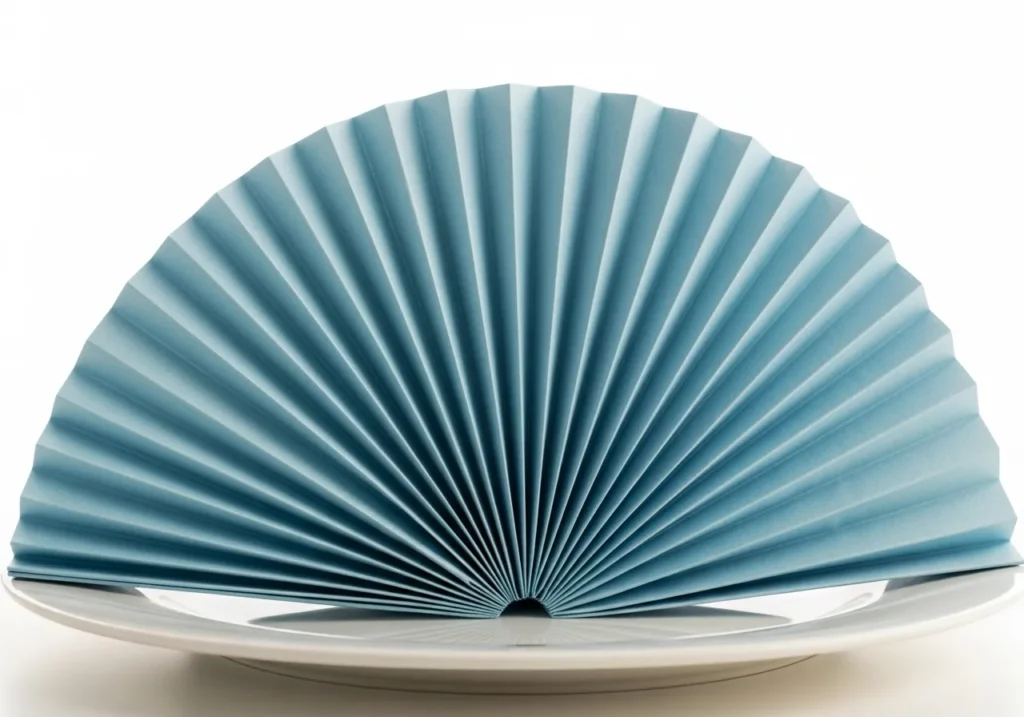
The fan fold offers an easy yet impressive design that works wonderfully for both casual and semi-formal occasions. This accordion-style fold creates visual interest and can be displayed either standing upright or laid flat on the plate. The fan fold also works exceptionally well when you want to showcase napkins with decorative patterns or borders.
Begin with your napkin opened completely and positioned as a square. Starting from one edge, create accordion pleats by folding the napkin back and forth in approximately one-inch increments. Continue this process until you’ve pleated the entire napkin, ensuring each fold is crisp and even.
Once fully pleated, fold the napkin in half so the pleated edges align. If you want the fan to stand upright, you can secure the base with a napkin ring or simply tuck one end under a plate to hold it in place. Gently spread the pleats at the top to create the fan shape. For a more dramatic presentation, you can create a double fan by pleating from both ends toward the center before folding.
The Festive Christmas Tree Fold
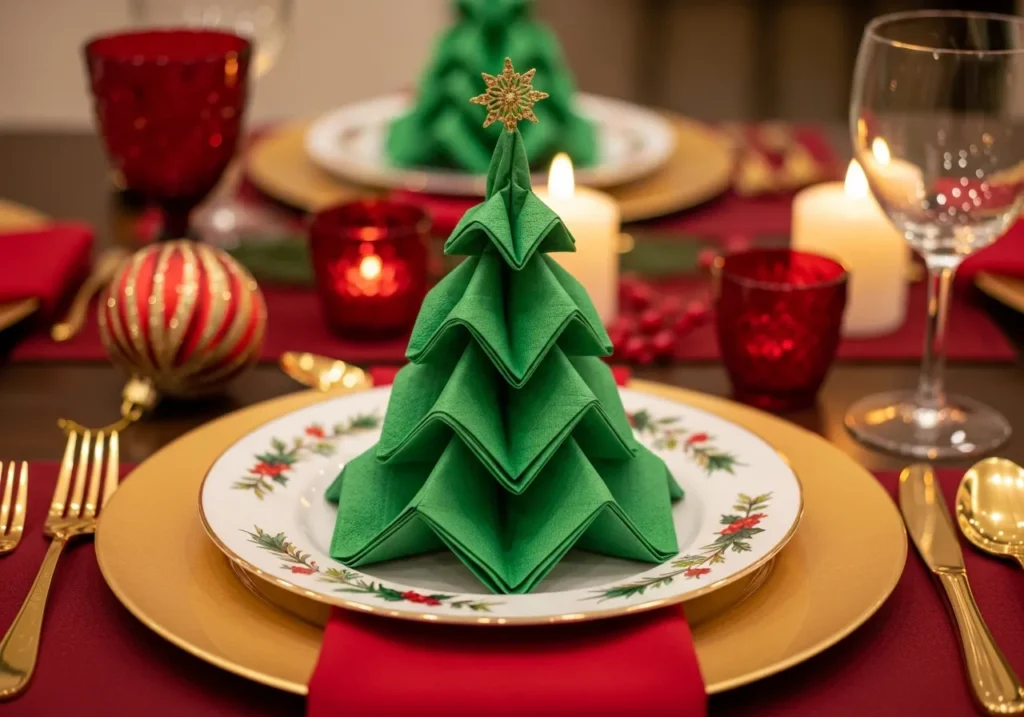
The Christmas tree fold brings holiday cheer to your winter table settings and serves as both a napkin and a decorative centerpiece. This fold works particularly well with green napkins, though red, gold, or silver varieties can create equally festive effects. The three-dimensional design adds a playful touch to holiday gatherings.
Start with your napkin fully opened and positioned as a square. Fold the napkin in half diagonally to create a triangle with the point facing away from you. Fold the napkin in half again to create a smaller triangle. You should now have a triangle with multiple layers along one edge.
Beginning with the top layer, fold it up toward the point, stopping about an inch from the top. Continue this process with each subsequent layer, leaving about an inch of space between each fold. Once all layers are folded, carefully flip the napkin over while maintaining the folds. Fold both sides toward the center to create the tree shape. Turn it back over, and you can decorate your tree by tucking small ornaments, berries, or a star into the top point.
The Sophisticated Bishop’s Hat Fold
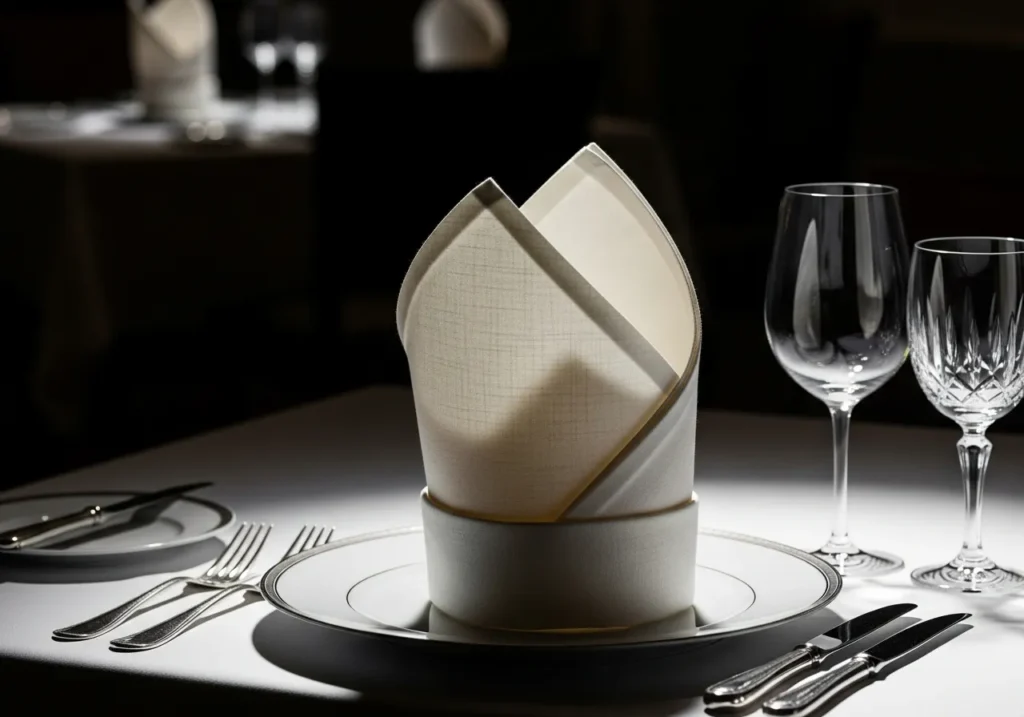
The bishop’s hat fold, also known as the mitre fold, creates an impressive vertical element on your table. This classic design has been used in fine dining establishments for decades and continues to be a favorite for formal occasions. The fold gets its name from its resemblance to a bishop’s ceremonial headpiece.
Begin with your napkin fully opened and positioned as a diamond. Fold the napkin in half to create a triangle with the point facing up. Take the bottom left corner and fold it up to meet the top point. Repeat with the bottom right corner, creating a diamond shape with four layers at the top point.
Flip the napkin over and fold the bottom point up to about one inch from the top point. Fold this section back down so the point touches the bottom edge, creating a pleat. Curl the left and right sides of the napkin backward and tuck one side into the fold of the other to create a cylindrical base. Stand the napkin upright and adjust the points to create the distinctive bishop’s hat shape.
The Charming Bow Tie Fold
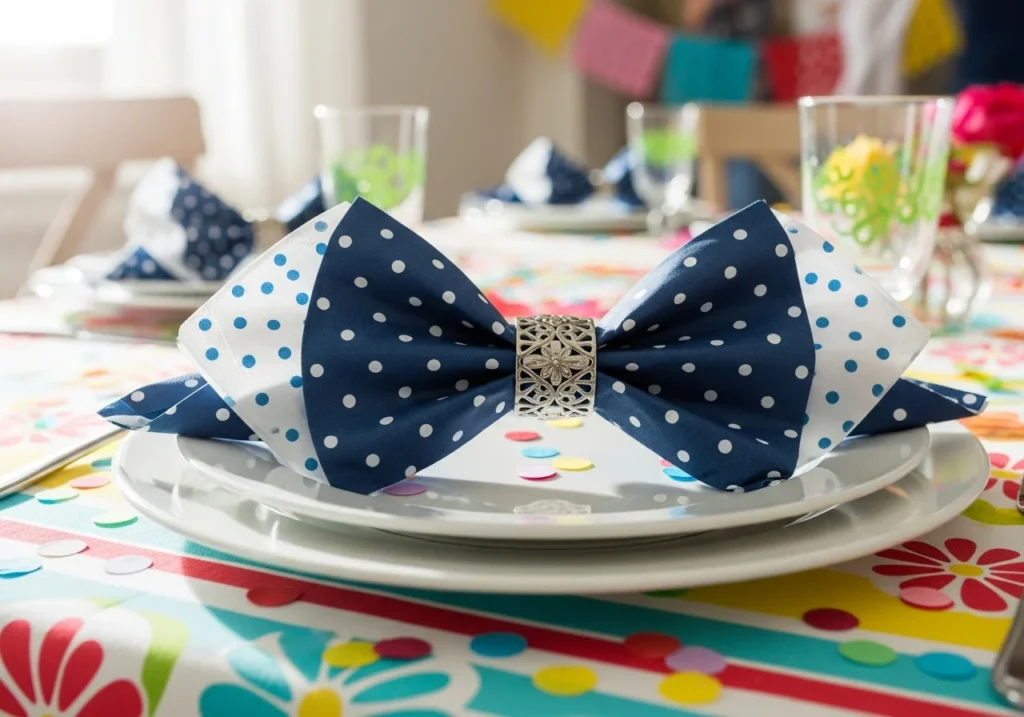
The bow tie fold adds a whimsical and playful element to your table setting, making it perfect for themed parties, children’s celebrations, or casual gatherings. This simple yet effective design can be completed in just a few steps and creates an instantly recognizable shape that brings a smile to guests’ faces.
Start with your napkin fully opened and positioned as a square. Fold the napkin in half horizontally to create a rectangle. Fold it in half again vertically, creating a smaller square. Position the square so the open corners are at the top right.
Fold the top and bottom edges toward the center line, creating a long rectangular shape. Pinch the center of the napkin and gather it together, creating the bow tie shape. Secure the center with a napkin ring, ribbon, or decorative tie. Adjust the ends to create even, symmetrical loops on both sides. For added flair, you can use napkins in fun patterns or colors that match your party theme.
The Practical Silverware Pouch

The silverware pouch combines elegance with functionality, providing an attractive way to present flatware at each place setting. This design works exceptionally well for casual outdoor dining, picnics, or buffet-style meals where guests will be carrying their place settings. The pouch keeps utensils neatly contained while adding a decorative touch.
Begin with your napkin opened completely and positioned as a square. Fold the napkin in half diagonally to create a triangle with the point facing away from you. Fold the left and right corners up to meet the top point, creating a diamond shape. Flip the napkin over while maintaining its orientation.
Fold the bottom point up toward the top, stopping about two inches from the point to create a band. Fold the top layers of this band down to create a cuff. Flip the napkin over once more and fold the left and right sides toward the center, overlapping them slightly. Turn it back over, and you have a neat pouch with a decorative cuff where you can slide in your silverware.
The Elegant Lotus Fold
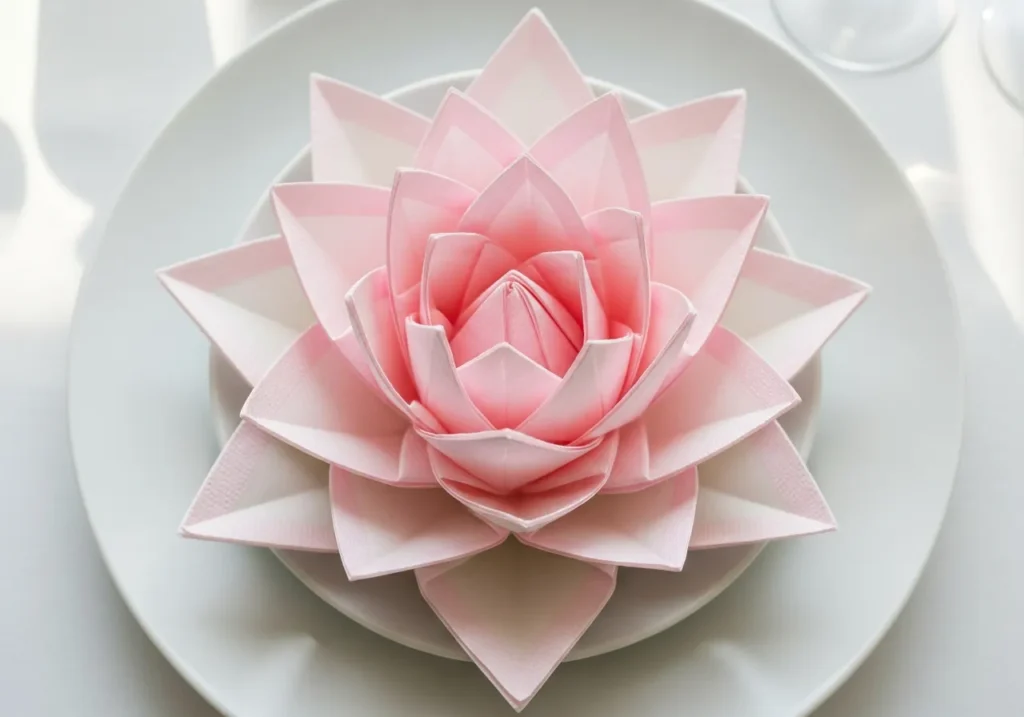
The lotus fold creates a stunning flower-like design that appears far more complex than it actually is. This impressive fold serves as a beautiful centerpiece on each plate and works wonderfully for spring and summer gatherings, garden parties, or any occasion where you want to bring a touch of nature to your table.
Start with your napkin fully opened and positioned as a diamond. Fold all four corners to meet in the center, creating a smaller diamond shape. Flip the napkin over and repeat the process, folding all four corners to the center again. Carefully flip the napkin over once more, keeping all the folds intact.
Reach underneath the napkin and gently pull out the four flaps from beneath each corner, bringing them up and outward to create the first layer of petals. Continue by pulling out the next set of flaps to create a second layer of petals. Adjust the petals as needed to create a balanced, flower-like appearance. The result is a beautiful lotus bloom that sits elegantly on each plate.
The Classic Diamond Fold
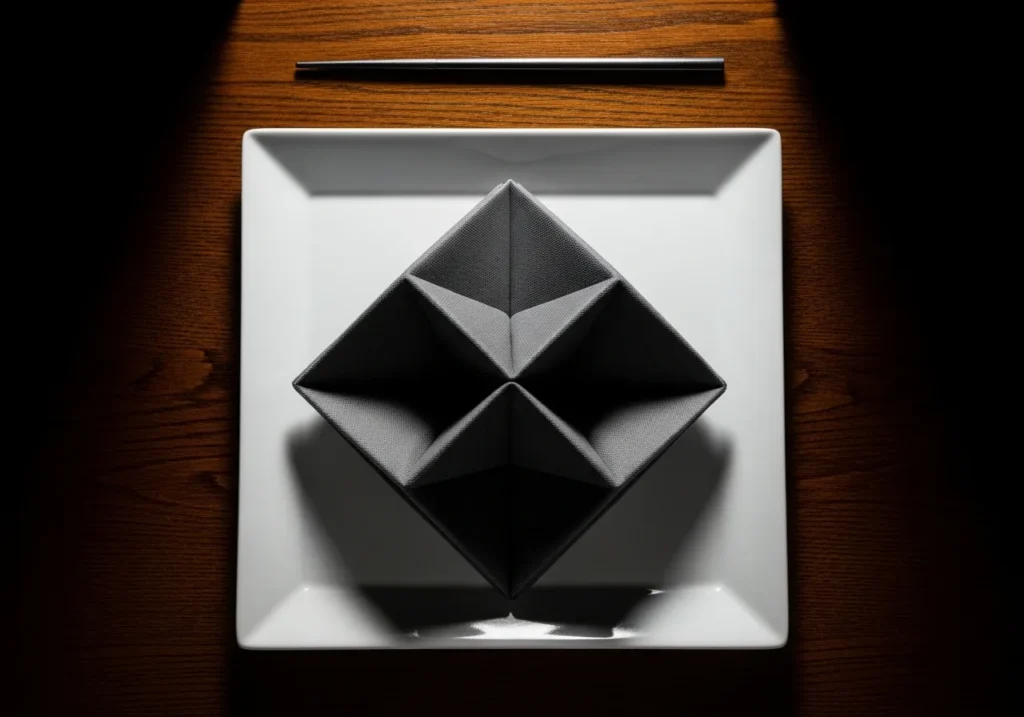
The diamond fold offers a clean, geometric look that works well for modern and minimalist table settings. This simple yet striking design can be completed quickly, making it ideal for last-minute gatherings or when you need to fold napkins for a large number of guests. The angular shape adds a contemporary touch to any table.
Begin with your napkin fully opened and positioned as a square. Fold the napkin in half diagonally to create a triangle. Position the triangle so the longest edge is closest to you. Take the left corner and fold it up and over to the right, creating an asymmetrical diamond shape with a vertical center fold.
Repeat the process with the right corner, folding it up and over to the left so it mirrors the first fold. You should now have a diamond shape with a point at the top and bottom. Adjust the folds as needed to ensure both sides are symmetrical. This fold can be placed directly on the plate or positioned at an angle for added visual interest.
The Romantic Heart Fold

The heart fold creates a sweet and sentimental design perfect for romantic dinners, Valentine’s Day celebrations, or anniversary meals. While it requires a few more steps than simpler folds, the charming result makes it well worth the effort. This fold works best with napkins in red, pink, or white.
Start with your napkin fully opened and positioned as a square. Fold the napkin in half horizontally, bringing the bottom edge up to meet the top edge. Fold it in half again vertically, creating a smaller square with the folded corner at the bottom left.
Take the top layer of the top right corner and fold it down diagonally to the bottom left corner. Flip the napkin over and repeat this diagonal fold on the other side. You should now have a triangle shape. Fold the left and right corners down and toward the center to create the top curves of the heart. Tuck the points underneath to create a smooth heart shape. Adjust as needed to achieve symmetrical curves.
The Stylish Sail Fold
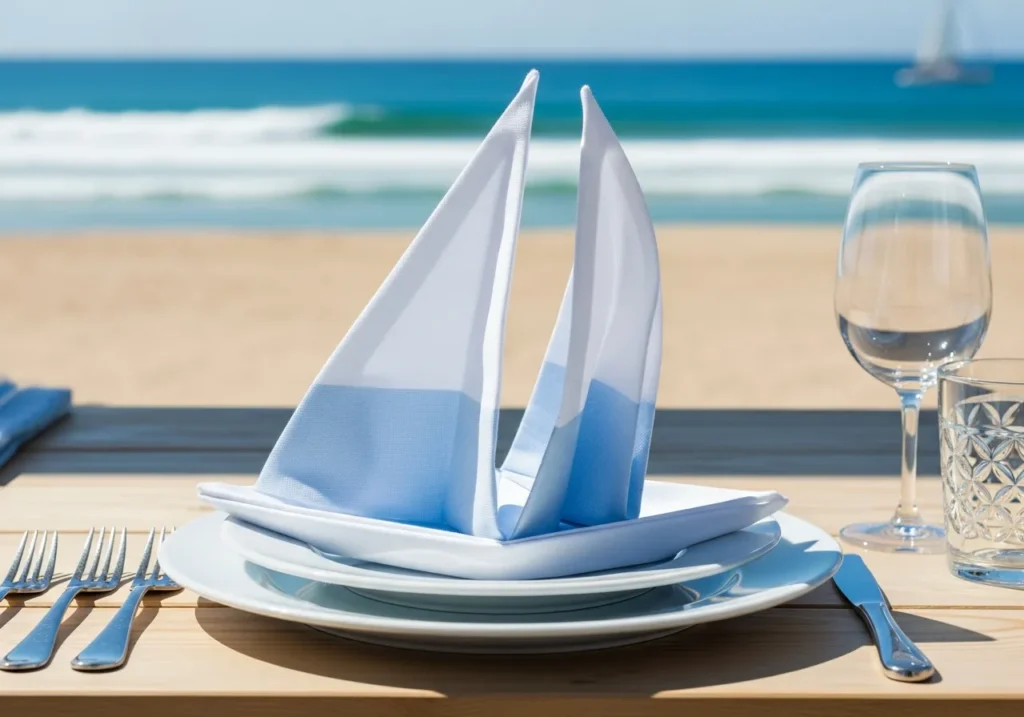
The sail fold creates a dynamic, three-dimensional shape that adds movement and interest to your table setting. This design works particularly well for nautical-themed events, beach parties, or summer gatherings. The vertical orientation of this fold creates visual height on the table.
Begin with your napkin fully opened and positioned as a square. Fold the napkin in half diagonally to create a triangle with the point facing up. Position the triangle so the longest edge is at the bottom. Fold the left corner up to meet the top point, then repeat with the right corner, creating a diamond shape.
Flip the napkin over and fold the bottom point up about two-thirds of the way toward the top point. Fold it back down so the point extends just below the bottom edge, creating a pleat. Fold the napkin in half vertically by bringing the left side over to meet the right side. Stand the napkin upright with the pleated edge at the base, and adjust the sail portion to create the desired shape.
The Festive Star Fold
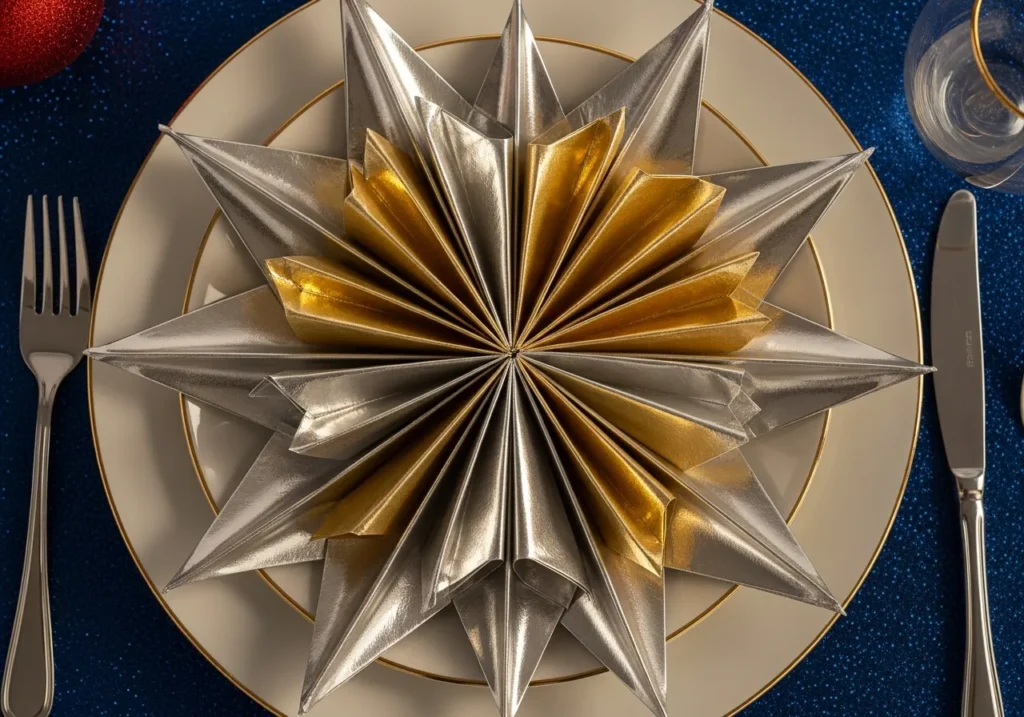
The star fold creates a striking geometric design that works beautifully for holiday celebrations, patriotic events, or any occasion where you want to add a touch of sparkle to your table. This fold looks particularly impressive when created with metallic or glittery napkins.
Start with your napkin fully opened and positioned as a square. Fold the napkin in half horizontally, then fold it in half again vertically to create a smaller square. Position the square so the open corners are at the top right. Fold the top layer of the top right corner down diagonally to the bottom left corner.
Take the next layer and fold it diagonally as well, but stop slightly short of the bottom left corner to create a layered effect. Repeat this process with the remaining layers, creating evenly spaced diagonal folds. Carefully flip the napkin over and fold the left and right sides toward the center to create the star shape. Turn it back over and adjust the layers to emphasize the star points.
The Simple Envelope Fold
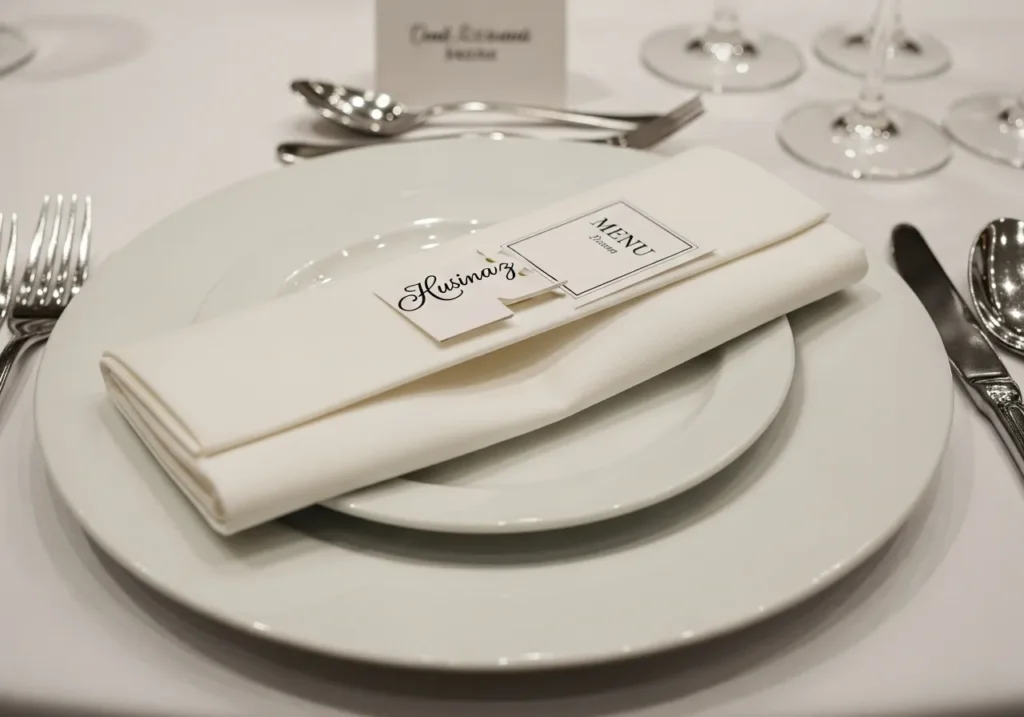
The envelope fold provides a clean, sophisticated look that works well in professional settings or modern dining environments. This understated design creates a neat rectangular shape that can hold place cards, menus, or small favors. The simplicity of this fold allows decorative napkin patterns to shine.
Begin with your napkin fully opened and positioned as a square. Fold the napkin in half horizontally, bringing the top edge down to meet the bottom edge. Fold it in half again horizontally to create a long, narrow rectangle. Fold the left and right sides toward the center, allowing them to overlap slightly in the middle.
Flip the napkin over to hide the overlapping edges, and you have a neat envelope-style fold. You can enhance this design by sliding a small card, flower stem, or herb sprig into the folds. The clean lines of this fold make it versatile enough for any occasion while maintaining an elegant appearance.
The Decorative Candle Fold
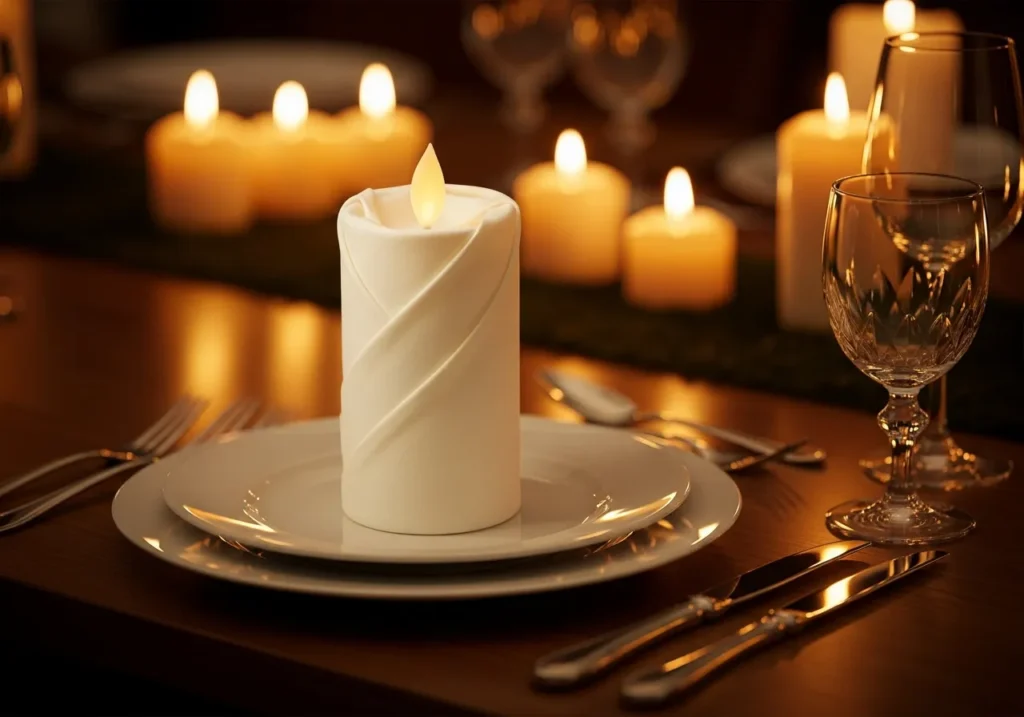
The candle fold creates a tall, cylindrical shape that resembles a standing candle, making it perfect for evening dinners or romantic occasions. This vertical design adds elegance to the table and works particularly well when paired with actual candlelight for a cohesive look.
Start with your napkin fully opened and positioned as a diamond. Fold the bottom corner up to meet the top corner, creating a triangle. Fold the left and right corners up to meet the top point, forming a diamond shape. Flip the napkin over and fold the bottom point up about halfway.
Begin rolling the napkin tightly from the left side toward the right, creating a cylindrical shape. Once fully rolled, tuck the end into the pocket created by the previous folds to secure the candle. Stand the napkin upright and adjust the top to create a slightly flared opening that resembles a candle flame. This fold looks stunning when placed in the center of each plate.
The Artistic Peacock Fold

The peacock fold represents one of the most elaborate and impressive paper napkin designs. While it requires more time and patience than simpler folds, the stunning result makes it perfect for special celebrations where you want to create a memorable impression. This fold works best with larger napkins in vibrant colors.
Begin with your napkin fully opened and positioned as a square. Fold the napkin in half diagonally to create a triangle. Starting from the long edge, create small accordion pleats all the way to the point of the triangle. The pleats should be approximately half an inch wide for the best effect.
Once fully pleated, fold the pleated napkin in half so the pleats are on the outside and the point of the triangle forms the tail of the peacock. Stand the napkin upright by placing it in a glass or napkin ring, with the pleated sections fanning out to create the peacock’s tail. Gently spread and adjust the pleats to create a full, dramatic display. You can add a small decorative element at the base to represent the peacock’s body.To see more napkin ideas visit Gala in the Kitchen.
Conclusion
Paper napkin folding transforms the ordinary into the extraordinary, turning simple table settings into memorable dining experiences. The techniques presented in this guide range from quick and simple designs that anyone can master to more elaborate creations that showcase your attention to detail and creativity. Each fold serves a purpose, whether adding elegance to a formal dinner, bringing playfulness to a casual gathering, or combining beauty with functionality.
The art of napkin folding requires nothing more than patience, practice, and quality paper napkins. As you work through these designs, you’ll discover that the key to success lies in creating crisp, clean folds and taking your time with each step. Don’t be discouraged if your first attempts don’t turn out perfectly. Like any skill, napkin folding improves with practice, and soon you’ll be creating beautiful designs with ease and confidence.
Remember that the best napkin fold is one that complements your overall table design and suits the occasion. A simple fan fold can be just as impressive as an elaborate peacock when it matches the tone of your event and coordinates with your other decorative elements. Experiment with different colors, patterns, and combinations to discover which designs resonate with your personal style and the atmosphere you want to create.
By mastering these paper napkin folding techniques, you’ve added a valuable skill to your entertaining repertoire. Your guests will appreciate the extra thought and care you’ve put into every detail of their dining experience, and you’ll enjoy the satisfaction of creating something beautiful with your own hands. Whether you’re setting the table for an intimate dinner for two or preparing for a large celebration, these creative folding ideas will help you make every meal feel special.
Frequently Asked Questions
What type of paper napkins work best for folding?
Two-ply or three-ply paper napkins work best for folding as they hold their shape better and create crisper creases than single-ply varieties. Look for napkins with a slightly stiffer texture and larger sizes, preferably dinner napkins measuring 6.5 to 8 inches square. Higher quality napkins will maintain their form throughout the meal and produce more professional-looking results.
Can I fold paper napkins ahead of time?
Yes, most paper napkin folds can be prepared several hours in advance. Store folded napkins on a flat surface or standing upright in glasses to maintain their shape. Avoid stacking heavy items on top of them, and keep them away from moisture or humidity. Some complex folds like the rose or peacock may benefit from last-minute adjustments before serving to ensure they look their best.
Do certain napkin colors work better for specific folds?
While any color can technically work for any fold, certain combinations enhance the visual impact. Solid colors tend to showcase the fold’s structure better than busy patterns, especially for geometric designs. Choose colors that complement your table setting and occasion: reds and pinks for romantic folds, greens for the Christmas tree, and metallics for stars. Patterns work well for simpler folds where the design won’t be obscured.
How can I make my napkin folds stay in place during dinner?
To help napkin folds maintain their shape, use napkin rings for designs like the fan or bow tie. For standing folds like the pyramid or bishop’s hat, place them on flat plates rather than in bowls. You can also lightly spray completed folds with water from a distance and allow them to dry slightly, which helps paper napkins hold their shape. Avoid handling folded napkins excessively before serving.
What is the easiest napkin fold for beginners to start with?
The pyramid fold and pocket fold are excellent starting points for beginners. Both require only basic folding techniques, create impressive results, and are forgiving of small mistakes. The envelope fold is another simple option that produces a clean, professional look. Once you’ve mastered these basic folds and feel comfortable creating crisp creases, you can progress to more intricate designs like the rose or peacock.