16+ Creative DIY Mini Bottle Charms Ideas
Creative DIY Mini Bottle Charms Ideas mini bottle charms have captured the imagination of craft enthusiasts and jewelry makers worldwide. These delicate, enchanting accessories offer endless possibilities for creative expression while remaining surprisingly simple to create. Whether you’re looking to craft personalized gifts, build a unique jewelry collection, or explore a new hobby, mini bottle charms provide the perfect canvas for your artistic vision.
The beauty of these tiny treasures lies in their versatility. From whimsical fairy-tale inspired designs to elegant minimalist pieces, mini bottle charms can be adapted to suit any style or occasion. The process of creating them combines multiple crafting techniques, allowing you to experiment with color, texture, and composition within the confined space of a glass vial. This limitation becomes a creative challenge that pushes you to think innovatively about materials and design.
What makes mini bottle charms particularly appealing is their accessibility. Unlike many jewelry-making projects that require expensive equipment or specialized skills, bottle charms can be created with readily available materials and basic techniques. The initial investment is minimal, and the learning curve is gentle enough for absolute beginners while offering sufficient complexity to engage experienced crafters. This combination of simplicity and creative potential has made bottle charm crafting one of the most popular DIY jewelry trends in recent years.
Essential Materials and Tools

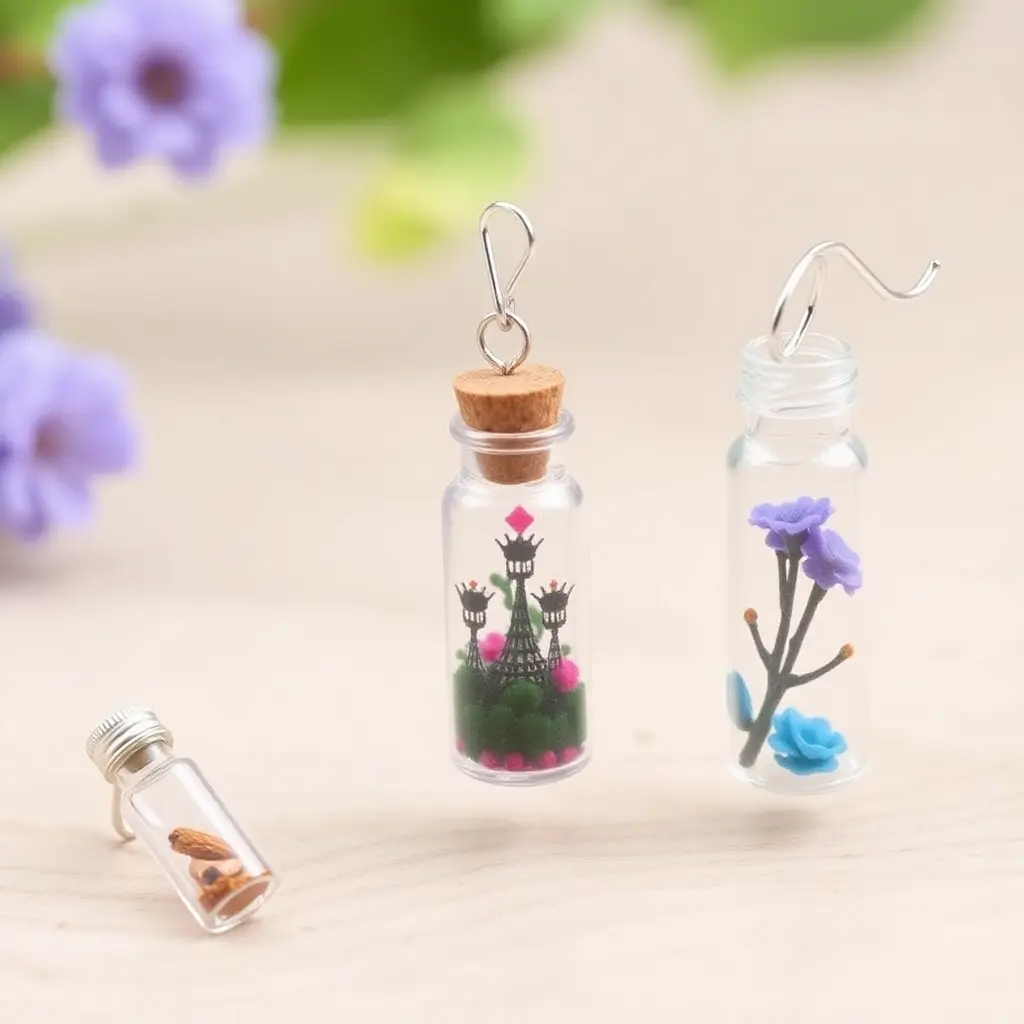
Before diving into specific project ideas, understanding the fundamental supplies will set you up for success. The foundation of any bottle charm project is, naturally, the bottle itself. Glass vials come in various shapes and sizes, from traditional cylindrical tubes to teardrop-shaped bottles and geometric containers. Most crafters start with bottles ranging from one to three centimeters in height, as these proportions work well for necklaces, bracelets, and keychains.
Cork stoppers or metal caps provide the closure mechanism for your bottles. Natural cork offers a rustic, organic aesthetic and creates an effective seal for dry materials. Metal screw caps or decorative stoppers add a more polished, finished appearance and work better for liquid-filled charms. Some bottles come with attached bails or loops, while others require you to add jump rings or wire wrapping to create the attachment point.
Adhesives play a crucial role in securing both the contents and the closures. E6000 industrial-strength adhesive works exceptionally well for attaching caps and bails, creating a permanent bond that withstands daily wear. For sealing cork stoppers, clear-drying craft glue or mod podge provides adequate protection while remaining less permanent if you want the option to change contents later.
Filling materials represent where your creativity truly flourishes. Seed beads, micro glitter, dried flowers, colored sand, tiny shells, gemstone chips, and miniature crystals all make excellent bottle fillings. Liquids such as glycerin, mineral oil, or baby oil can be combined with glitter or small lightweight objects to create motion within the charm. Resin can be poured into bottles to suspend objects permanently or create colorful transparent effects.
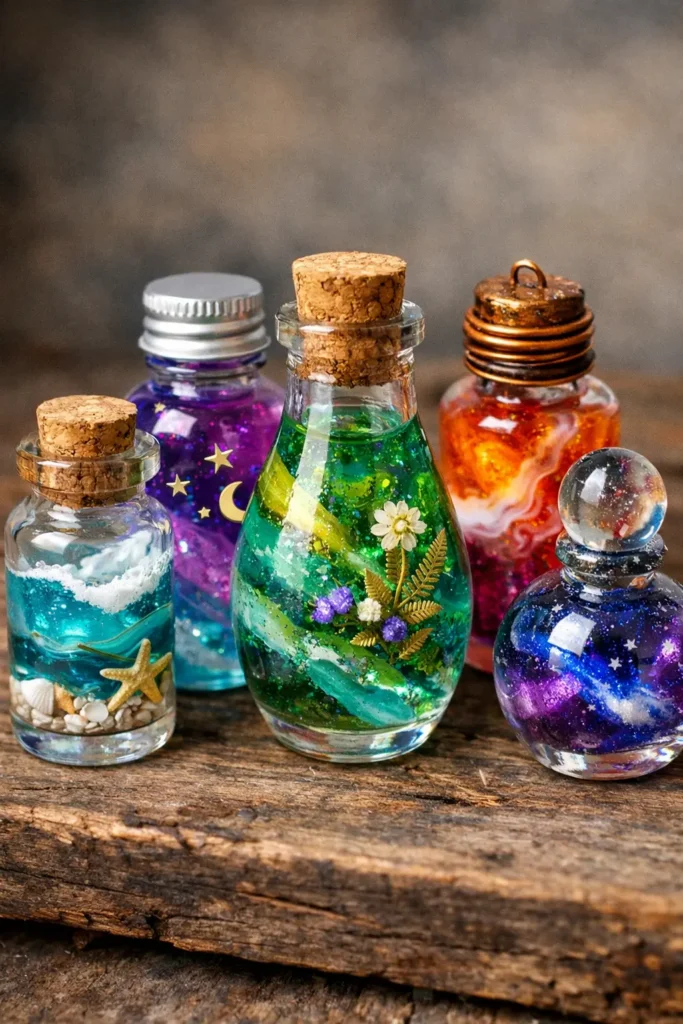
Beach and Ocean Themed Bottle Charms

Capturing the essence of the seaside in a tiny bottle creates a wearable memento of beach vacations or a reminder of ocean tranquility. Start with fine white or tan sand as your base layer, filling the bottle approximately one-third full. Add tiny shells collected from beach walks or purchased from craft stores. Miniature starfish, tiny spiral shells, and fragments of coral create authentic beachy scenes .https://casolia.com/diy-mini-bottle-charms-ideas/
For added dimension, include small turquoise or blue glass beads to represent water or sea glass. A drop of iridescent glitter mixed into the sand catches light beautifully, mimicking the sparkle of sun on water. Some crafters add a small amount of clear glycerin with blue food coloring to create a liquid ocean layer above the sand, though this requires careful sealing to prevent leakage.
Consider creating a layered effect by alternating sand colors. White sand topped with black volcanic sand creates striking contrast, while mixing in crushed shells or pearl dust adds shimmer. Complete the oceanic theme by attaching the charm to a chain with additional small shell or anchor charms, or wrapping the bottle neck with thin copper wire in wave-like patterns.
Fairy Garden and Terrarium Bottles
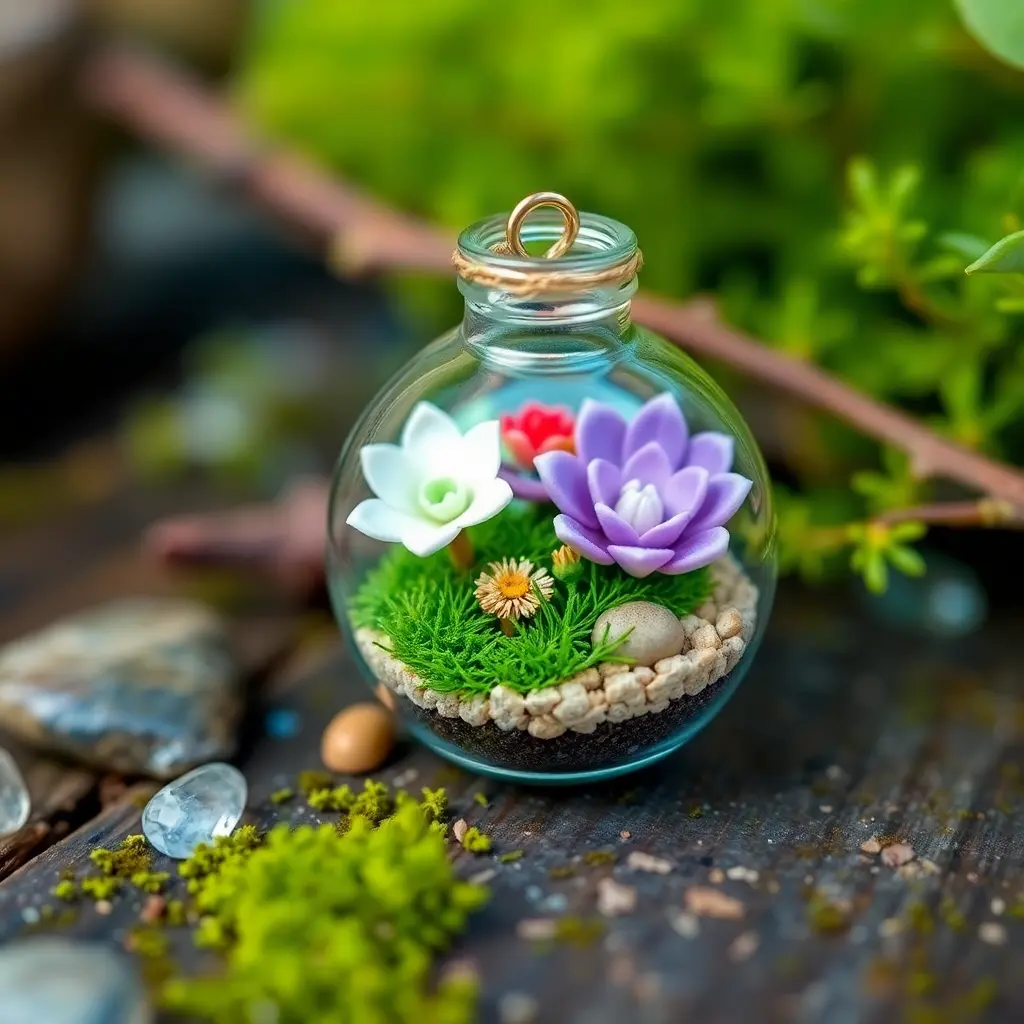
Miniature terrarium charms bring the magic of tiny gardens into wearable art. Begin with a layer of small pebbles or aquarium gravel to represent soil. Add preserved moss, which maintains its color and texture without requiring water or light. Craft stores sell various types of preserved moss in different shades of green, from bright lime to deep forest tones.
Dried flowers add color and delicate beauty to terrarium bottles. Baby’s breath, small rosebuds, lavender buds, and statice all dry well and maintain their form in enclosed spaces. Arrange these elements carefully using tweezers or a thin wooden skewer to position each piece. Some crafters include tiny artificial mushrooms, miniature fairy figurines, or small crystals to enhance the magical woodland aesthetic.
For a more contemporary take, create succulent-inspired charms using polymer clay to sculpt tiny succulents, then arrange them with sand and small stones. Air-dry clay allows you to craft custom miniature plants in any color scheme. Seal terrarium bottles carefully, as exposure to moisture can cause organic materials to deteriorate over time.
Potion and Apothecary Style Bottles
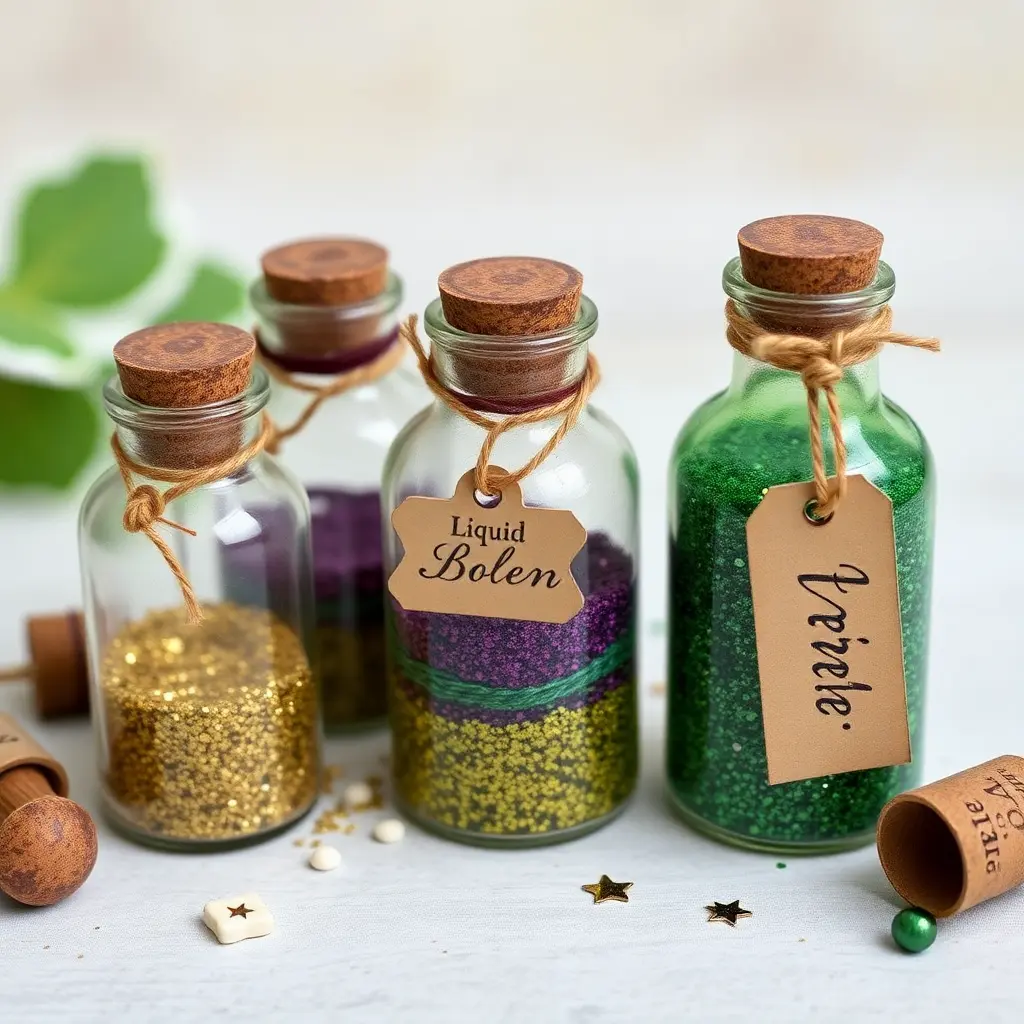
Drawing inspiration from vintage apothecary jars and magical potions creates charms with mysterious, enchanting appeal. Layer different colors of glitter to create the appearance of magical substances. Gold, purple, and emerald green glitters stacked in horizontal bands evoke ancient elixirs and wizard potions.
Mica powder mixed with a small amount of glycerin creates a shimmering, liquid-like appearance without the complications of actual liquids. This technique produces a thick, slow-moving substance that catches light beautifully. Add small star-shaped confetti or metallic flakes to represent magical ingredients suspended in the potion.
Label your potion bottles with tiny handwritten tags. Use aged paper or parchment-style cardstock cut into small rectangles, writing names like “Liquid Luck,” “Dragon’s Breath,” or “Stardust” in calligraphy or printed fonts. Attach these labels with thin twine or ribbon wrapped around the bottle neck. Seal the labels with mod podge or clear nail polish to protect them from wear.
For an authentic vintage appearance, tea-stain your labels before attaching them. The aged look enhances the apothecary aesthetic. Some crafters add a tiny wax seal using miniature sealing wax and stamps designed for doll-making or miniature crafts.
Galaxy and Celestial Themed Charms
Cosmic-inspired bottle charms capture the wonder of the night sky in miniature form. Create galaxy effects using cotton batting as a cloud-like base. Pull the cotton into wispy, irregular shapes and stuff it loosely into the bottle. Apply drops of acrylic paint in deep purples, blues, and blacks directly onto the cotton, allowing colors to blend naturally.
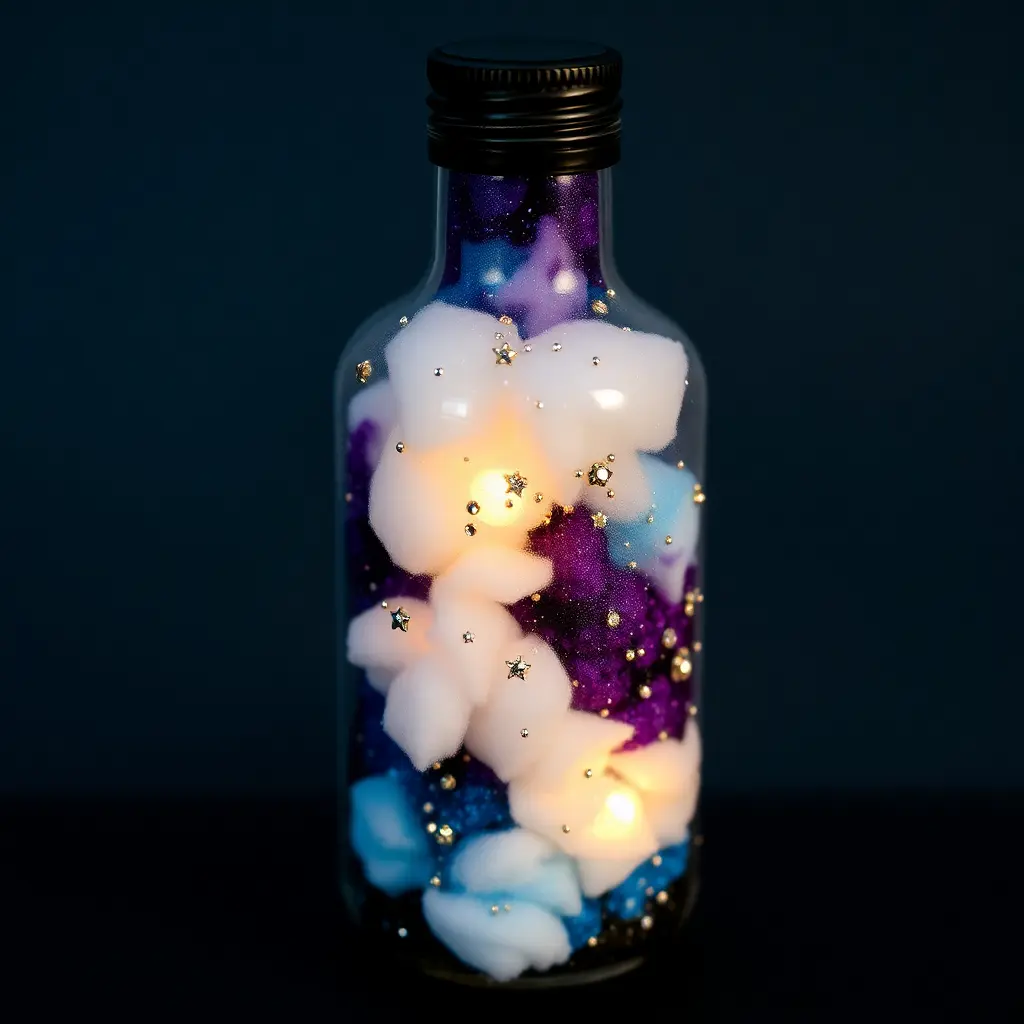
Add fine glitter in silver, gold, or holographic finishes to represent stars and cosmic dust. Micro star-shaped confetti or tiny rhinestones placed strategically create focal points representing bright stars or planets. Some crafters include glow-in-the-dark paint or glitter for a magical effect when lights are dimmed.
Another technique involves layering colored sand in deep space hues. Navy blue, purple, black, and dark teal sands create depth when carefully poured in thin layers. Tilt the bottle while adding each layer to create diagonal stratification mimicking nebula formations. Top with clear glitter to add sparkle without obscuring the color variations.
For a more dimensional approach, fill bottles partially with clear resin tinted with transparent dyes in cosmic colors. Before the resin fully cures, add glitter and small metallic flakes. This method suspends the sparkle throughout the bottle rather than settling at the bottom.
Seasonal and Holiday Bottle Charms
Creating seasonal bottle charms allows you to rotate your jewelry collection throughout the year or craft thoughtful holiday gifts. Winter charms might feature white and silver glitter representing snow, tiny pinecone fragments, or red and green beads for Christmas themes. Miniature snowflake confetti suspended in clear glycerin creates a snow globe effect.
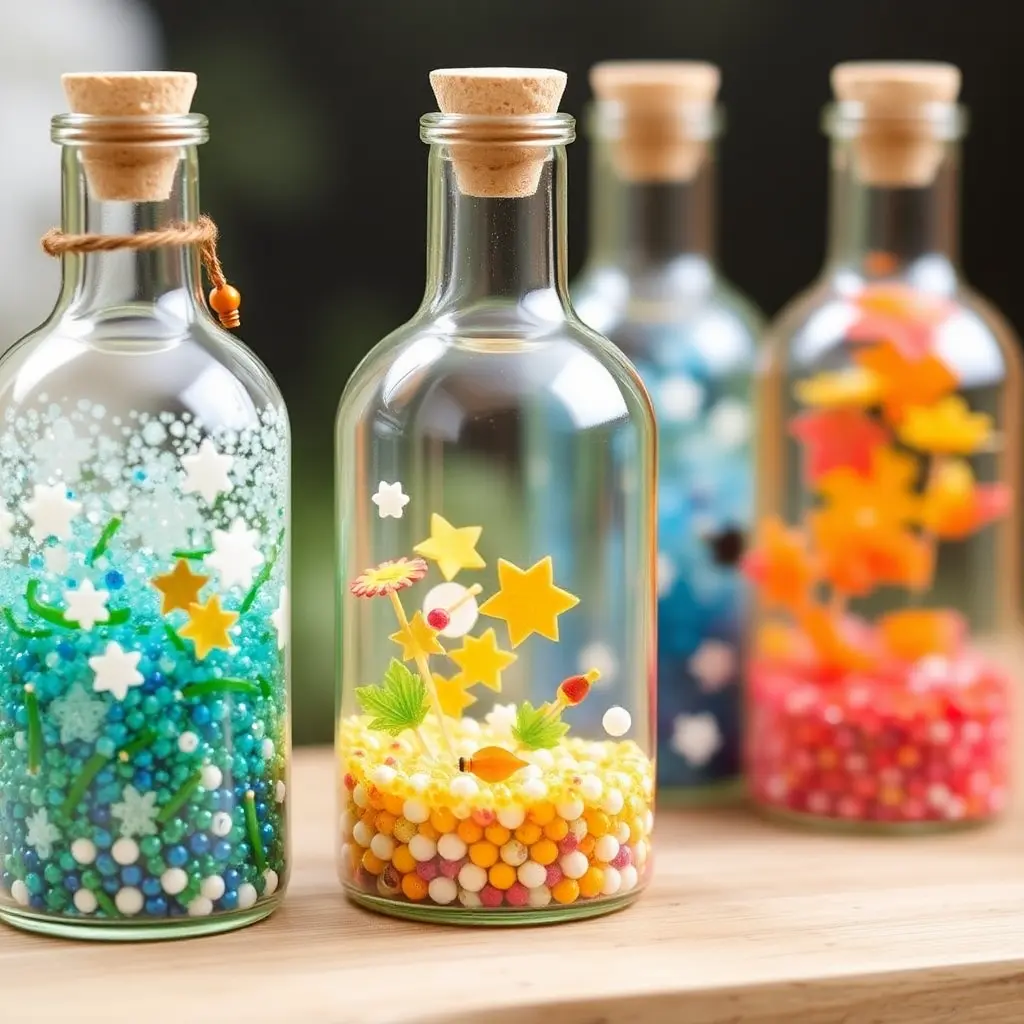
Spring designs incorporate pastel colors, tiny dried flowers, and butterfly confetti. Yellow and pink sands layered with green represent blooming gardens. Easter-themed bottles might include miniature egg-shaped beads or bunny-shaped confetti with pastel glitters.
Summer charms embrace bright, vibrant colors. Fill bottles with layers of rainbow-colored sand, tropical-toned glitters, or tiny umbrella decorations. Miniature fruit-shaped beads or confetti create playful, warm-weather designs.
Autumn bottles feature warm earth tones. Orange, red, and yellow glitters mixed with small leaf-shaped confetti capture fall foliage. Add tiny acorn caps or small pieces of cinnamon stick for textural interest. Halloween variations might include orange and black layers, tiny bat or pumpkin confetti, or purple glitter with black beads.
Message and Wish Bottles
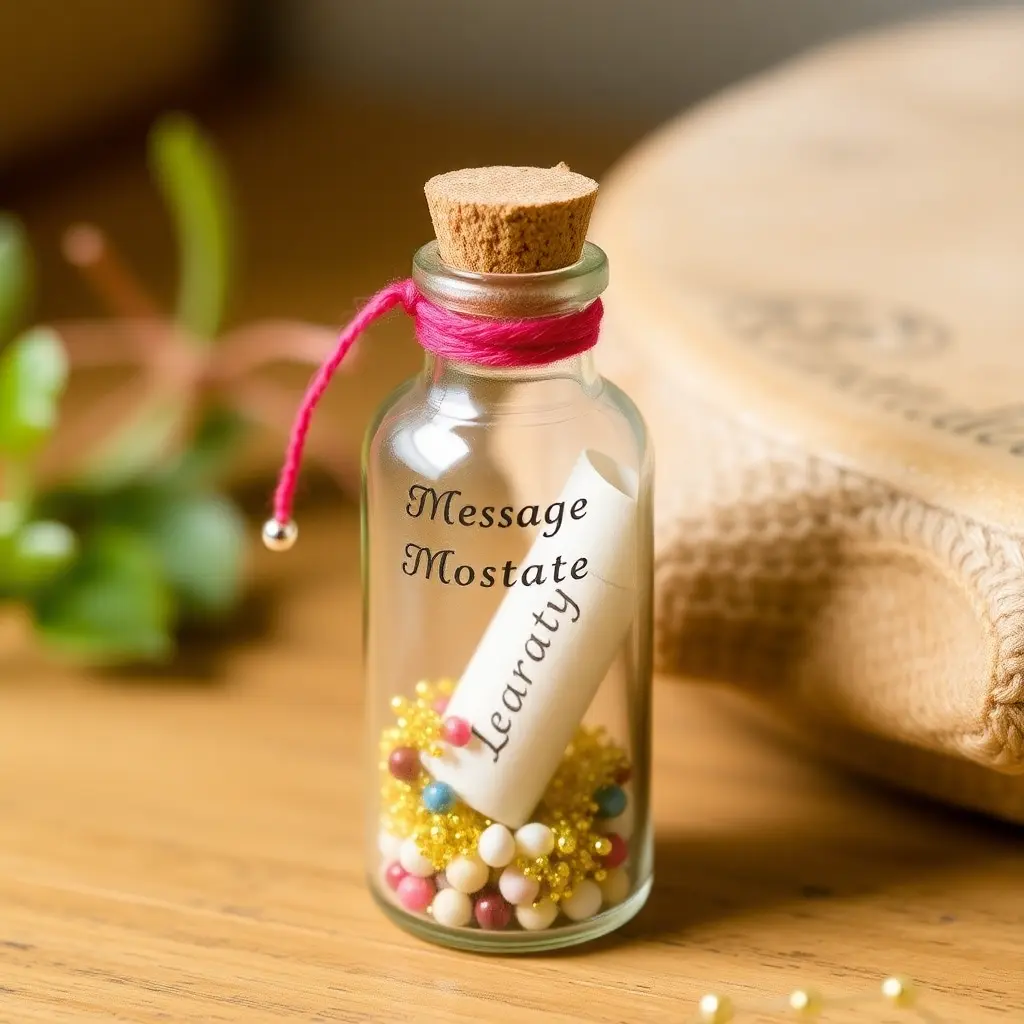
Tiny scrolls containing personal messages transform simple bottles into meaningful keepsakes. Write messages, wishes, quotes, or affirmations on thin paper strips using fine-point pens. Age the paper with tea-staining for a vintage appearance, or use decorative papers in colors matching your design scheme.
Roll the messages tightly and secure with thin ribbon or thread before inserting into bottles. The visible portion of the scroll becomes part of the design, so choose ribbon colors that complement your overall aesthetic. Some crafters fill the remaining space around the scroll with sand, small beads, or glitter to add color and prevent the message from shifting.
Coordinate filling materials with the message theme. Bottles containing love notes might include pink and red glitters with small heart-shaped confetti. Wish bottles could feature star-shaped elements and gold glitter. Inspirational quote bottles pair well with peaceful blue tones and small gemstone chips.
For gift-giving, create sets of message bottles with different quotes or wishes, allowing the recipient to wear different messages based on their mood or needs. This personalization adds emotional value beyond the aesthetic appeal of the charm.
Birthstone and Crystal Healing Bottles
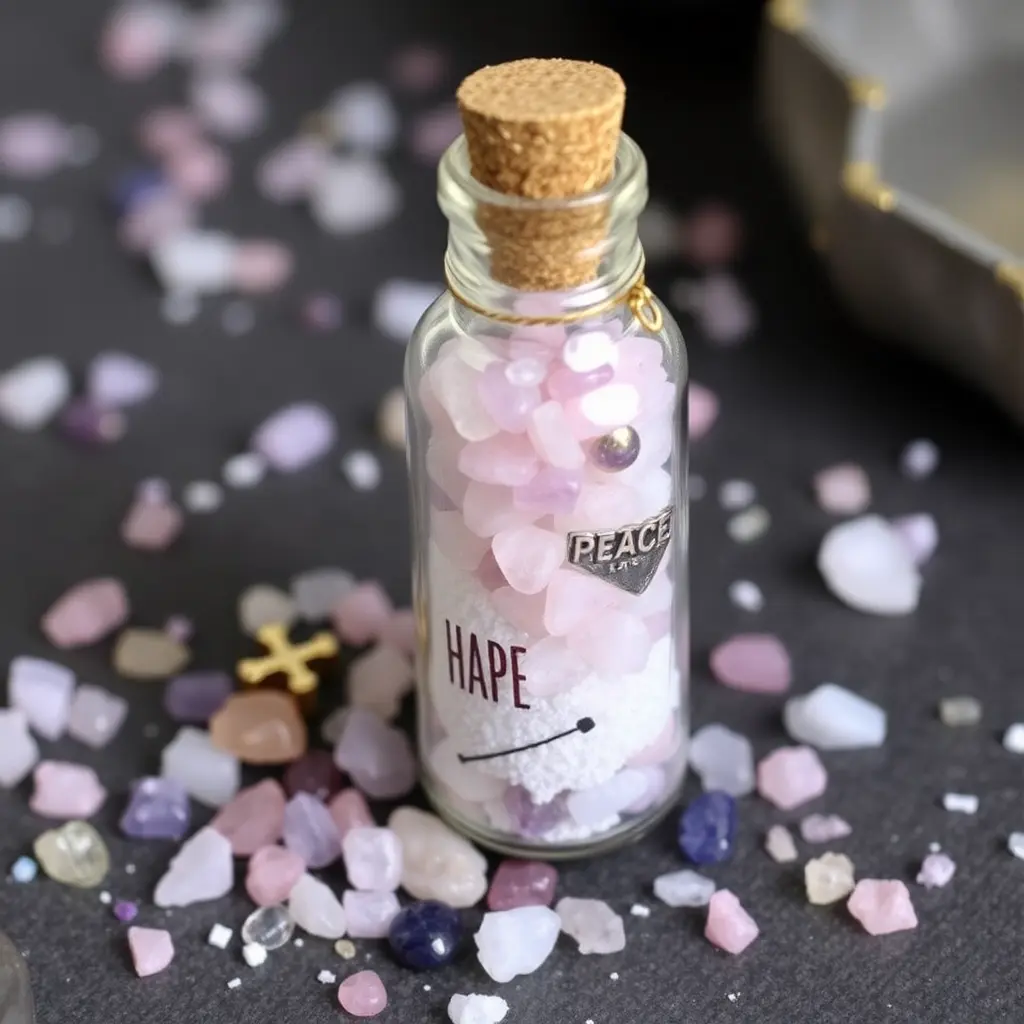
Incorporating genuine gemstone chips creates charms with both visual appeal and potential metaphysical significance. Small chips of amethyst, rose quartz, citrine, or other stones fill bottles beautifully while remaining affordable. Group stones by color for monochromatic designs, or combine complementary stones based on their attributed healing properties.
Layer gemstone chips with coordinating glitter or sand to enhance color while stretching more expensive materials. A base layer of matching sand topped with a smaller amount of gemstone chips creates the appearance of a fuller stone bottle at lower cost. Clear or white sand works well for lighter stones like rose quartz or clear quartz, while darker sands complement amethyst or black tourmaline.
Create birthstone charms as personalized gifts by using stones associated with birth months. Add small metallic numbers or initial charms inside the bottle for additional customization. These make thoughtful birthday gifts or coming-of-age presents.
For those interested in crystal healing properties, combine stones with complementary attributes. A calming blend might include amethyst for peace, rose quartz for love, and blue lace agate for tranquility. Protection blends could combine black tourmaline, hematite, and clear quartz.
Miniature Ecosystem Bottles
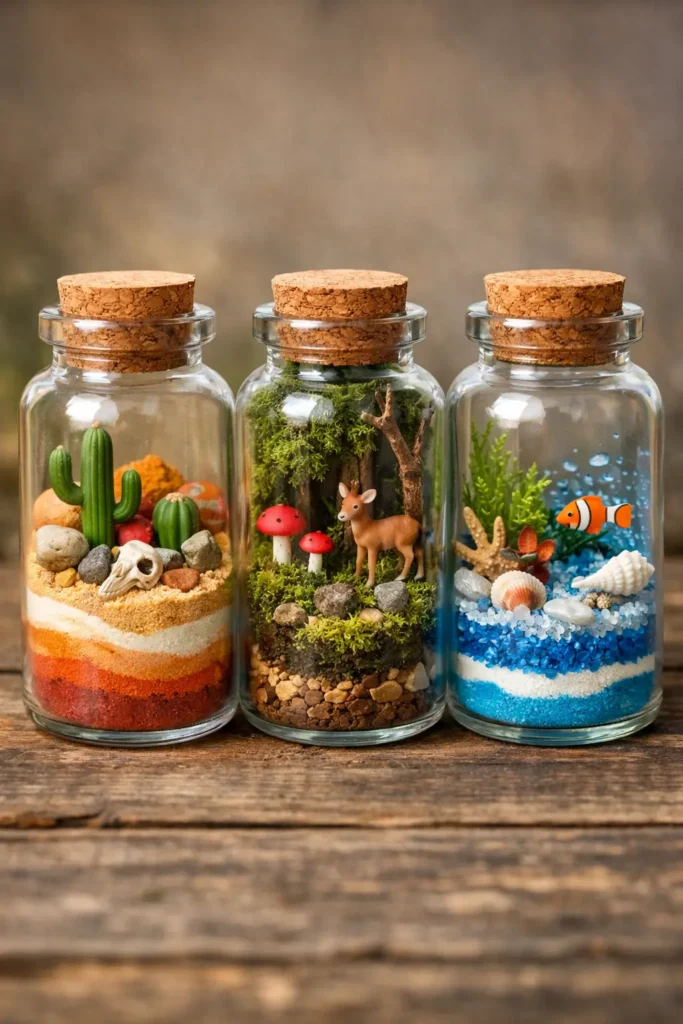
Creating self-contained miniature worlds within bottles offers complexity and visual interest. Layer different textures and materials to represent various ecosystems. Desert scenes might include multiple colors of sand representing rock strata, small tumbled stones as boulders, and tiny artificial cacti made from polymer clay.
Woodland ecosystems combine moss, small twigs, tiny pinecones, and forest-colored sands or gravels. Add miniature mushrooms or small animal figurines if the bottle size permits. Aquatic themes layer blue-tinted sand or gravel with small shells, representing underwater environments.
The key to successful ecosystem bottles lies in careful layering and proportion. Use tweezers or thin tools to position each element precisely. Create depth by placing larger elements at the back and smaller details toward the front opening. This arrangement creates the illusion of greater space within the small container.
Seal ecosystem bottles thoroughly to protect organic materials from moisture and air exposure, which can cause decomposition or mold growth. Apply adhesive around cork stoppers or use bottles with screw caps for better protection.
Glitter and Shimmer Gradient Bottles
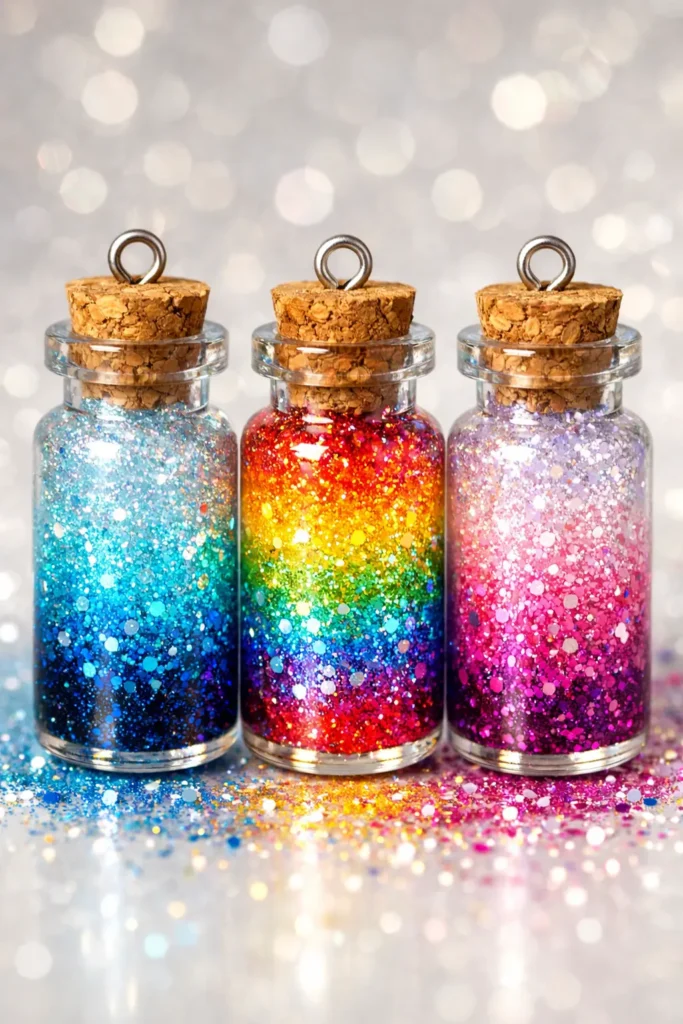
Mastering gradient techniques with glitter creates stunning visual effects in bottle charms. Select three to five glitter colors in a single color family, ranging from light to dark or progressing through the spectrum. Ultra-fine glitters work best for smooth gradients, while mixing fine and medium sizes adds textural variety.
Begin with the darkest color, filling approximately one-fifth of the bottle. Tap the bottle gently on your work surface to settle the glitter evenly. Add the next color, slightly overlapping the first layer. Continue this process with progressively lighter shades, creating smooth color transitions.
For rainbow gradients, progress through spectral colors in order. Red to orange to yellow to green to blue to purple creates classic rainbow effects. Metallic glitters in these hues add extra dimension and light reflection.
Create ombre effects by mixing glitters at the boundaries between colors. This blending technique produces softer transitions than distinct color bands. Use a thin wire or skewer to gently mix the glitters where layers meet, being careful not to overmix and muddy the colors.
Seal glitter bottles carefully, as the fine particles can escape through imperfect closures. Apply a ring of clear adhesive around the inside of the cap or cork before sealing to lock glitter securely inside.
Resin-Filled Artistic Bottles
Working with resin inside mini bottles opens advanced creative possibilities. Mix small amounts of clear epoxy resin according to manufacturer instructions, dividing into portions for tinting with resin dyes or mica powders. Transparent dyes create glass-like colored effects, while mica powders add shimmer and opacity.
Pour resin in thin layers, allowing each to partially cure before adding the next. This prevents colors from blending completely while creating soft transitions between layers. Tilt bottles at different angles while resin cures to create diagonal or curved color bands.
Embed small objects in resin for three-dimensional effects. Tiny dried flowers, small charms, glitter, or confetti pieces can be positioned in partially cured resin, then covered with additional clear resin to seal. This technique creates the appearance of items floating within the bottle.
Alcohol inks dropped into wet resin create organic, flowing patterns resembling natural stone or abstract art. The inks spread and blend unpredictably, ensuring each bottle is completely unique. Seal resin bottles while the final layer is slightly tacky to ensure the cap or cork bonds to the resin surface.
Work in well-ventilated areas when using resin and follow all safety precautions. Resin requires patience as curing times vary by product and environmental conditions, but the professional-quality results justify the extra effort.
Dried Flower Preservation Bottles
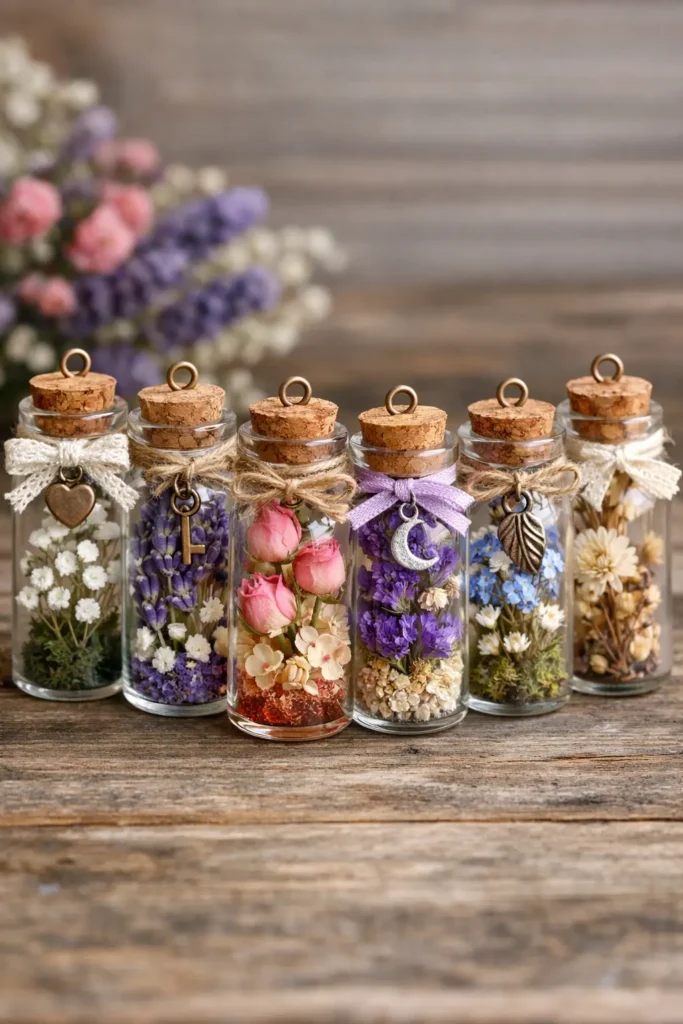
Preserving delicate flowers in miniature bottles creates romantic, nature-inspired charms. Select flowers specifically for drying, such as baby’s breath, lavender, small rosebuds, or statice. Dry flowers completely before bottling to prevent mold or deterioration. Hang them upside down in a dark, dry location for two to three weeks until crispy and fully dehydrated.
Trim dried flowers to appropriate sizes using small scissors or wire cutters. For very small bottles, individual petals or flower heads work better than whole stems. Layer flowers with complementary dried materials like small leaves, seed pods, or grasses for added interest.
Consider color preservation when selecting flowers. Some varieties maintain their colors better than others during the drying process. Purple statice and lavender retain vibrant hues, while white flowers may yellow slightly. Pink roses often fade to antique rose tones, creating vintage appeal.
Add a drop of essential oil to dried flower bottles before sealing for light fragrance. Lavender oil in lavender bottles or rose oil with dried roses creates multisensory charms. Use oils sparingly to avoid saturating the flowers or creating visible oil residue.
For additional protection, some crafters spray dried flowers with clear acrylic sealer before bottling. This adds a layer of protection against humidity and helps preserve colors longer.
Sand Art Pattern Bottles
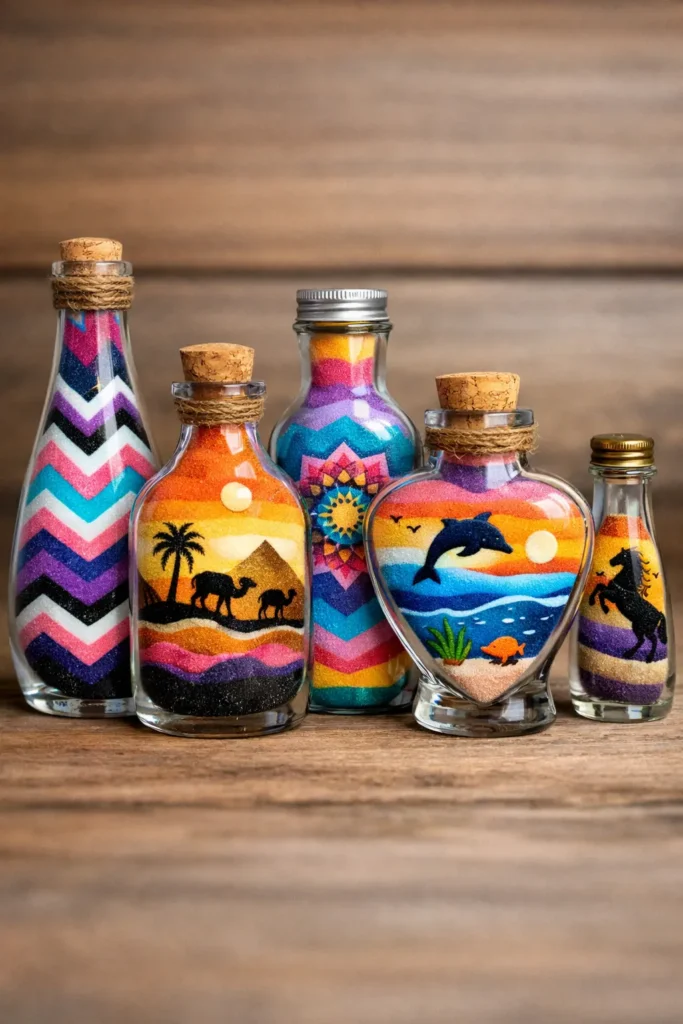
Creating intricate patterns with colored sand requires patience and precision but produces striking results. Purchase or create colored sand in multiple hues. Commercial colored sand offers consistent colors and textures, while homemade versions can be created by mixing white sand with acrylic paint and drying thoroughly.
Layer sand using a small funnel or rolled paper cone to control placement. Create chevron patterns by tilting the bottle at consistent angles while pouring, alternating tilt direction with each color. Straight horizontal layers require holding the bottle level and tapping gently to settle each layer evenly before adding the next.
Advanced sand artists create images or designs by carefully controlling where each color falls. This technique requires practice and steady hands but can produce surprising detail even in small bottles. Use thin wire or toothpicks to manipulate sand after pouring, pushing colors into specific positions to refine designs.
Compact sand layers gently after each addition to prevent settling and pattern distortion over time. Use a thin dowel or skewer to press down lightly on each layer. Avoid over-compacting, which can make layers too dense and affect the overall appearance.
Seal sand art bottles carefully to prevent the fine particles from shifting or escaping. Fill bottles completely to the top, leaving minimal empty space that allows sand to move. Apply adhesive around closures and allow to cure fully before handling.
Personalized Initial and Monogram Bottles
Creating customized bottles with initials or monograms makes these charms perfect for gifts or personal collections. Several techniques allow you to incorporate letters into designs. Small metal or wooden letter charms can be placed inside bottles, surrounded by coordinating beads, glitter, or sand in colors matching the recipient’s preferences.
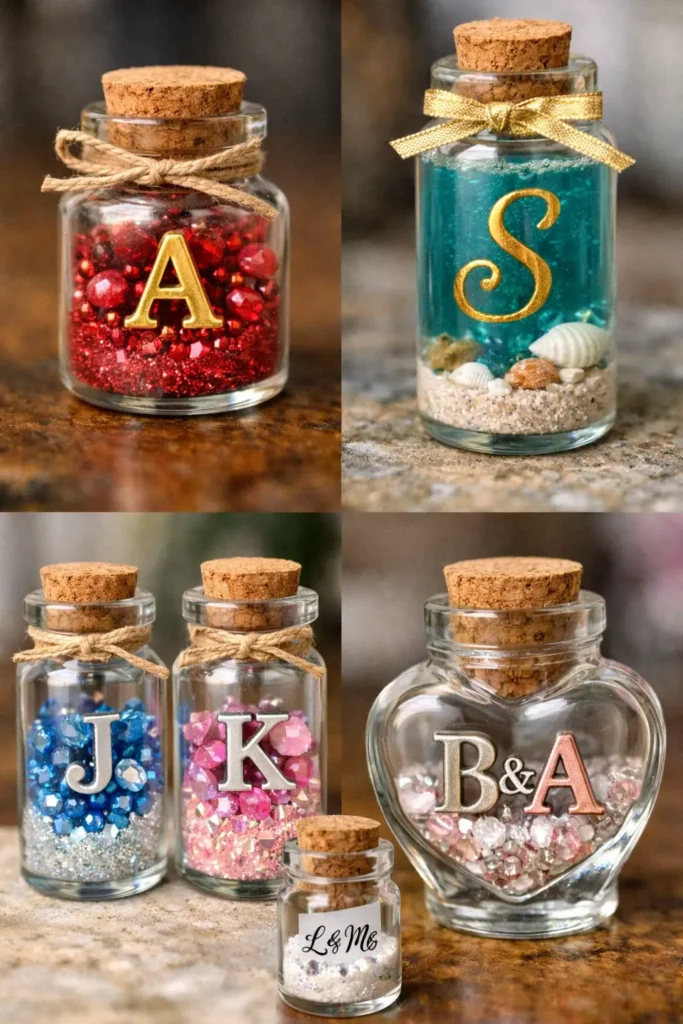
For a more integrated approach, paint letters directly onto the outside of glass bottles using enamel paint or permanent markers designed for glass. Seal painted designs with clear acrylic sealer to protect against wear and chipping. Gold or silver metallic paints create elegant, classic appearances.
Create custom backgrounds for letter charms by coordinating filling colors with favorite colors or birthstones. A bottle containing an initial charm surrounded by birthstone-colored beads and complementary glitter creates a highly personalized piece.
Another option involves printing tiny letters on paper, then rolling them to display through clear bottle sides. This works particularly well with decorative fonts or calligraphy styles. Fill the surrounding space with materials that don’t obscure the visible letters.
For wedding or couple gifts, create matching pairs of bottles with individual initials or combine them in a single bottle with both letters displayed together.
Glow in the Dark and UV Reactive Bottles
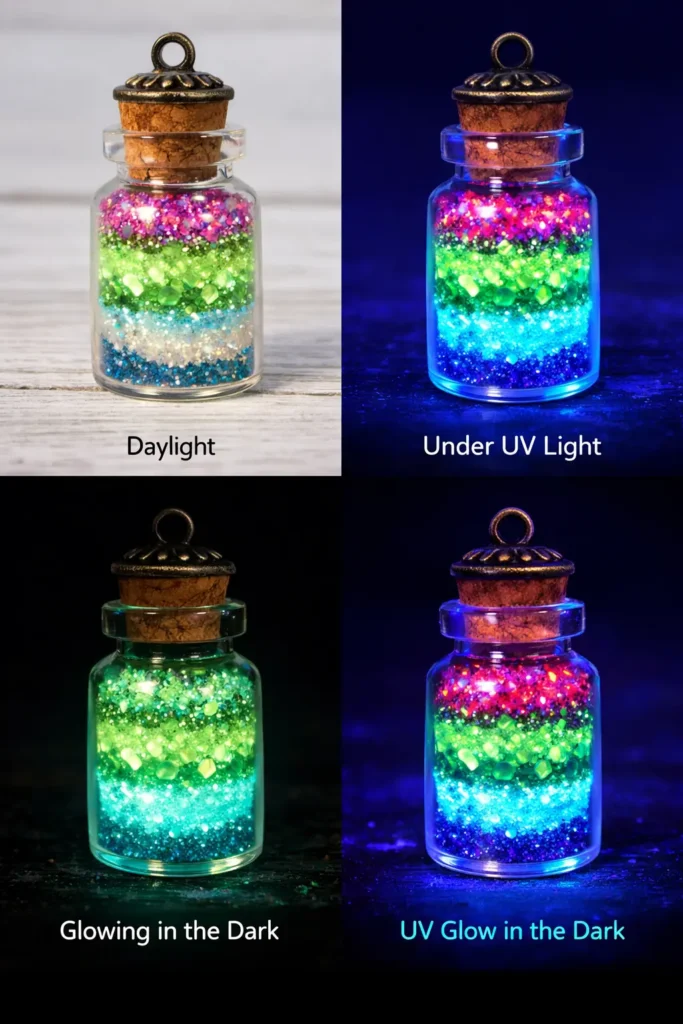
Adding luminescent elements creates charms with surprising nighttime appeal. Glow-in-the-dark glitter, paint, or powder can be mixed with regular materials or used independently. These materials absorb light during the day and emit a soft glow in darkness, creating magical effects.
Layer glow-in-the-dark materials strategically for maximum impact. A base layer of regular glitter or sand topped with glow material creates the appearance of illumination from within. Alternatively, mix glow powder with clear glitter for overall luminescence.
UV-reactive materials respond to blacklight rather than storing light energy. These materials appear in normal colors under regular lighting but glow brilliantly under UV light. Neon glitters, UV-reactive paints, and blacklight-responsive beads create dramatic effects at concerts, parties, or other blacklight environments.
Combine both types of reactive materials in a single bottle for versatility. The piece appears attractive in daylight, glows under blacklight, and emits stored light in darkness. This triple functionality makes these charms conversation pieces.
Charge glow-in-the-dark materials by exposing them to bright light before expecting luminescence. The intensity and duration of the glow depend on the quality of materials and charging time. Higher-quality glow products emit stronger, longer-lasting light.
Memory and Travel Souvenir Bottles
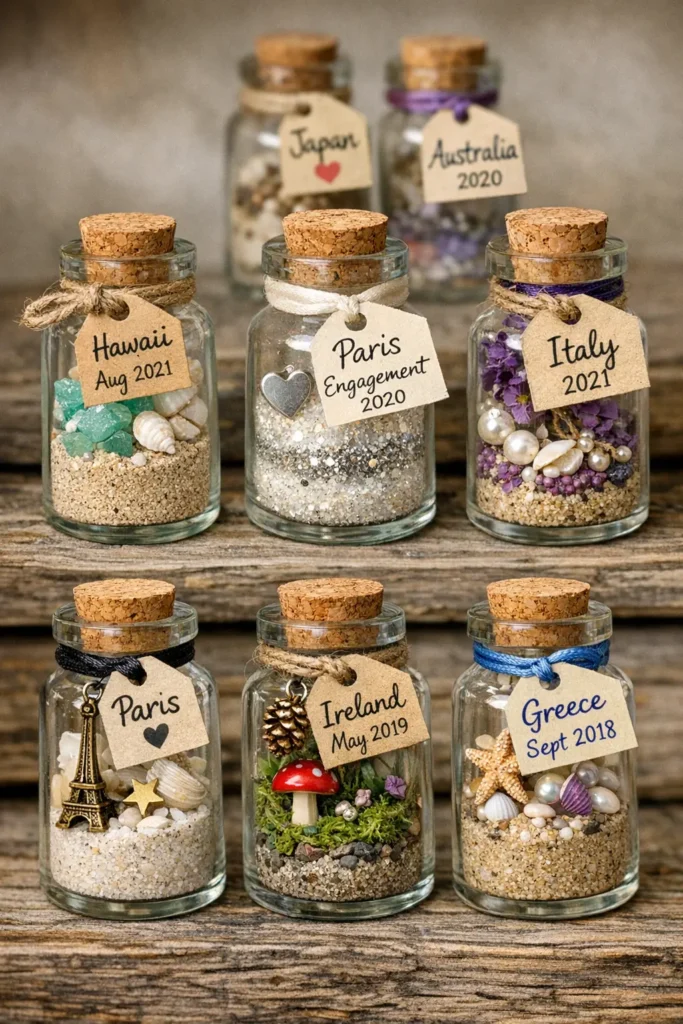
Collecting small mementos from travels or special events and preserving them in bottles creates wearable memory keepsakes. Beach sand from vacation destinations, small shells from memorable shore walks, or tiny flowers from significant locations become personal treasures when bottled.
Label memory bottles with dates, locations, or event names using small tags attached to bottle necks. This documentation transforms simple charms into chronicled memories. Use archival-quality materials for labels to ensure longevity and prevent fading.
Combine natural collected materials with purchased elements to enhance designs while maintaining personal significance. Sand from a beach proposal might be layered with white and silver glitter representing the celebration. Dried flowers from a garden wedding could be arranged with pearls or crystals.
Create themed collections representing extended trips or life phases. A series of bottles from different locations visited during a year abroad or graduation journey becomes a cohesive set that tells a story through jewelry.
Some travelers create bottles for each destination, wearing different charms to remind them of specific adventures. This approach builds a growing collection tied to personal experiences rather than purchased jewelry.
Conclusion
The world of DIY mini bottle charms offers boundless creative opportunities limited only by imagination and the physical constraints of tiny containers. These projects welcome crafters of all skill levels, from beginners creating their first simple glitter-filled bottles to advanced artists working with complex resin pours and intricate layering techniques. The accessibility of materials, combined with the potential for deep personalization, makes bottle charm crafting a satisfying hobby that produces wearable art.
What distinguishes bottle charms from other jewelry projects is their ability to contain complete miniature worlds, each one unique and meaningful. Whether you choose to capture beach memories, create magical potions, preserve delicate flowers, or design abstract color compositions, each bottle becomes a tiny canvas for self-expression. The process itself provides therapeutic benefits, requiring focus and patience while offering immediate visual rewards.
As you develop your bottle charm skills, experimentation becomes key to discovering your personal style. Try different material combinations, explore various sealing techniques, and don’t fear failure. Some of the most beautiful bottles emerge from happy accidents or unexpected material interactions. Document successful formulas and techniques to replicate favorite designs while continuing to push creative boundaries with new ideas.
The gift-giving potential of personalized bottle charms adds practical value to this artistic pursuit. Handmade jewelry carries emotional weight that purchased items cannot match, and the customization possibilities ensure each recipient receives something created specifically for them. Whether you craft bottles as a meditative personal hobby or as a small business venture, the skills you develop will serve you well across numerous creative applications.
Start your bottle charm journey with simple projects, building confidence and technical skills before attempting more complex designs. Gather basic supplies, choose a design that appeals to you, and begin creating your first miniature masterpiece. The tiny world you create will hang close to your heart, a wearable reminder of your creativity and the magic contained in small things.
Frequently Asked Questions
What type of glue works best for sealing mini bottle charms?
E6000 industrial adhesive provides the strongest, most durable seal for bottle caps and corks. It creates a waterproof bond that withstands daily wear. Apply a thin ring around the inside of the cap or around the cork before inserting, then allow 24 to 72 hours for complete curing. For less permanent options where you might want to change contents, clear-drying craft glue or mod podge works adequately for dry fillings, though it offers less security for liquid-filled bottles.
How do I prevent glitter from leaking out of my bottle charms?
Preventing glitter escape requires proper sealing techniques. Fill bottles completely to minimize empty space where particles can shift. Apply adhesive around the entire contact point between the bottle opening and the closure, creating a complete seal rather than just securing the cap in place. For extra security, dip the sealed closure area in clear nail polish or liquid sealer. Allow all adhesives to cure completely before wearing or handling the charm vigorously.
Can I use real liquids inside mini bottle charms, and what works best?
Real liquids can be used in bottle charms with proper sealing and appropriate liquid selection. Glycerin works excellently as it’s thick, clear, and doesn’t evaporate quickly. Mineral oil or baby oil also perform well and don’t cloud over time. Avoid water-based liquids as they can evaporate, leak more easily, and may cause corrosion on metal components. When using liquids, leave a small air bubble to allow for temperature-related expansion, and seal extremely thoroughly with strong adhesive to prevent leaks.
How long will dried flowers last inside a sealed bottle charm?
Properly dried and sealed flowers can last for years inside bottle charms when protected from moisture and air exposure. The key is ensuring flowers are completely dried before bottling, as any remaining moisture can cause mold or deterioration. Keep sealed bottles away from extreme humidity or temperature changes. Some color fading may occur gradually over months or years, but structural integrity typically remains intact. Avoid opening sealed flower bottles, as exposure to air and humidity will accelerate deterioration.
Where can I find mini bottles for charm making at affordable prices?
Craft stores like Michaels or Hobby Lobby carry mini bottles in their jewelry-making sections, often with coupons available for discounts. Online marketplaces including Amazon, Etsy, and eBay offer bulk quantities at lower per-unit costs. Scientific supply stores sell laboratory vials that work perfectly for charms. Antique shops sometimes have vintage small bottles with unique shapes. For the most economical options, purchase bottles in bulk sets of 50 to 100 pieces, which reduces individual bottle costs significantly compared to buying singles.