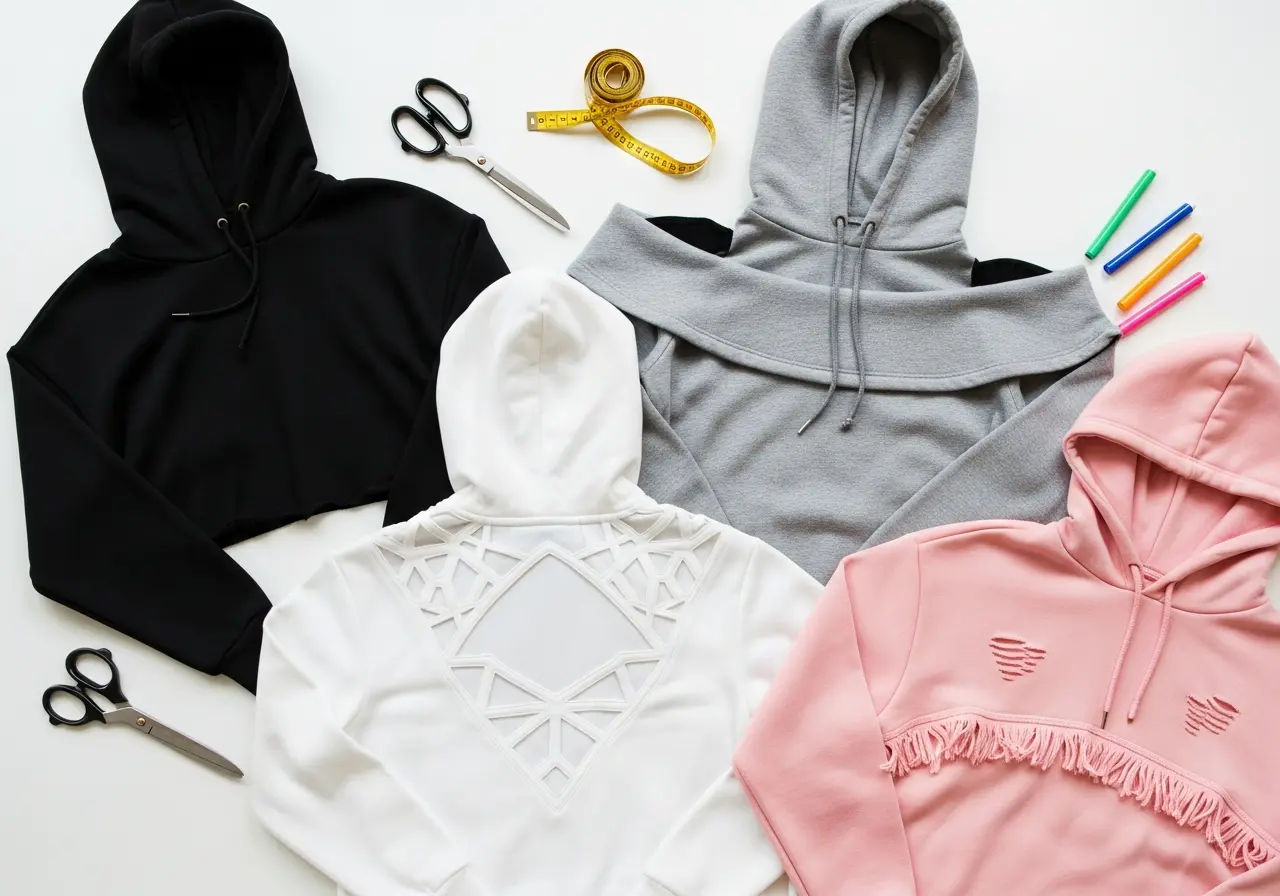
15+ Creative DIY Hoodie Cutting Ideas
Transforming an ordinary hoodie into a fashion statement has never been easier. Whether you have an old sweatshirt gathering dust in your closet or you simply want to refresh your wardrobe without spending a fortune, cutting and customizing hoodies offers endless creative possibilities. The beauty of DIY hoodie cutting lies in its accessibility. You don’t need professional sewing skills or expensive equipment to achieve stunning results that rival high-end boutique pieces.
Hoodie customization has evolved from simple alterations to an art form embraced by fashion enthusiasts worldwide. From cropped styles that show just a hint of midriff to dramatic off-shoulder designs that exude effortless cool, the options are limited only by your imagination. This comprehensive guide walks you through over fifteen creative cutting ideas that will breathe new life into your hoodies while helping you develop a unique personal style.
Before diving into specific designs, it’s important to understand that successful hoodie cutting requires proper preparation. Always wash and dry your hoodie before cutting to prevent unexpected shrinkage after your hard work. Mark your cutting lines with chalk or fabric markers, and remember that you can always cut more but cannot add fabric back. Start conservatively, especially if this is your first project.
Classic Cropped Hoodie
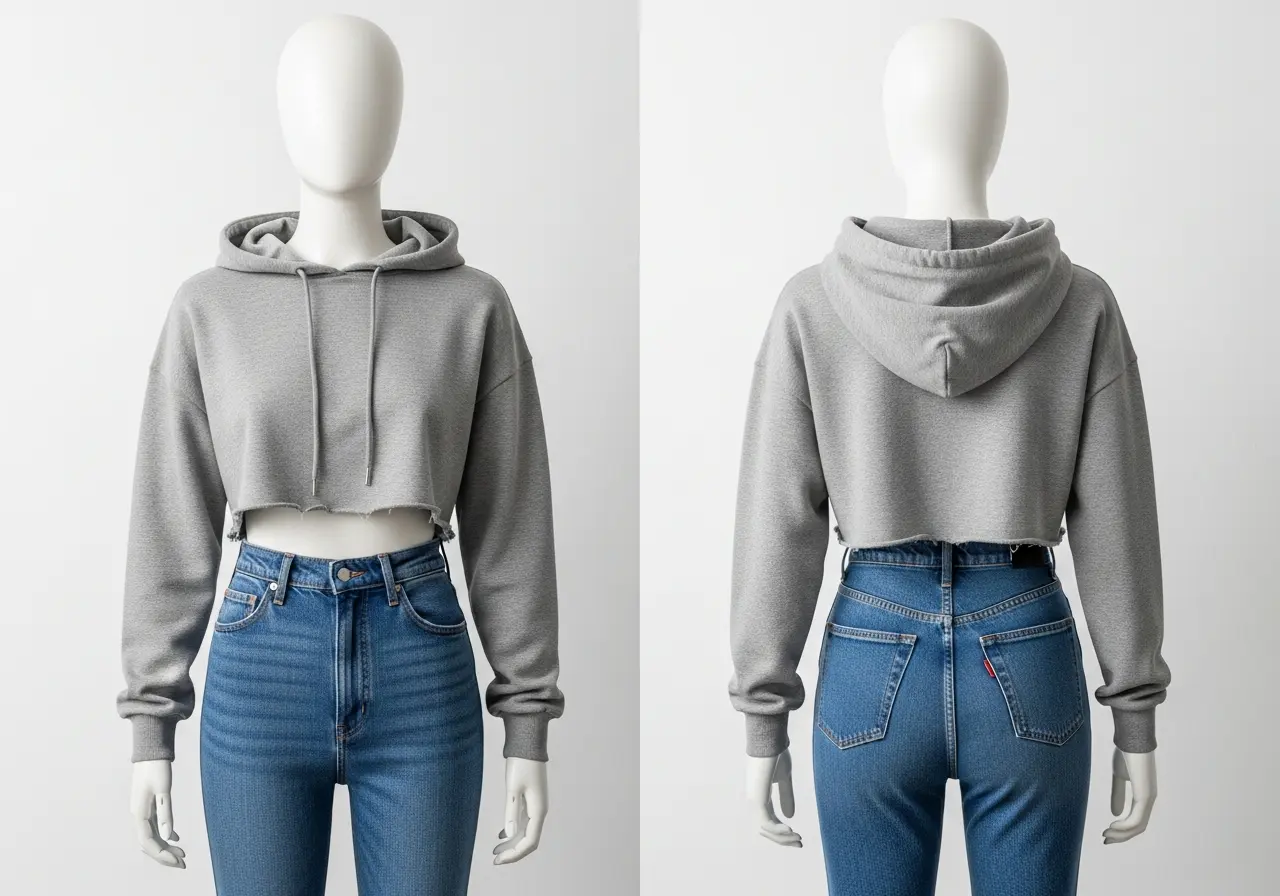
The cropped hoodie remains one of the most popular and versatile cutting styles. This design involves shortening the length of your hoodie to hit anywhere from just below the bust to the natural waistline. The beauty of a cropped hoodie is its ability to pair perfectly with high-waisted jeans, skirts, or leggings, creating a balanced and flattering silhouette.
To create this look, put on your hoodie and determine your desired length using a mirror. Mark a straight line across the front and back, adding an extra inch below your preferred length to account for potential fraying or hemming. Cut carefully along your marked line. For a raw edge finish, simply leave the cut as is and wash the hoodie to create a slightly distressed hem. If you prefer a cleaner look, fold the raw edge under about half an inch and secure with fabric glue or a simple running stitch.
The cropped style works exceptionally well with oversized hoodies, transforming them from shapeless to structured while maintaining that comfortable, relaxed vibe.
Off-Shoulder Design

Off-shoulder hoodies exude a casual yet feminine aesthetic that’s perfect for transitional weather. This style involves removing the neckline and collar area to create a wide opening that drapes across the shoulders. The result is an effortlessly chic look that shows just enough skin while keeping you warm.
Begin by carefully removing the hood itself using a seam ripper or small scissors. Once the hood is detached, cut away the ribbed neckline. To create the off-shoulder effect, extend your cuts diagonally from the center of what was once the neckline down toward each shoulder seam. The deeper you cut, the more dramatic the off-shoulder effect will be.
This design pairs beautifully with a bandeau or stylish bralette underneath, adding layers and visual interest to your outfit. The off-shoulder hoodie works particularly well for spring and fall when you want warmth without feeling completely bundled up.
Cut-Out Back Design
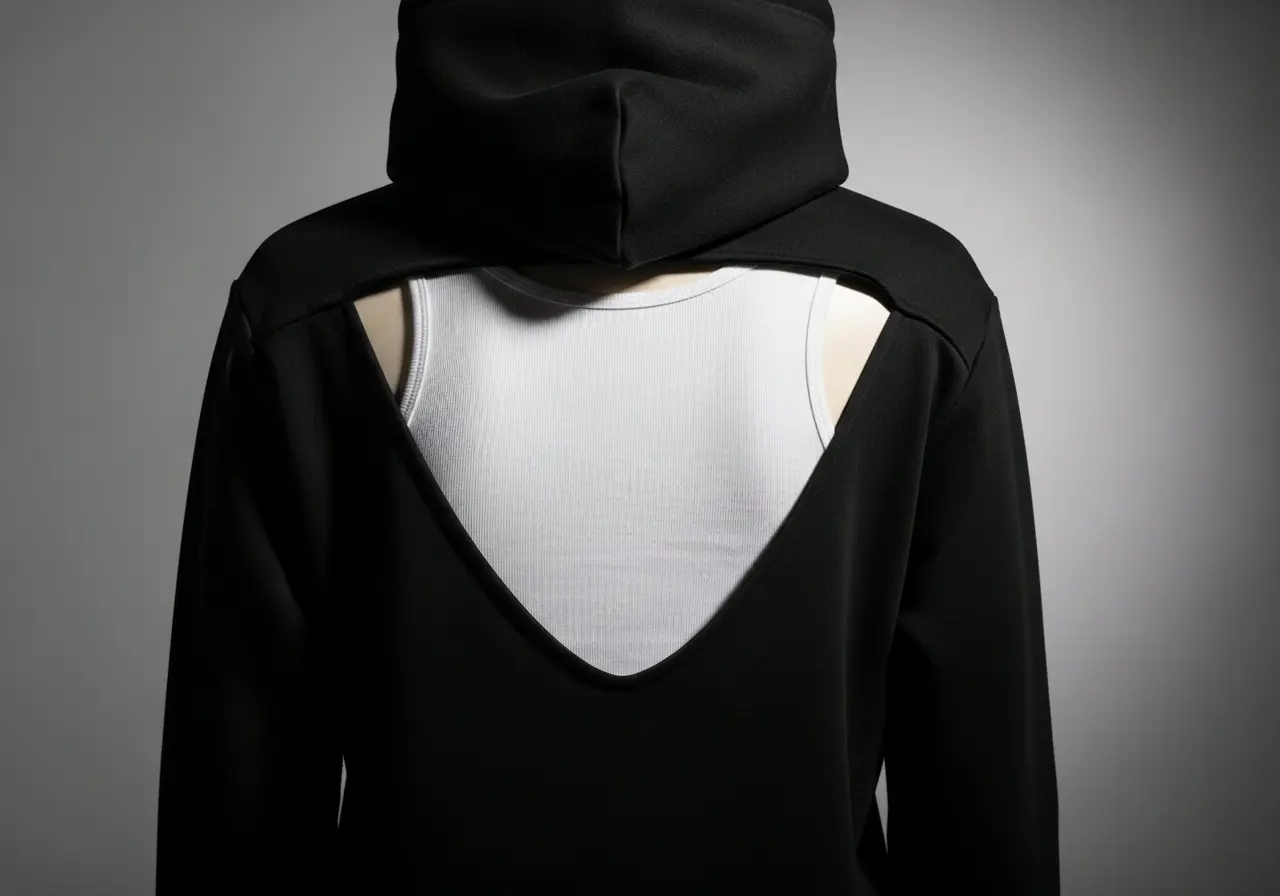
A cut-out back transforms a basic hoodie into a statement piece that looks simple from the front but surprises from behind. This design is perfect for layering over sports bras, tank tops, or graphic tees, allowing you to showcase what you wear underneath while adding dimension to your outfit.
The most common cut-out back design features a large geometric shape such as a triangle, diamond, or rectangle removed from the upper back area. Mark your chosen shape using chalk, ensuring it’s centered between the shoulder seams. Cut carefully along your marked lines, then consider finishing the edges with a rolled hem or leaving them raw for a more edgy, distressed appearance.
For added interest, try cutting multiple smaller shapes instead of one large cutout, or create a lace-up back by cutting two parallel vertical lines and threading ribbon or cord through holes punched along the edges.
Slashed Sleeve Style
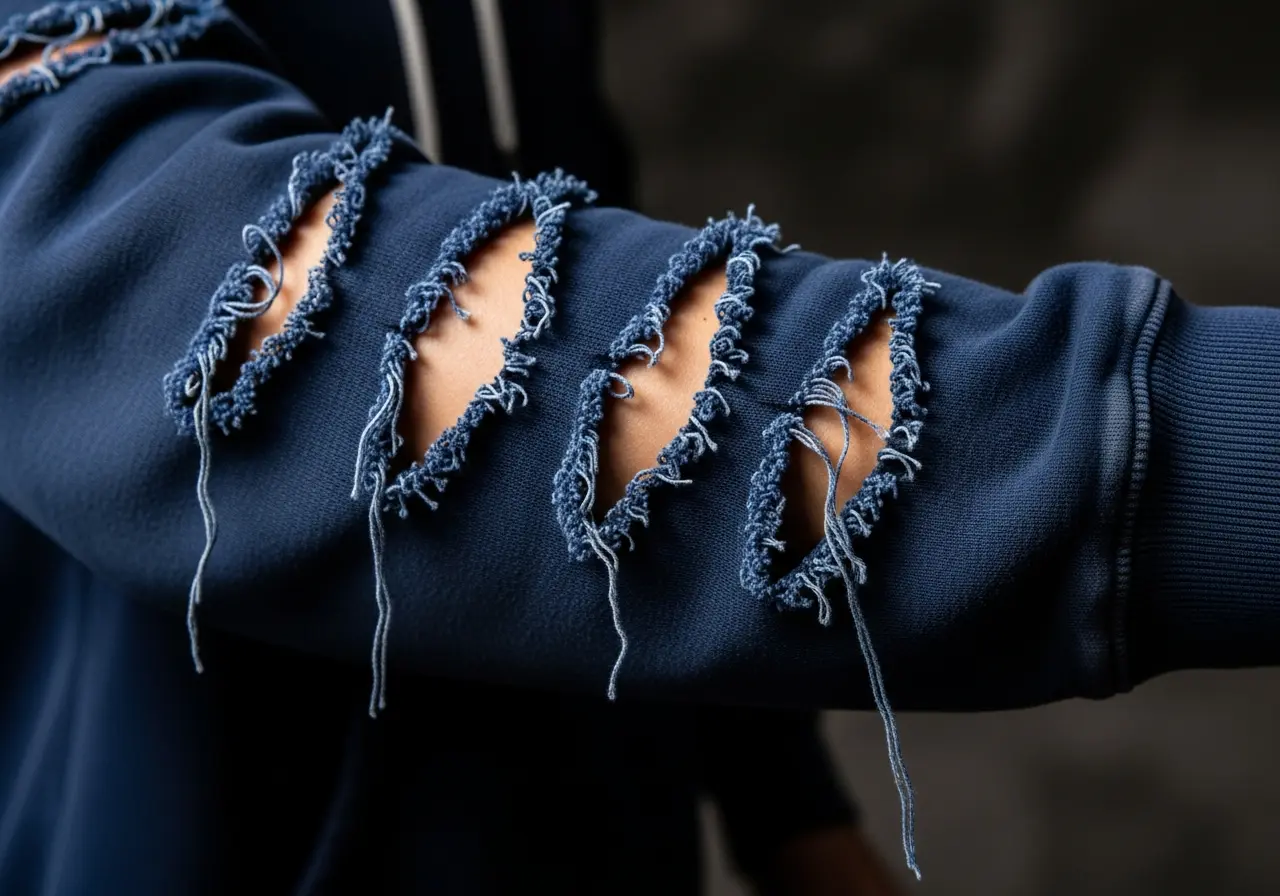
Slashed sleeves add edgy, punk-inspired detail to any hoodie without requiring advanced cutting skills. This technique involves making strategic horizontal or vertical cuts along the sleeves to create deliberate distressing that reveals glimpses of skin or the layers worn underneath.
Start by laying your hoodie flat and deciding on the placement and number of slashes. Horizontal cuts across the sleeve create a striped effect, while vertical slashes running from shoulder to cuff produce a fringe-like appearance. Make your cuts approximately one to three inches long, spacing them evenly for a uniform look or varying the sizes and placement for a more random, organic feel.
After cutting, wear and wash the hoodie several times to encourage natural fraying, which enhances the distressed aesthetic. The beauty of slashed sleeves is that they work equally well on fitted and oversized hoodies, adapting to your preferred silhouette.
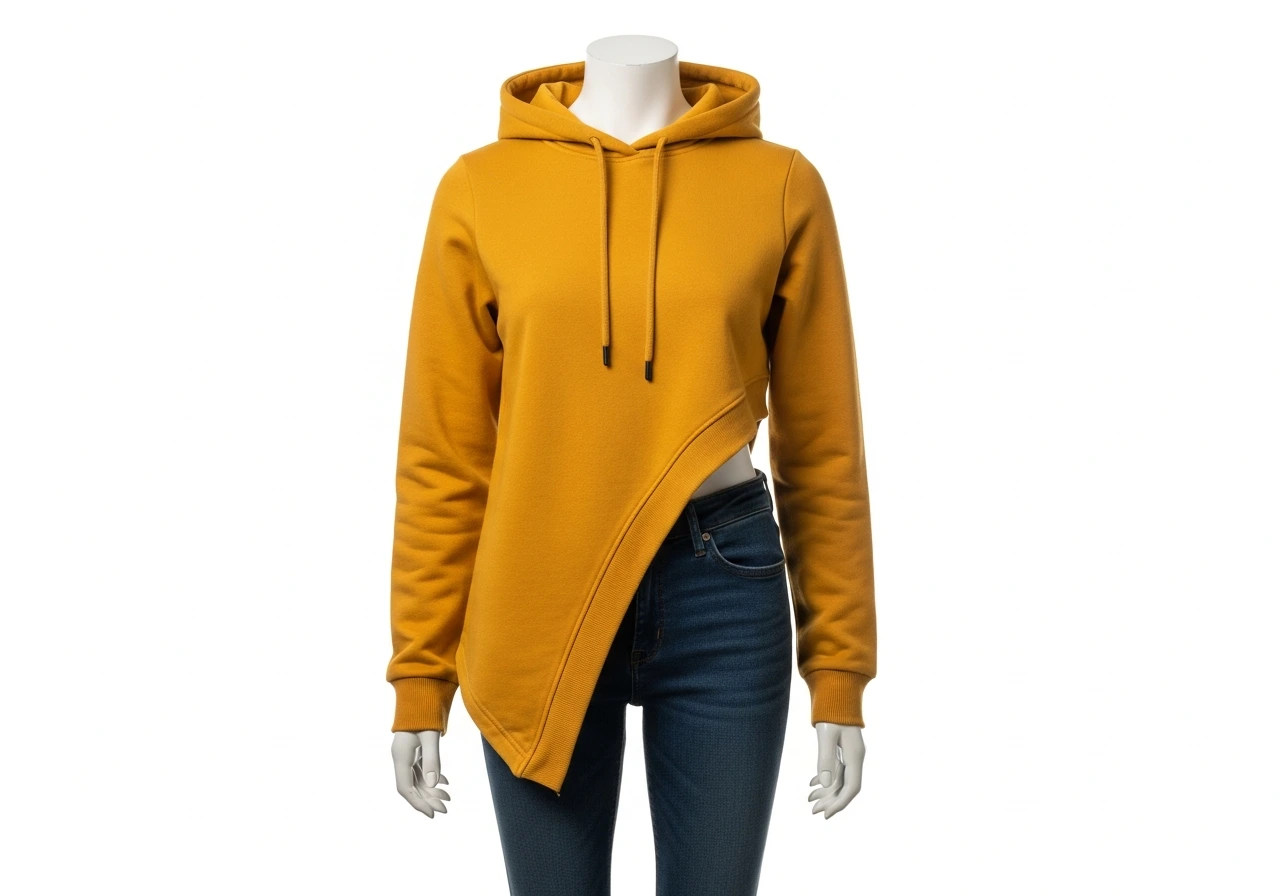
Asymmetrical Hem
An asymmetrical hem breaks away from traditional straight cuts, offering a contemporary and fashion-forward alternative. This design features a hemline that’s intentionally uneven, typically shorter in the front and longer in the back, or vice versa.
To create this look, decide which side you want shorter. A common approach is cutting the front significantly shorter than the back, creating a high-low effect that’s both flattering and modern. Mark your cutting line so it gradually angles from the shorter side to the longer side, creating a smooth diagonal transition.
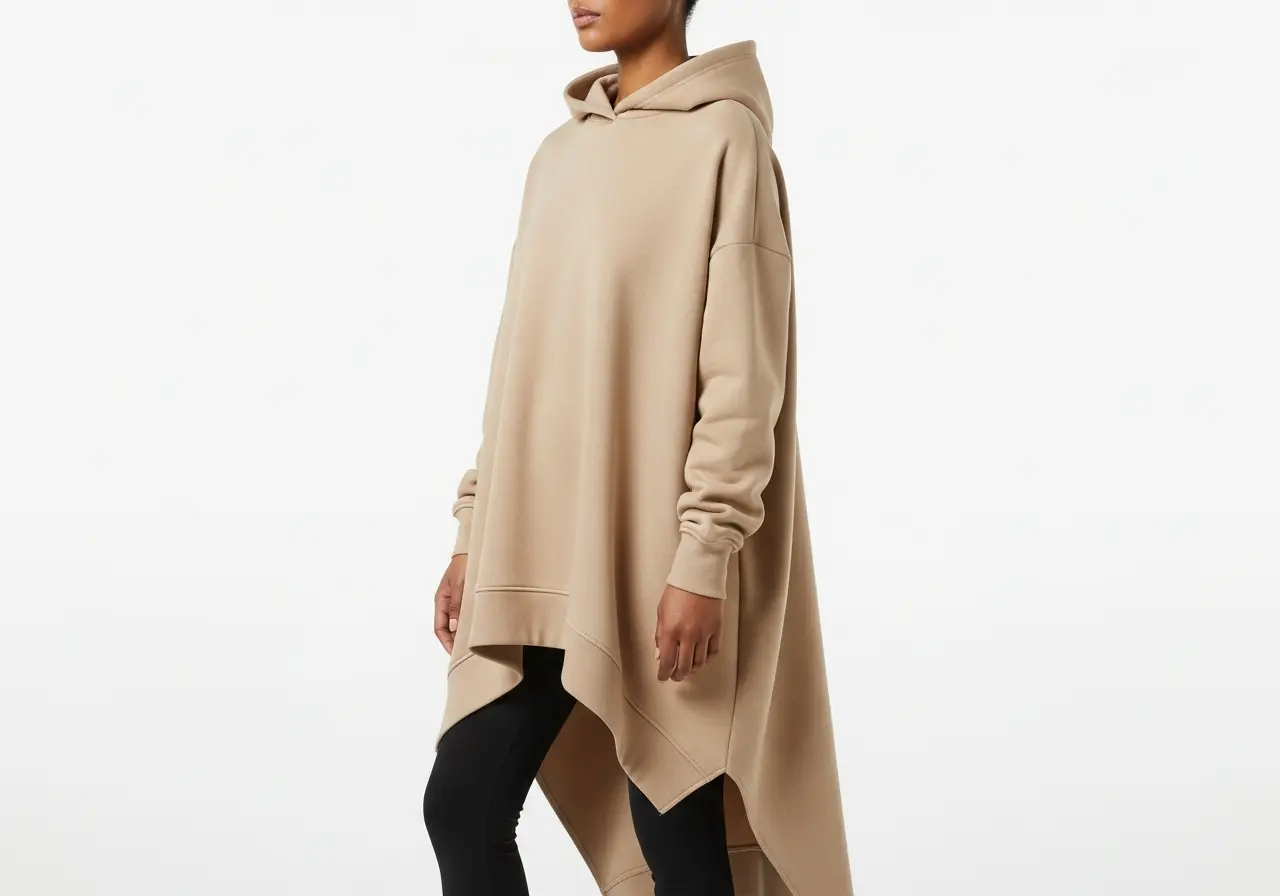
The asymmetrical hem works particularly well with longer, oversized hoodies, transforming them into tunics that pair beautifully with leggings or skinny jeans. This style adds visual movement to your outfit and helps create the illusion of longer legs.
Cold Shoulder Cutouts
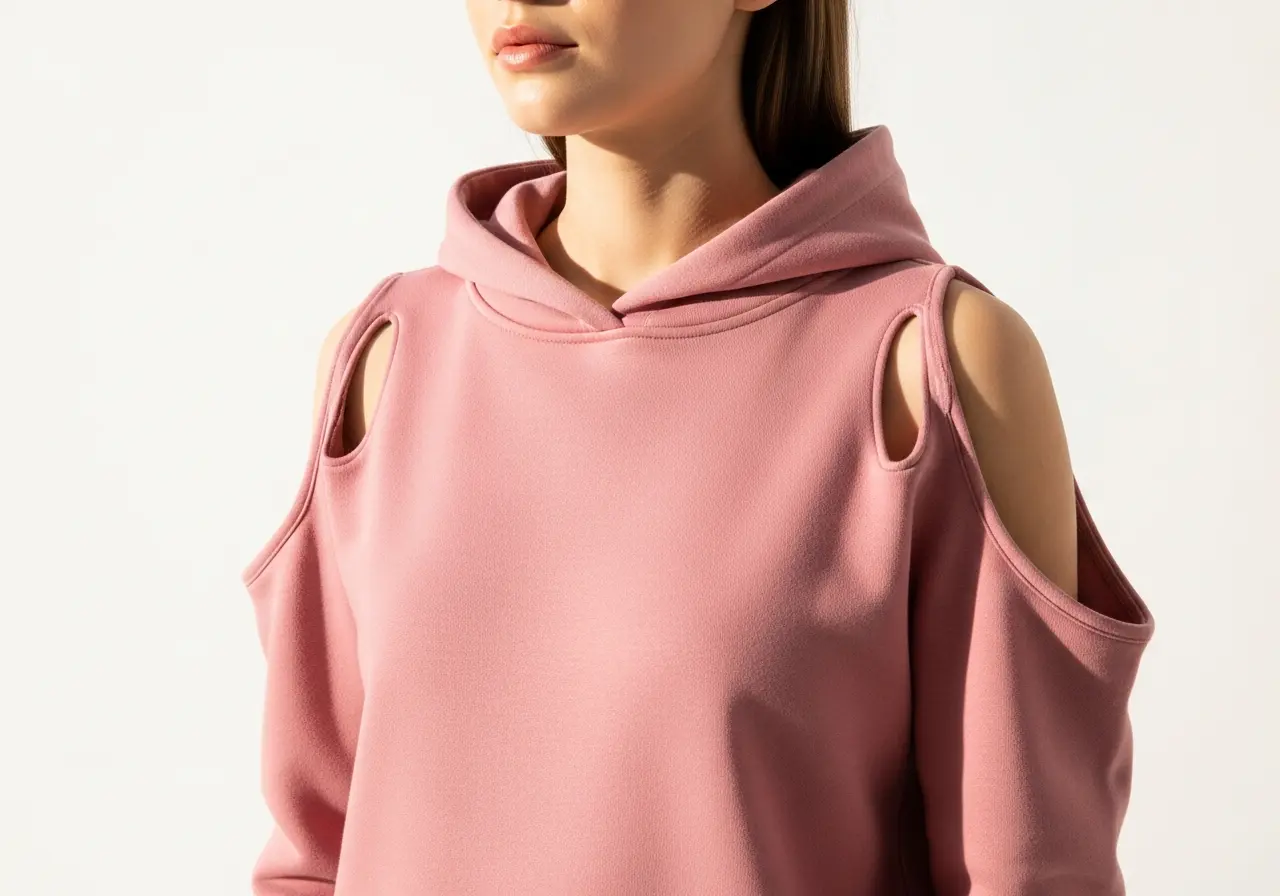
Cold shoulder cutouts offer a middle ground between fully covered sleeves and off-shoulder designs. This style features strategic oval or circular cutouts on the upper arm area, revealing just the shoulders while keeping the neckline and rest of the sleeve intact.
Put on your hoodie and use a mirror to mark where you want the cutouts positioned on each shoulder. The openings are typically placed just below the shoulder seam, though you can adjust based on your preference. Cut oval or circular shapes, keeping them symmetrical on both sides for a polished look.
This design is particularly flattering because it draws attention to the collarbones and shoulders while maintaining the hoodie’s overall coverage and warmth. Cold shoulder styles bridge the gap between conservative and revealing, making them appropriate for various settings.
Fringe Bottom Detail
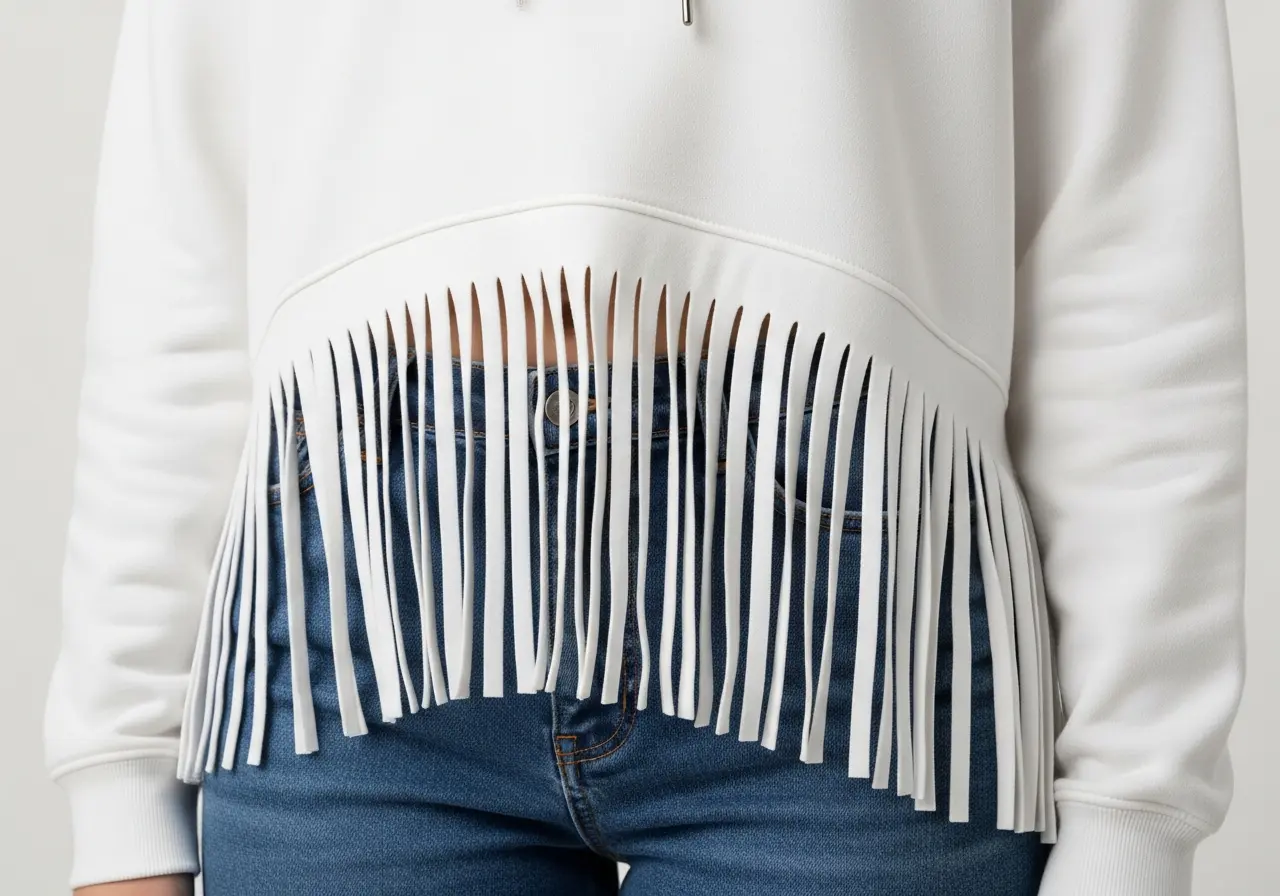
Fringe detailing adds texture, movement, and bohemian flair to any hoodie. This technique involves cutting the bottom hem into thin strips that create a fringe effect, perfect for music festivals, casual outings, or adding personality to workout wear.
Decide how long you want your fringe to be, typically ranging from two to six inches. Mark a horizontal line around the entire bottom of your hoodie at your desired fringe length. Then, using sharp scissors, cut vertical strips from the bottom hem up to your marked line, spacing them approximately half an inch to one inch apart depending on how dense you want the fringe.
For added dimension, try varying the length of the fringe strips, creating a V-shape in the front and back, or knotting pairs of strips together for a macrame-inspired effect. Fringe works exceptionally well on lighter-weight hoodies where the fabric can move and sway naturally.
Lace-Up Sides
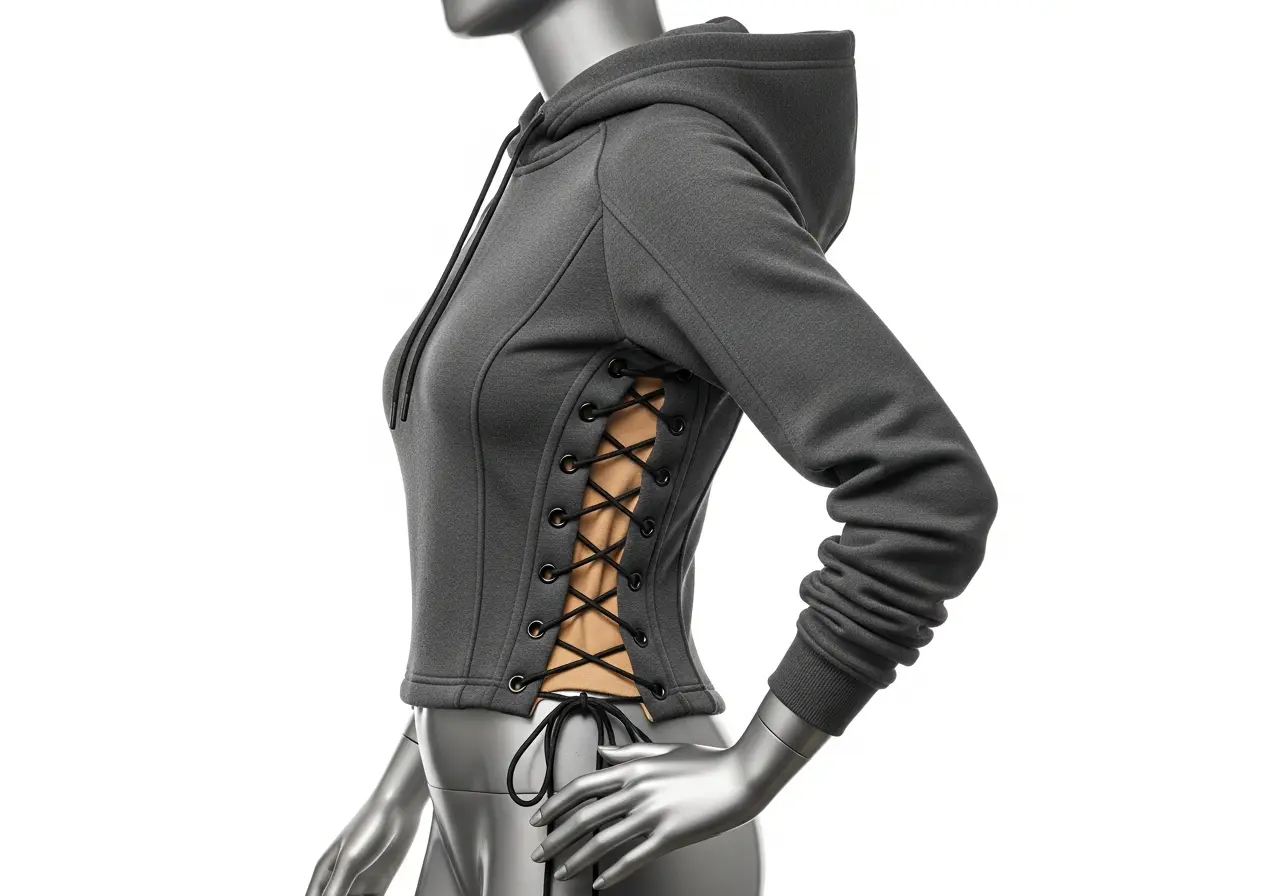
Lace-up sides create an adjustable, customizable fit while adding athletic-inspired detail to your hoodie. This design involves cutting matching vertical slits along both sides of the hoodie and threading ribbon, cord, or shoelaces through them to create a corset-like effect.
Mark two parallel vertical lines along each side seam of your hoodie, spacing them about one to two inches apart. Cut horizontal slits approximately half an inch long at regular intervals along these lines. Using a hole punch on the remaining fabric between slits creates cleaner openings that are less likely to tear.
Thread your chosen lacing material through the holes in a crisscross pattern, similar to lacing shoes. This design allows you to adjust how much skin shows through the sides and creates an interesting silhouette that can be modified based on your mood or what you’re wearing underneath.
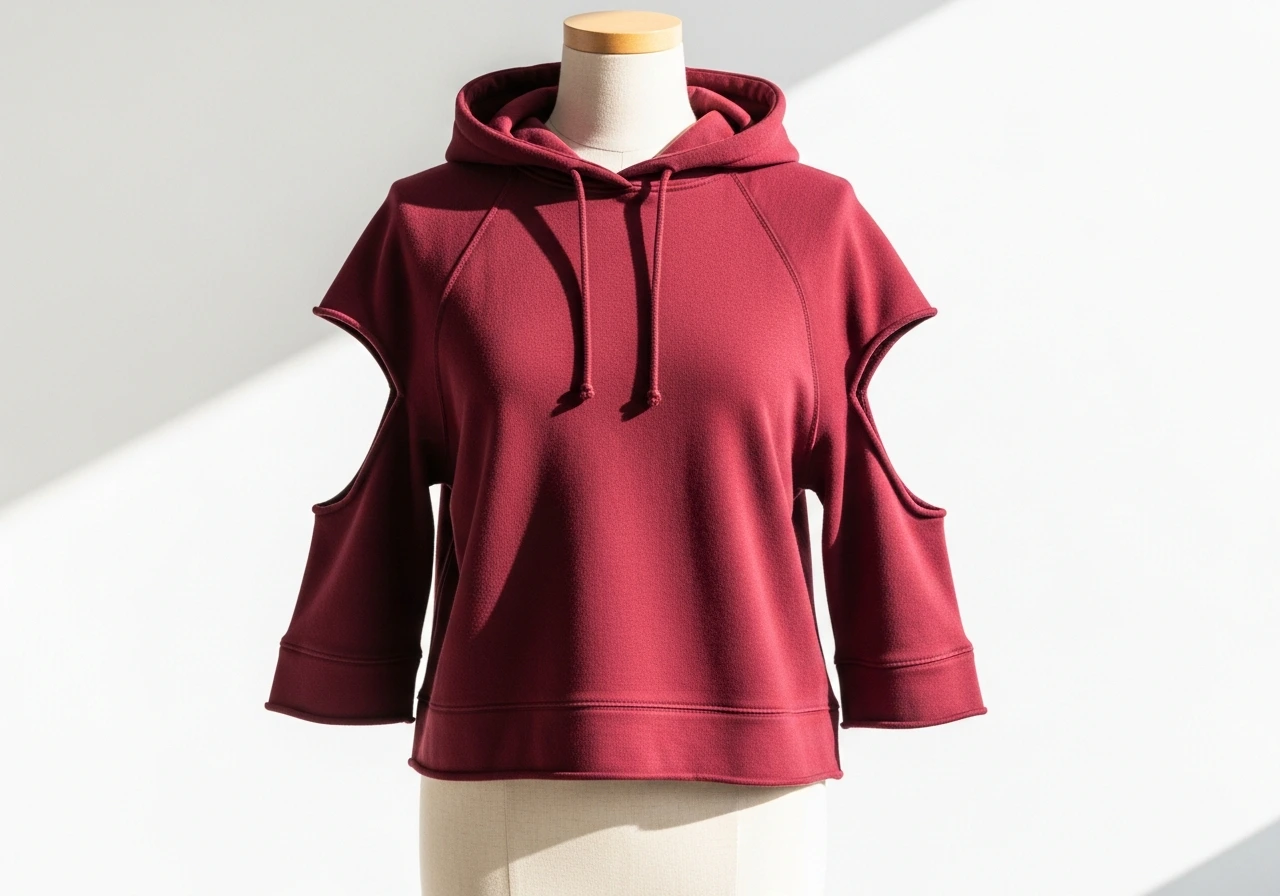
Cutout Shoulders
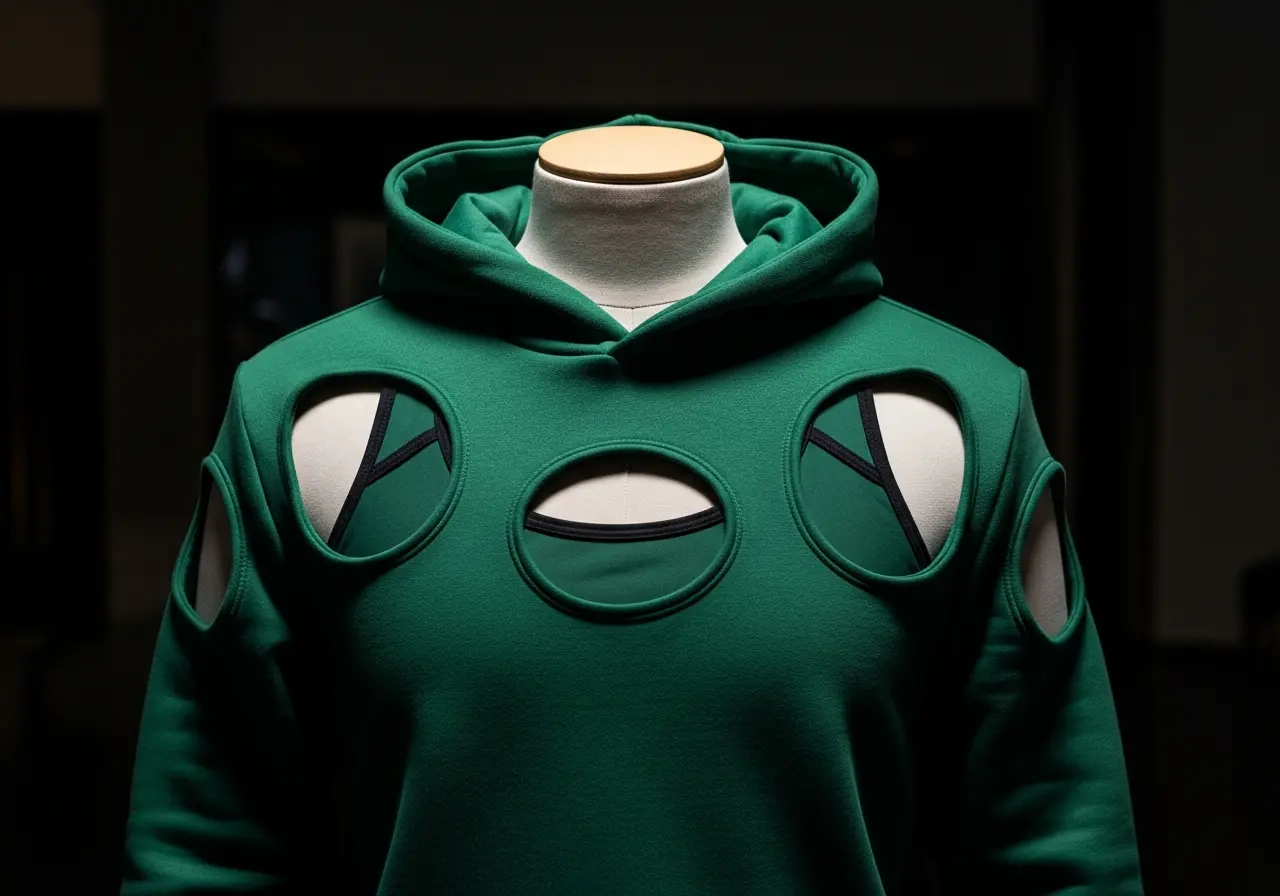
Cutout shoulders differ from cold shoulder styles by removing larger sections of the shoulder area, creating bold, geometric negative space. This dramatic design makes a strong fashion statement and works best with structured, heavier-weight hoodies that maintain their shape despite the missing fabric.
Mark large circular, triangular, or rectangular shapes on the shoulder area of each sleeve. Ensure your cutouts are symmetrical by folding the hoodie in half and cutting both shoulders simultaneously, or by creating a template and tracing it onto each side.
The cutout shoulder design pairs well with interesting bras or layered tank tops that complement the hoodie’s color. This style bridges streetwear and high fashion, creating an avant-garde look that stands out in any crowd.
Hooded Crop with Extended Sleeves

This design combines the popular cropped body with exaggerated, extra-long sleeves for a unique proportion play that’s both cozy and stylish. The contrast between the short body and long sleeves creates visual interest and has become increasingly popular in contemporary streetwear.
Crop your hoodie to your desired short length, typically hitting just below the bust or at the natural waist. The sleeves remain full length or can even be extended by leaving the cuffs unhemmed and allowing them to naturally stretch and lengthen with wear. Some enthusiasts even add fabric to the sleeve ends to exaggerate this effect further.
This style works best with oversized hoodies where there’s plenty of sleeve fabric to work with. The extended sleeves create a protective, cocooning feeling while the cropped body prevents the overall look from becoming too overwhelming.
Diagonal Cut Hem
The diagonal cut hem offers a dynamic alternative to straight or asymmetrical cuts. This design features a hemline that angles diagonally across the entire front or back of the hoodie, creating strong visual lines that draw the eye and add geometric interest.
Lay your hoodie flat and mark a diagonal line from one side hem at your desired highest point to the opposite side hem at the lowest point. The angle can be subtle or dramatic depending on your preference. Cut along this line, ensuring the cut is smooth and continuous.
The diagonal hem creates an elongating effect and adds movement to your outfit. This style is particularly effective when the hoodie’s color contrasts with your bottoms, as it highlights the unique cut line.
Cut and Tied Front
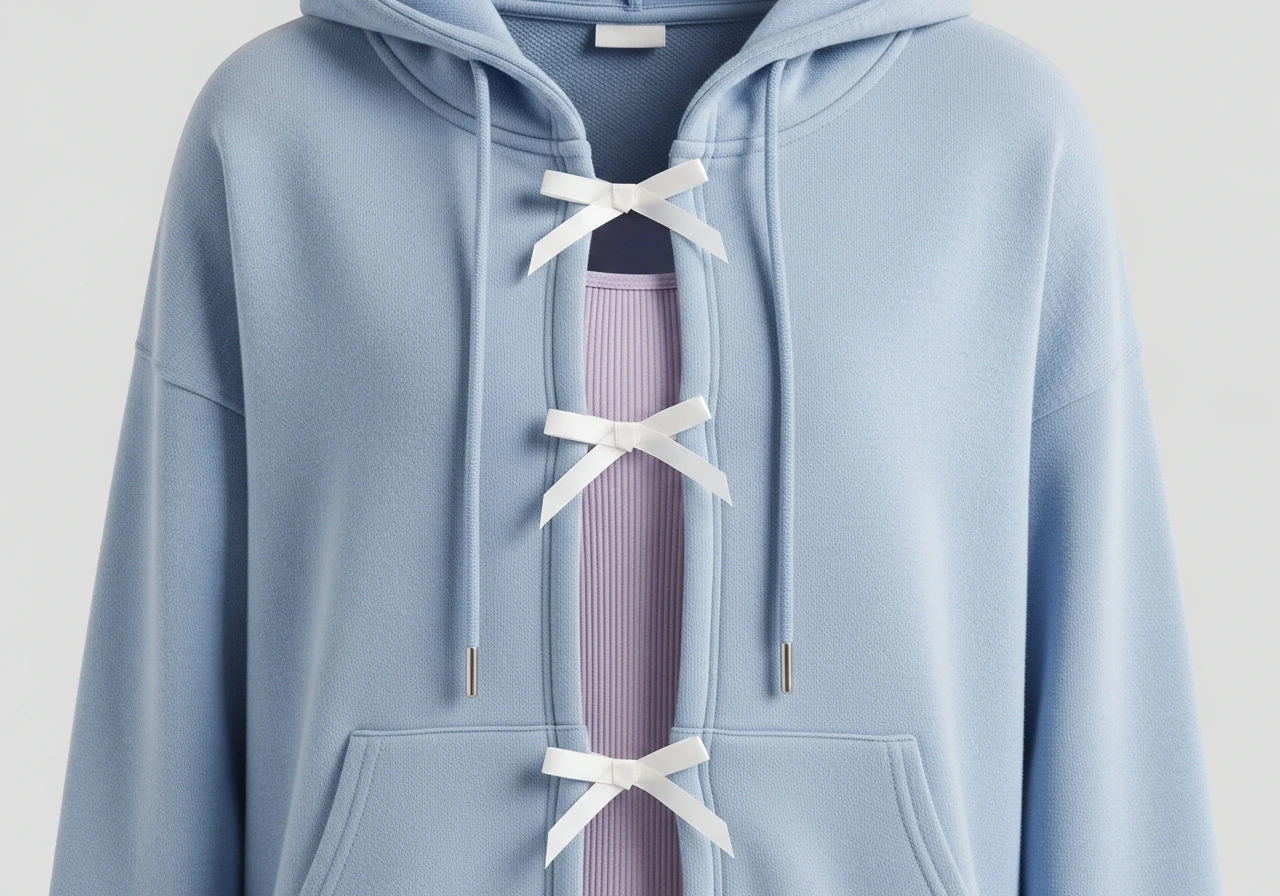
The cut and tied front design adds adjustability and a feminine touch to casual hoodies. This technique involves cutting the front of the hoodie vertically down the center and creating ties at strategic points to hold it together, allowing you to control how much you want to reveal or conceal.
Using sharp scissors, cut straight down the center front of your hoodie from the neckline to the hem. Then, cut small horizontal slits at intervals along both cut edges. Thread ribbon, cord, or strips of contrasting fabric through these slits, creating ties that can be knotted to hold the hoodie closed.
This design lets you wear your hoodie multiple ways: fully tied for more coverage, partially tied for a peek of what’s underneath, or completely open as a cardigan-style layer over tanks or tees.
Deconstructed Hood
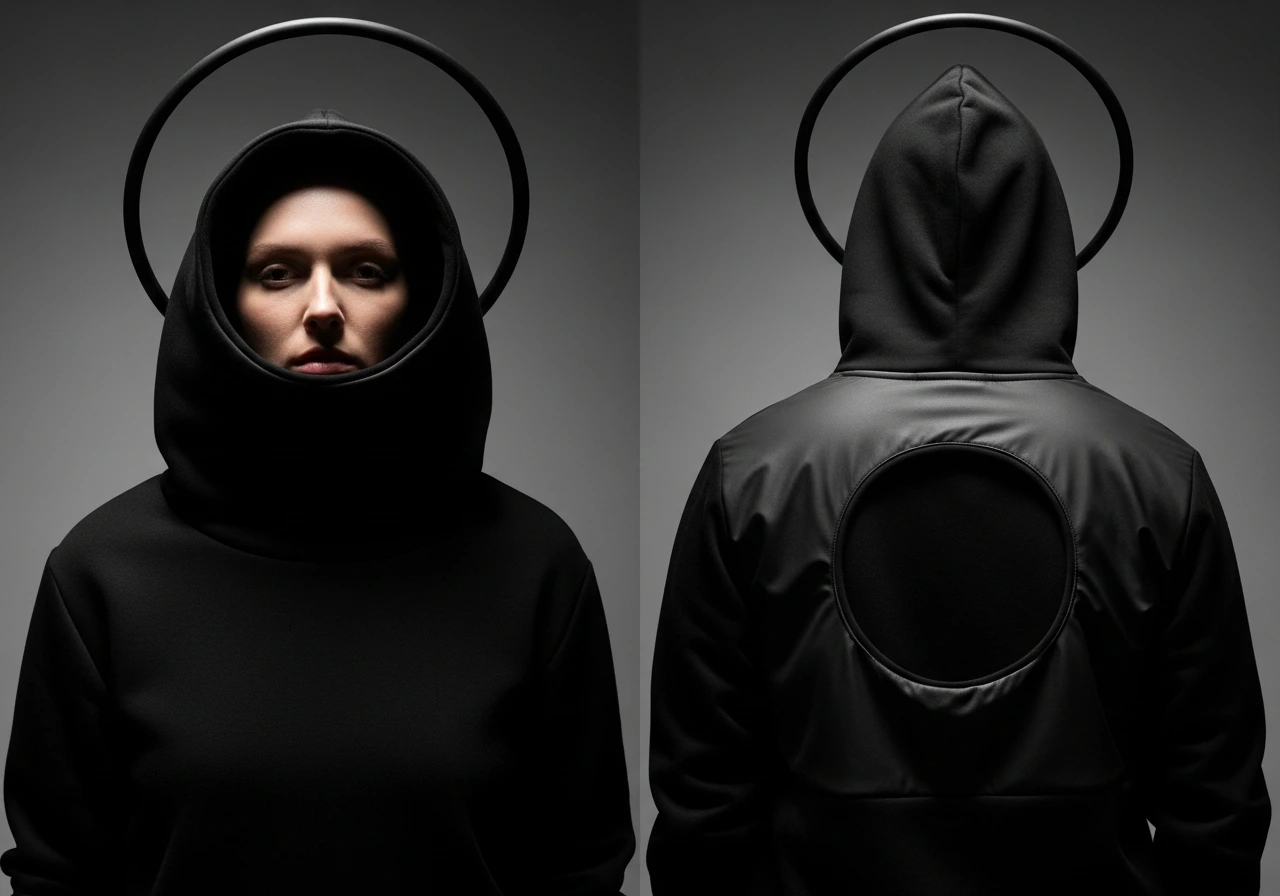
A deconstructed hood involves partially removing or cutting sections of the hood itself to create an architectural, avant-garde element. Rather than completely removing the hood, this design strategically cuts away portions to create interesting shapes and negative space.
Try cutting a large circle or oval from the back panel of the hood, creating a halo effect when worn up. Alternatively, cut away the front portion of the hood, leaving only the back and side panels for a unique draped collar effect when the hood is down.
This design requires careful planning and precise cutting but results in a truly unique piece that looks intentionally designer rather than DIY. The deconstructed hood works best on solid-colored hoodies where the architectural elements can be fully appreciated.
Sleeve Cutoff Conversion
Converting long sleeves to short or three-quarter length sleeves gives your hoodie a completely different seasonal versatility. This simple modification transforms a winter hoodie into spring-appropriate outerwear or creates a unique layering piece. For more information visit Homeliaa.
Determine your desired sleeve length by putting on the hoodie and marking where you want the new edge to fall. Cut straight across both sleeves at the same length. For a finished look, fold the raw edge under and secure with fabric glue or stitching. For a more casual, distressed vibe, leave the edges raw and allow them to naturally fray with washing.
Short-sleeved hoodies work exceptionally well for athletic activities or as transitional pieces that provide core warmth without overheating your arms.
Spine Cutout Design
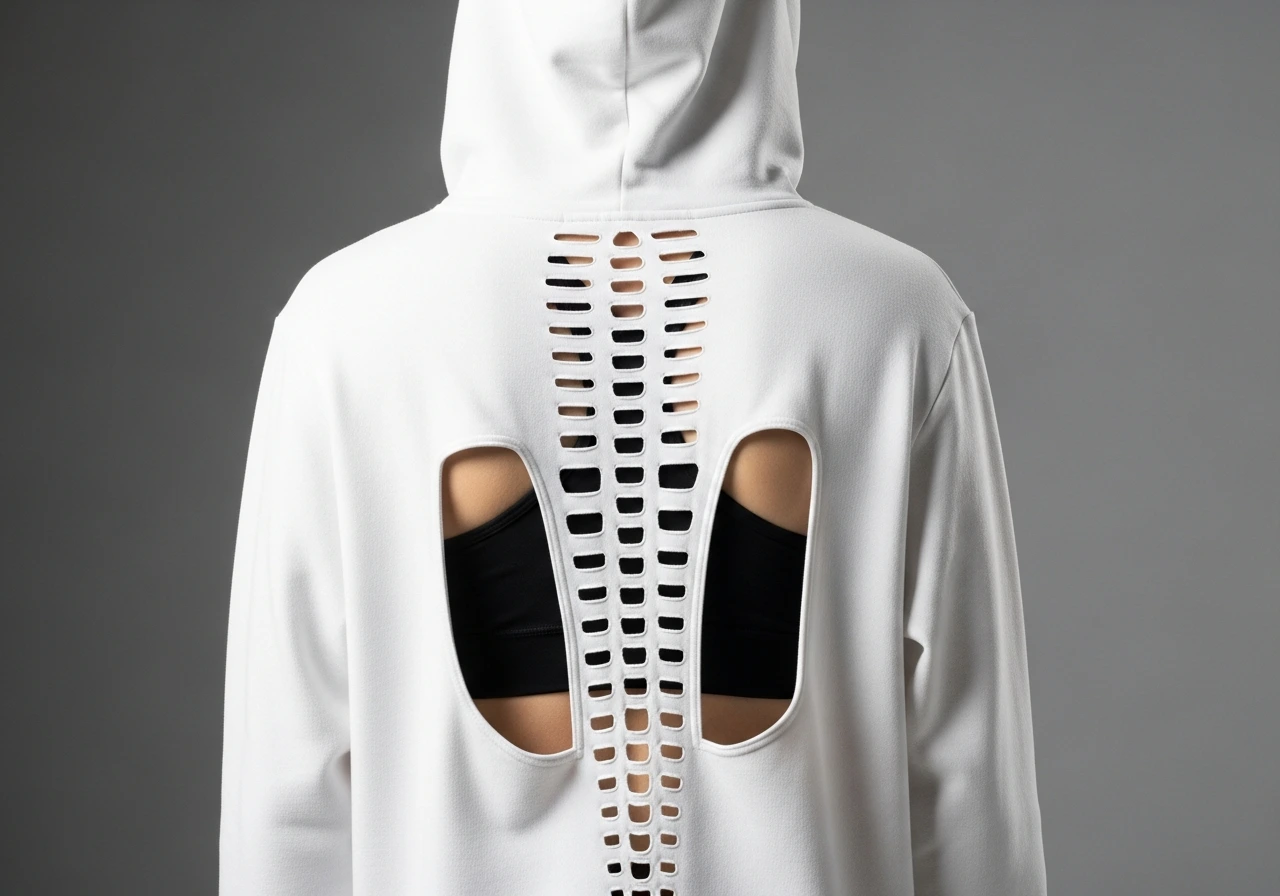
The spine cutout creates a vertical opening down the center back of the hoodie, resembling a spine or backbone. This design is both edgy and elegant, revealing a strip of skin or whatever you’re layering underneath while maintaining coverage everywhere else.
Mark a vertical line down the center back of your hoodie, from just below the collar to the mid-back area. Cut along this line, creating an opening approximately one to two inches wide. For added detail, cut small horizontal lines extending from the central cut at regular intervals, creating a ladder or spine-like effect.
This design looks particularly striking when paired with a contrasting color tank top or sports bra underneath, creating intentional color blocking through the cutout.
Braided Side Detail
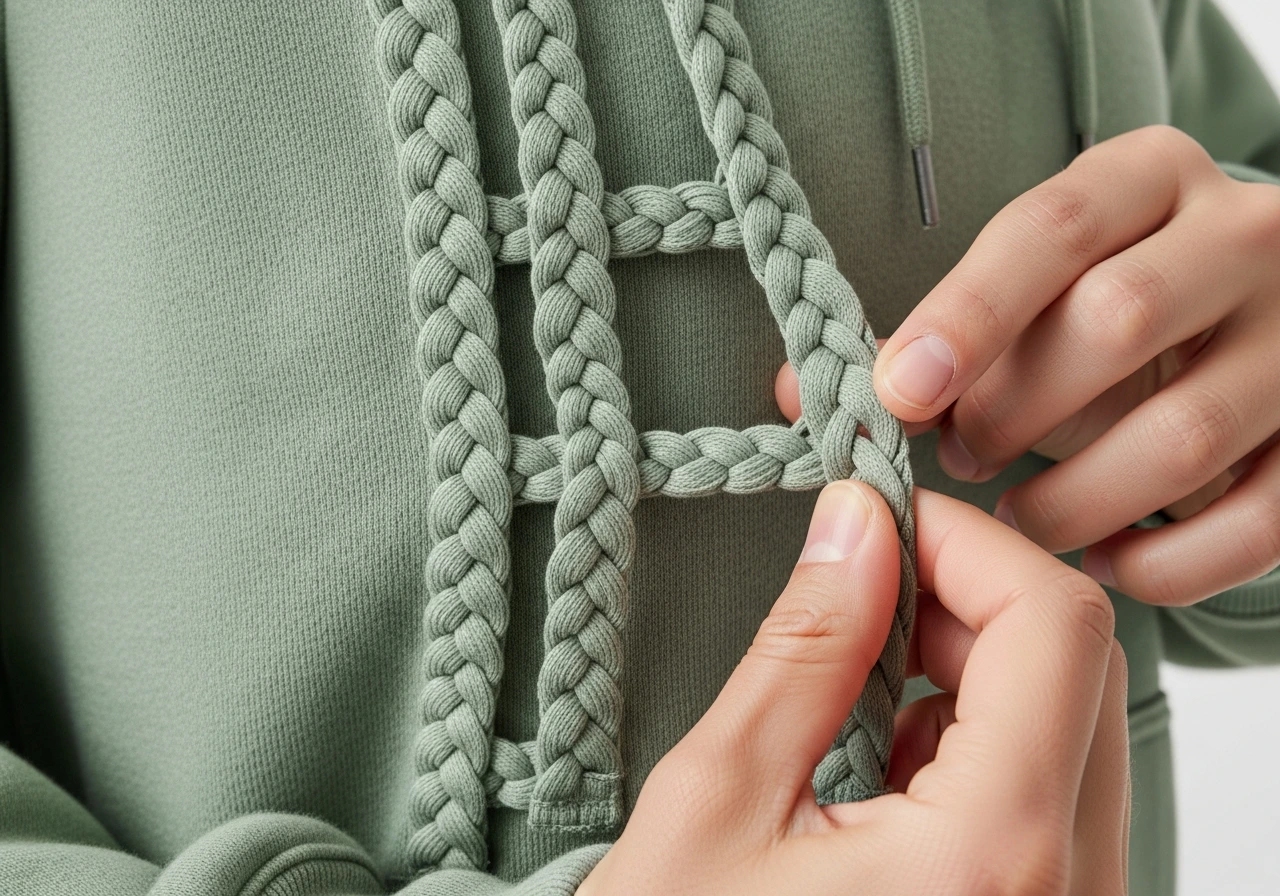
Braided side details add intricate, handcrafted charm to hoodies through a combination of cutting and weaving techniques. This design involves cutting strips along the side seams and braiding them together to create textured, dimensional side panels.
Cut away approximately two inches of fabric along each side seam of your hoodie. Then, cut the remaining edge into six or nine long, thin strips. Divide these strips into three groups and braid them together, securing the end with a knot or small stitch. Repeat on both sides for symmetry.
The braided detail creates visual interest and a slightly fitted effect along the sides while maintaining the hoodie’s overall comfort and ease. This design works best on solid-colored hoodies where the braided texture is clearly visible.
Conclusion
Transforming hoodies through creative cutting techniques offers an accessible entry point into fashion customization that requires minimal investment but yields maximum impact. Each of the fifteen-plus designs outlined here provides a unique way to express your personal style while giving new life to existing wardrobe pieces. Whether you prefer subtle modifications like cropped hems or dramatic alterations like deconstructed hoods, the key to successful hoodie cutting lies in careful planning, precise execution, and willingness to experiment.
As you embark on your hoodie customization journey, remember that mistakes often lead to unexpected creative breakthroughs. Start with hoodies you’re less attached to while building your skills and confidence. Pay attention to fabric weight and composition, as these factors significantly influence how cuts drape and whether edges fray attractively or unravel problematically. Cotton-blend hoodies typically offer the most forgiving canvas for beginners.
The sustainable aspect of upcycling hoodies through cutting and customization cannot be overlooked. Rather than discarding worn or outdated sweatshirts, these techniques extend their lifespan while reducing textile waste. You’re not just creating unique fashion pieces but also participating in a more conscious approach to consumption and creativity.
Most importantly, hoodie cutting empowers you to curate a wardrobe that truly reflects your individuality. In an era of mass production and fast fashion, handcrafted modifications ensure that no one else will have exactly the same piece as you. The time invested in planning, cutting, and finishing your custom hoodie creates a deeper connection to your clothing and greater appreciation for the creative process itself.
Frequently Asked Questions
What tools do I need to cut a hoodie?
You need sharp fabric scissors, fabric chalk or washable markers for marking cut lines, a ruler or measuring tape, and optionally a seam ripper for removing hoods or collars. Fabric glue or a basic sewing kit helps finish edges if desired.
Will my hoodie unravel after cutting?
Cotton and cotton-blend hoodies typically fray slightly but stabilize after a few washes, creating a desirable distressed look. To prevent excessive unraveling, you can seal edges with fabric glue, apply a rolled hem, or use a zigzag stitch along cut edges.
Can I cut any type of hoodie?
Most hoodies can be cut successfully, but cotton and cotton-poly blends work best for beginners. Avoid cutting technical athletic fabrics or very thin materials until you’re more experienced, as they may require special finishing techniques to prevent runs.
How do I ensure my cuts are symmetrical?
Fold your hoodie in half lengthwise, matching the sleeves and side seams perfectly. Cut through both layers simultaneously for symmetrical results, or create a paper template of your desired shape and trace it onto both sides before cutting.
Should I wash my hoodie before or after cutting?
Always wash and dry your hoodie before cutting to pre-shrink the fabric and remove any sizing chemicals. This prevents unexpected shrinkage after you’ve made your cuts. Wash it again after cutting to see how the edges will behave and make any necessary adjustments.