15+ Stunning Spray Paint Pumpkin Ideas
Introduction
Spray Paint Pumpkin Ideas, Fall is the season that turns ordinary front porches into picture-worthy displays, and nothing captures that autumn charm quite like a beautifully decorated pumpkin. While traditional carving has its place, spray paint pumpkin ideas have taken the decorating world by storm for one very good reason: they last longer, look more polished, and open the door to an almost endless range of creative finishes.
Whether you are decorating for Halloween, styling a Thanksgiving centerpiece, or simply embracing the warm tones of the fall season, spray-painted pumpkins offer a level of versatility that carving simply cannot match. A carved pumpkin may last a week before it starts to soften. A properly sealed, spray-painted pumpkin can hold its beauty from early October straight through to the end of November.
This article walks you through 16 of the most stunning spray paint pumpkin ideas available today, covering everything from elegant metallics to eye-catching marble effects. Whether you are a first-time decorator or someone who sets up a full seasonal display every year, there is something here that will inspire your next project.
1. Metallic Gold Spray Paint Pumpkins
If there is one spray paint pumpkin idea that never goes out of style, it is the metallic gold finish. Gold-sprayed pumpkins carry an effortless sense of elegance that works beautifully both indoors and outdoors. Placed on a porch alongside warm-toned mums and dried corn stalks, a gold pumpkin becomes an instant focal point.
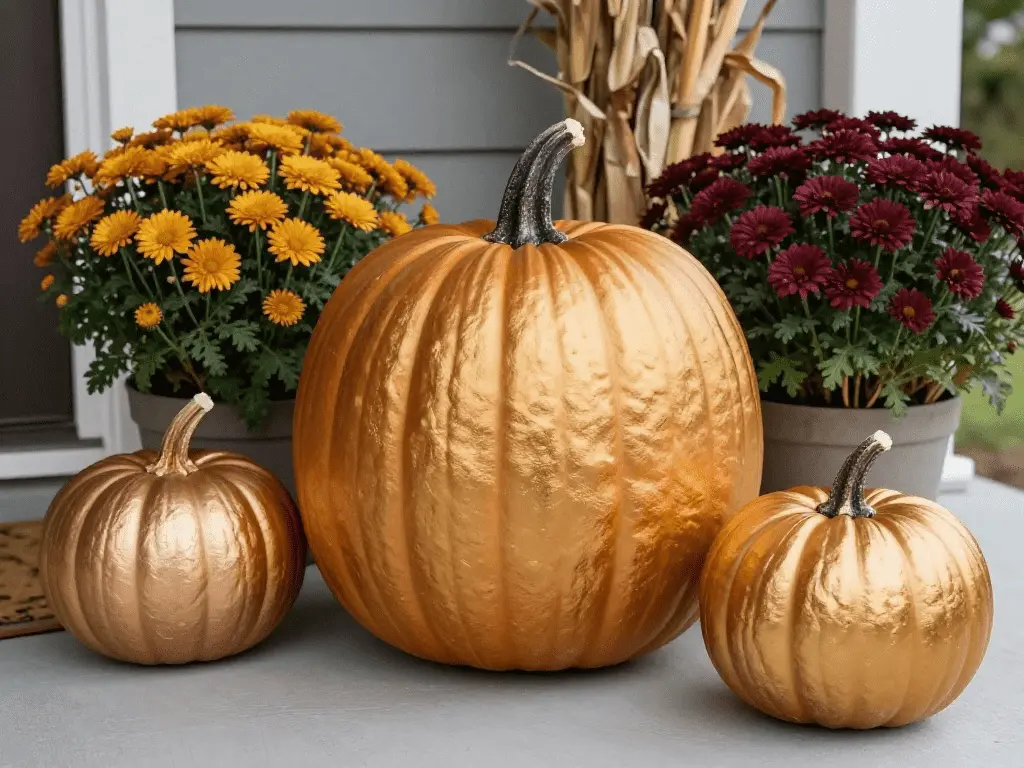
Start with a clean, dry pumpkin. Apply one even base coat of gold metallic spray paint from a distance of about 12 inches. Let it dry fully, then apply a second coat for a rich, even finish. For added sophistication, try layering rose gold and champagne gold on the same pumpkin to create dimension.
Gold metallic spray paint pairs exceptionally well with deep burgundy and hunter green decor, making it a perfect choice for both Halloween and Thanksgiving displays.
2. Ombre Gradient Spray Paint Pumpkins
The ombre effect on pumpkins creates a soft, flowing transition between two or more colors. This technique looks professionally done but is actually very beginner-friendly with a can of spray paint.
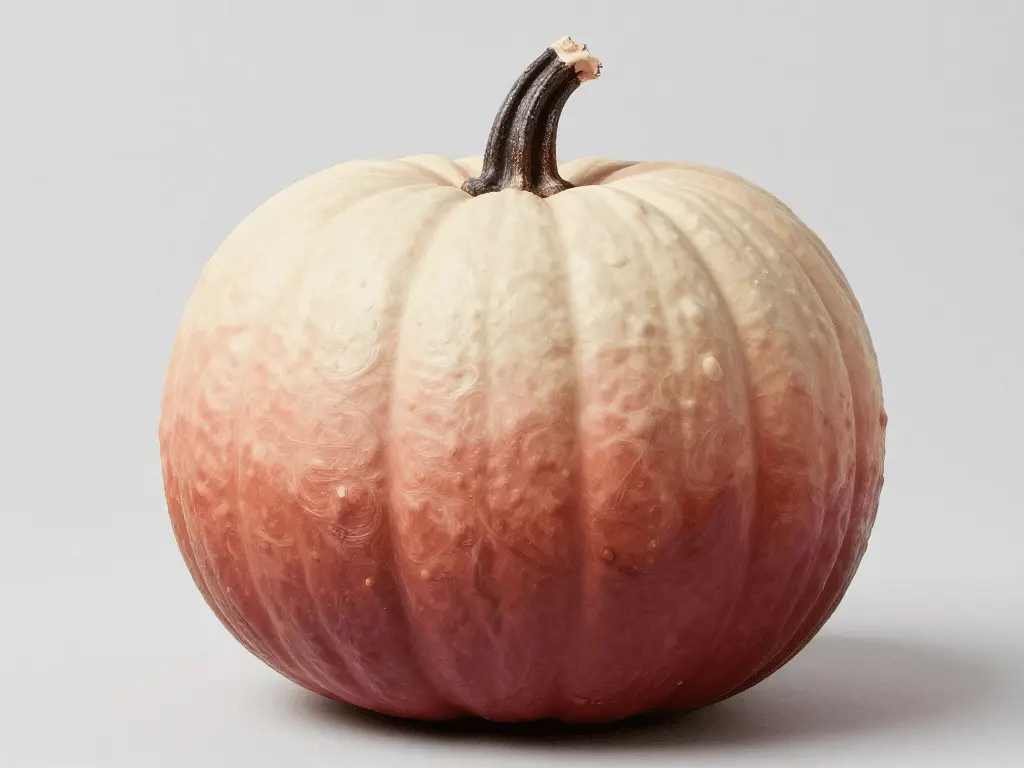
Choose two colors from the same family, such as cream and terracotta, or pale blush and deep burgundy. Spray the lighter color across the top half of the pumpkin and the darker shade along the bottom. While the paint is still slightly wet, blend the two tones in the middle by lightly misting from a greater distance. This creates that seamless gradient that looks like it took hours to achieve.
3. Marble Effect Spray Paint Pumpkins
The marble-effect pumpkin has become one of the most sought-after spray paint pumpkin ideas in recent years, and it is easy to see why. The finished result looks like a piece of natural stone art sitting on your doorstep.
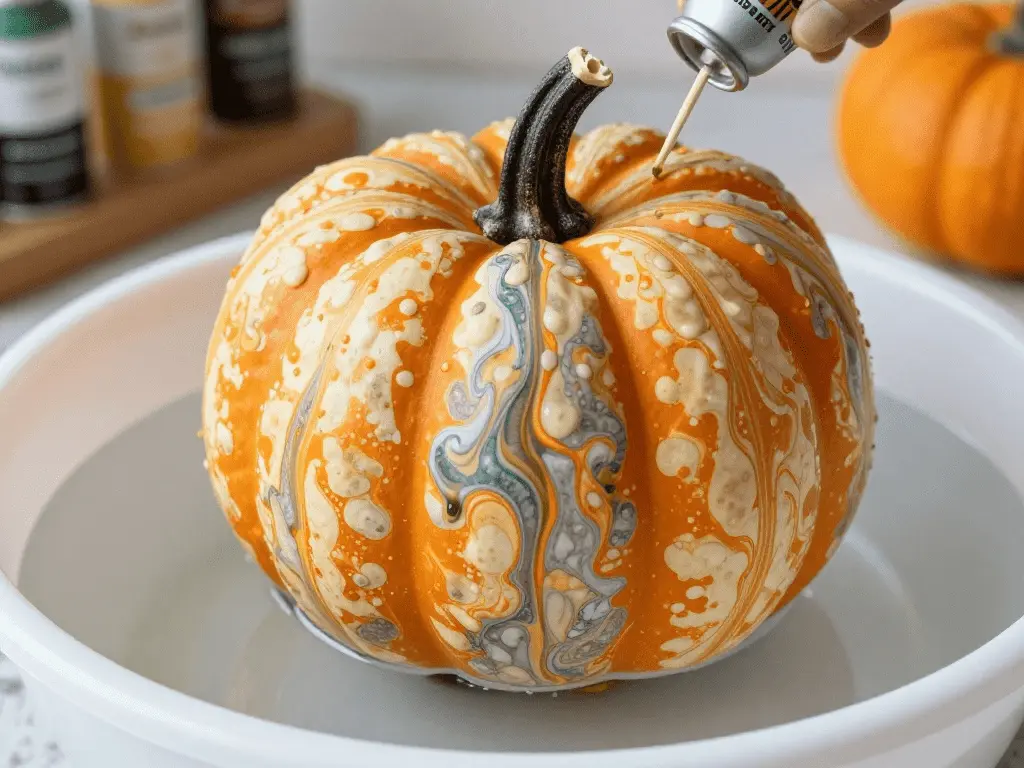
Fill a container with water. Drip several colors of spray paint onto the surface of the water one drop at a time. Use a toothpick to swirl the colors gently. Then dip your pumpkin slowly into the water and pull it out. The paint film transfers onto the pumpkin, creating a one-of-a-kind marble pattern. No two will ever look exactly alike, which is part of the beauty of this technique.
4. Glitter Spray Paint Pumpkins
For those who want their pumpkin display to genuinely sparkle, glitter spray paint pumpkins are a show-stopping choice. These work especially well for indoor displays, where light catches the shimmer and creates a dramatic effect throughout a room.

Apply a base coat of any solid color first. Before the paint fully dries, dust the surface with loose craft glitter. Once dry, seal with a clear gloss sealant spray to lock the glitter in place. Alternatively, use a dedicated glitter spray paint such as Rust-Oleum’s glitter finish range for an even, all-over sparkle without the mess.
5. Two-Tone Color Block Spray Paint Pumpkins
Clean, bold, and modern, the two-tone color block look is one of the easiest spray paint pumpkin ideas to pull off. The result is a graphic, contemporary piece that looks great in minimalist or Scandinavian-inspired interiors.

Use painter’s tape to mask off the top or bottom half of the pumpkin. Apply your first color and let it dry completely before removing the tape. Flip and tape the dried section, then apply your second color. The result is a sharp, crisp line that divides the pumpkin into two perfectly contrasting halves. Black and white, navy and cream, or sage green and terracotta all work beautifully together.
6. Stenciled Spray Paint Pumpkins
Stenciling opens up an entirely new dimension of design possibilities for spray-painted pumpkins. From intricate lace patterns to bold geometric shapes and seasonal motifs like leaves, moons, and spiderwebs, stencils give you precision without requiring any artistic ability.
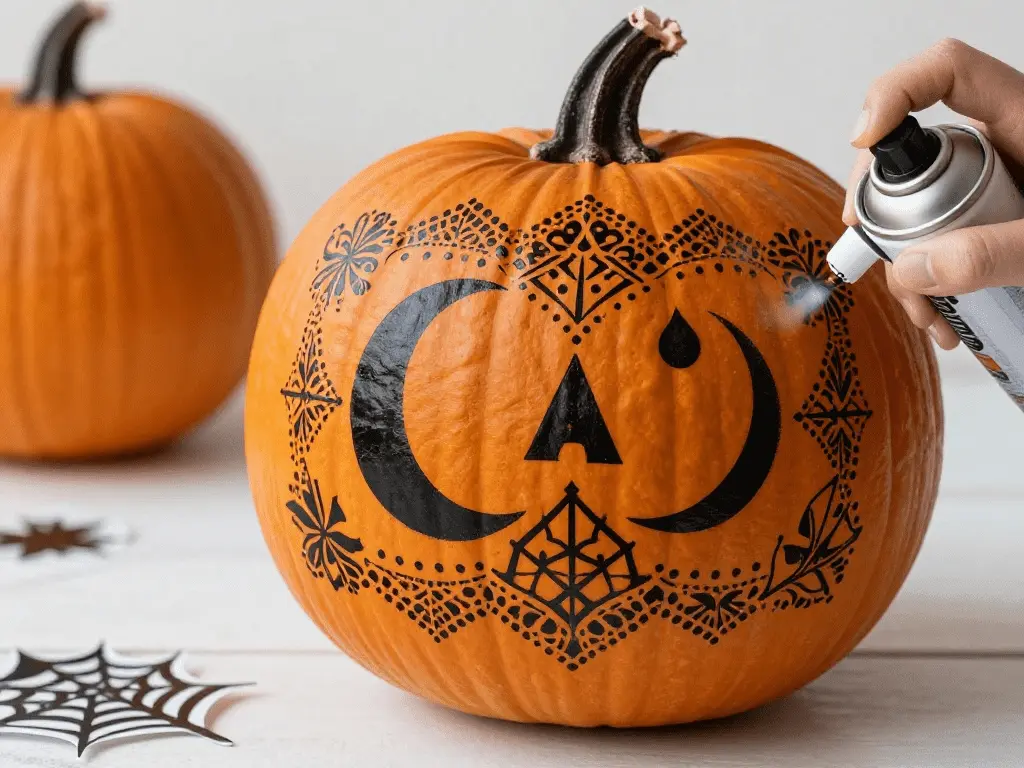
Hold the stencil firmly against the pumpkin surface or use a repositionable adhesive spray to keep it in place. Apply the spray paint in short, light bursts rather than one heavy coat. This prevents bleeding under the stencil edges, which is the most common issue beginners face. Peel the stencil away slowly while the paint is still slightly tacky for the cleanest edges.
7. Glow-in-the-Dark Spray Paint Pumpkins
For a Halloween effect that is genuinely unexpected, glow-in-the-dark spray paint pumpkins are a brilliant idea. During the day they look like any other decorated pumpkin. After sundown, they come alive with an eerie, soft luminescence.
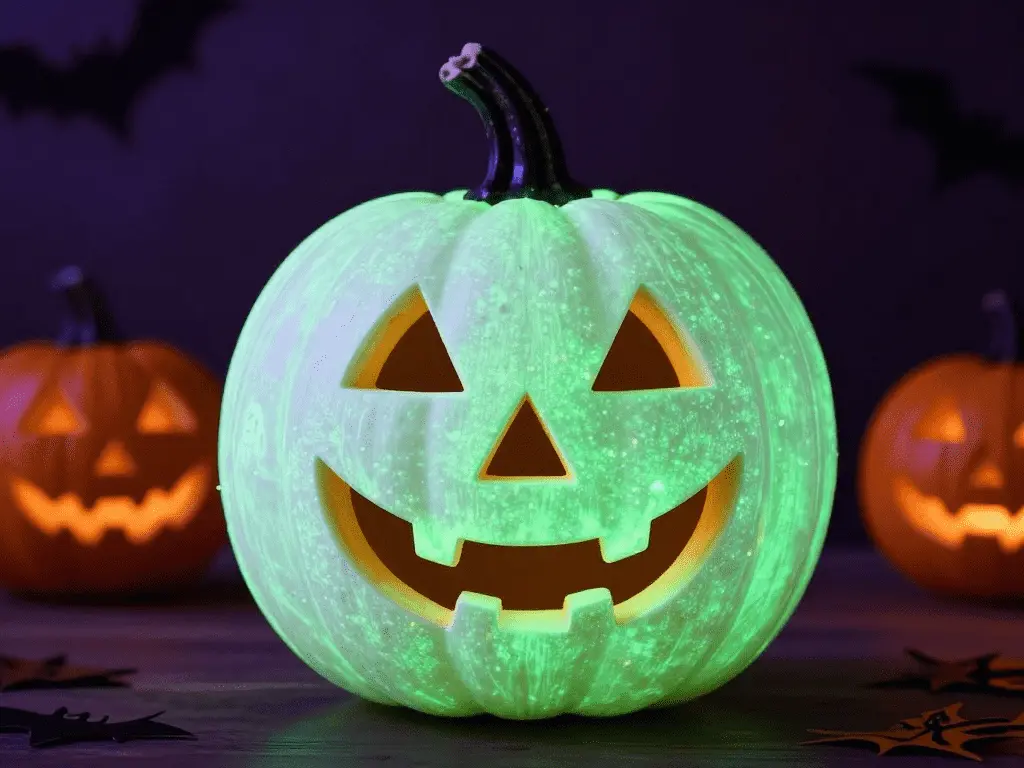
Apply glow-in-the-dark spray paint over a white base coat. White reflects the luminescent particles more effectively than darker colors. For best results, charge the pumpkin under a bright light for 20 to 30 minutes before displaying it in a dim or dark setting. You can also combine this technique with black stencils to create ghostly silhouettes that glow from within.
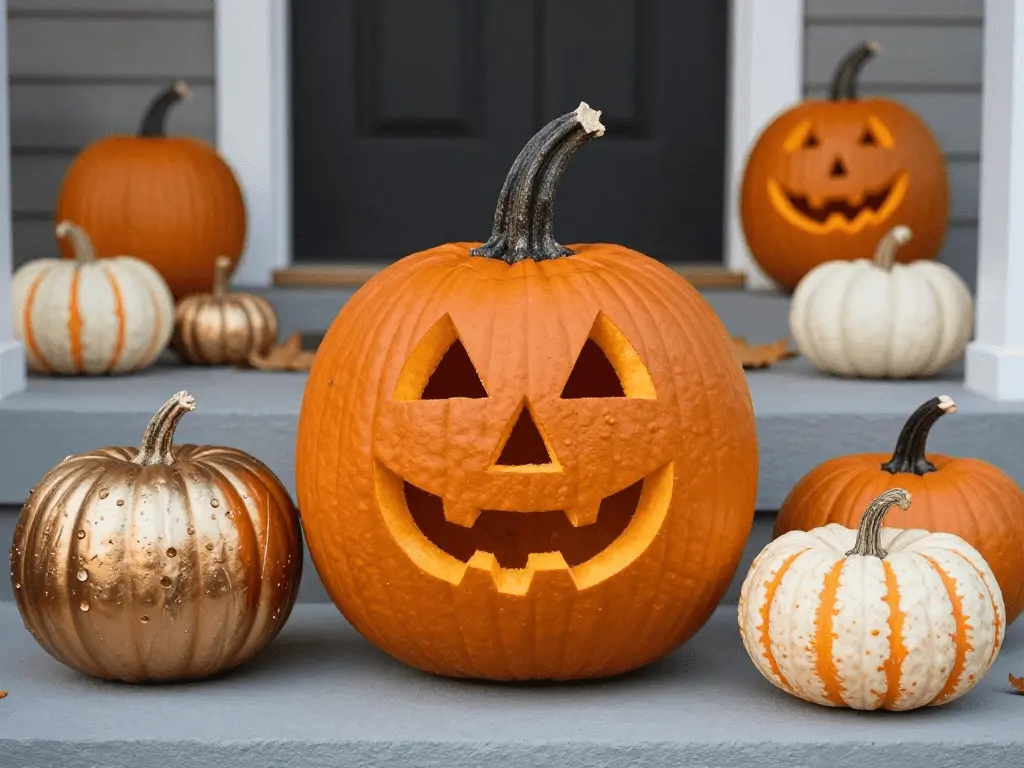
8. Matte Black Spray Paint Pumpkins
The matte black pumpkin is one of the boldest and most dramatic spray paint pumpkin ideas available. It makes an especially powerful statement when grouped with white or metallic pumpkins and works perfectly for a sophisticated Halloween aesthetic.
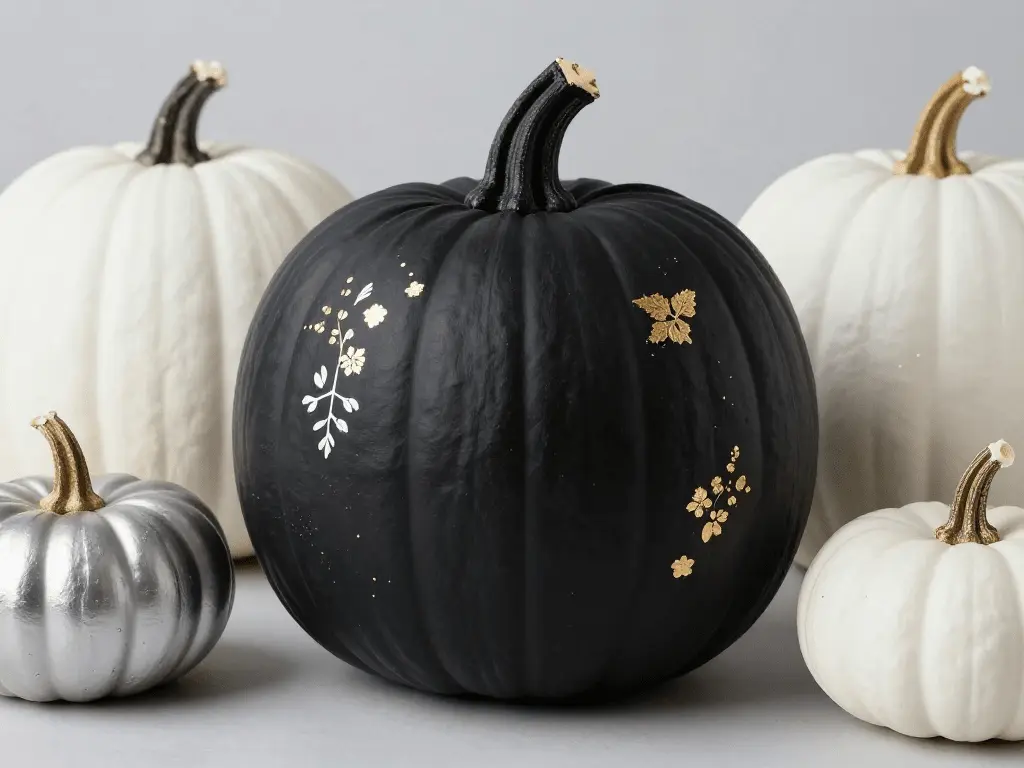
Matte black eliminates all reflection, making the natural ridges and contours of the pumpkin stand out in sharp relief. It is the perfect canvas for additional decoration. Gold leaf accents, hand-painted white designs, or metallic stenciled patterns all pop dramatically against a matte black background. It is one of the most versatile base coats you can apply.
9. Drip Effect Spray Paint Pumpkins
The drip effect is a playful, artistic spray paint technique that gives pumpkins a painterly, handcrafted feel. It is visually striking and surprisingly simple to achieve.
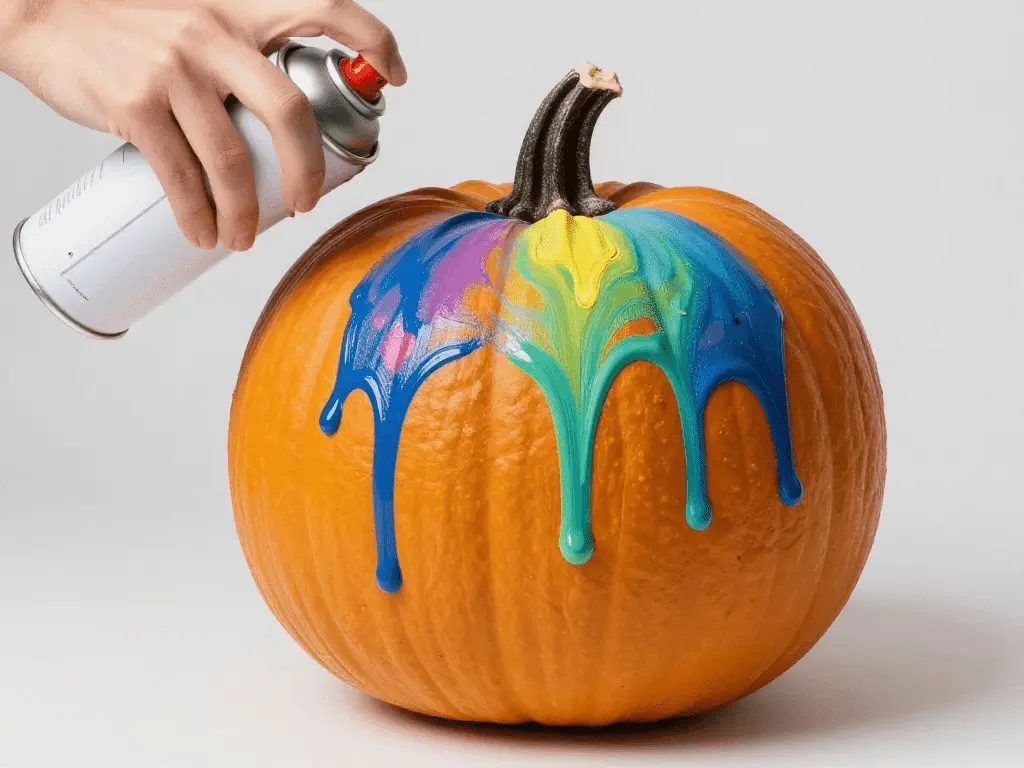
Start with a solid base coat of your chosen color. Once dry, hold a contrasting color of spray paint directly above the pumpkin and let slow, deliberate drips fall from the nozzle down the sides. You can control the thickness of the drips by adjusting how long you hold the can in place. Multiple contrasting colors layered this way create a vivid, abstract effect that looks almost like melting wax.
10. Lace Pattern Spray Paint Pumpkins
This technique uses actual lace fabric or nylon stockings as a natural stencil. The result is a delicate, intricate pattern that would take hours to paint by hand but takes just minutes to spray.
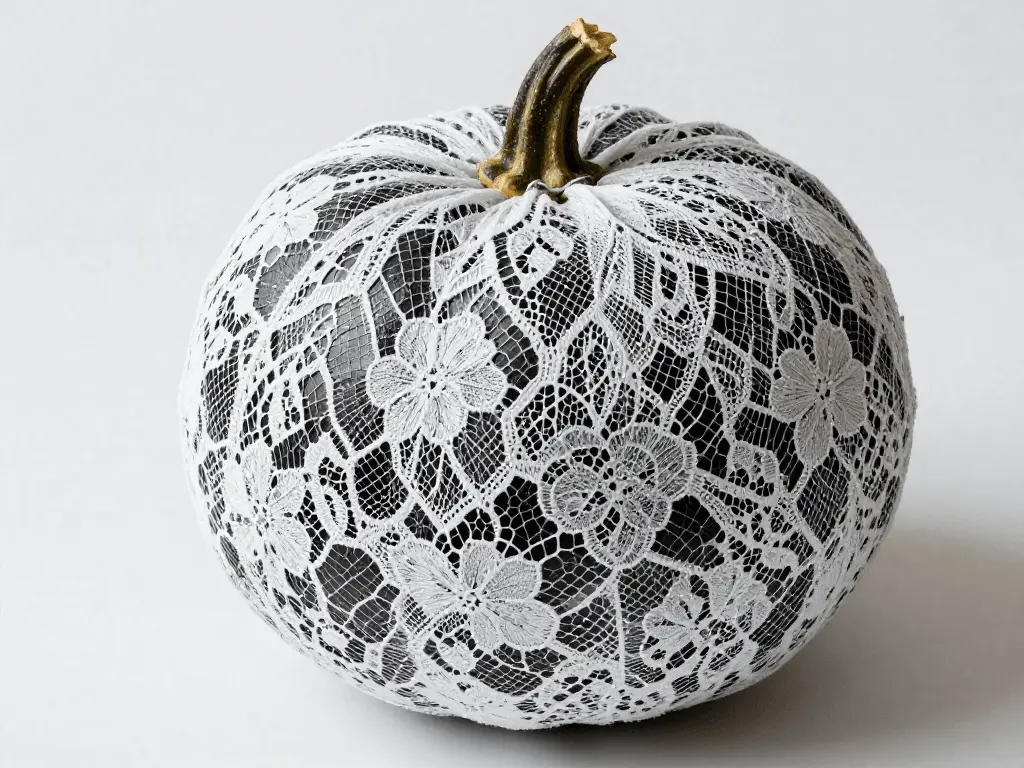
Wrap a piece of lace fabric snugly around the pumpkin, securing it at the back with a rubber band or clip. Spray over the lace with a single, even coat. Remove the lace immediately after spraying. The pattern transfers perfectly onto the surface beneath. Use a bold contrast, such as white lace over matte black, to make the pattern really stand out.
11. Geometric Tape Design Spray Paint Pumpkins
Painter’s tape is the secret weapon behind some of the most visually striking spray paint pumpkin ideas. By building up layers of tape and spray paint, you can create geometric patterns that look intentional, precise, and incredibly modern.
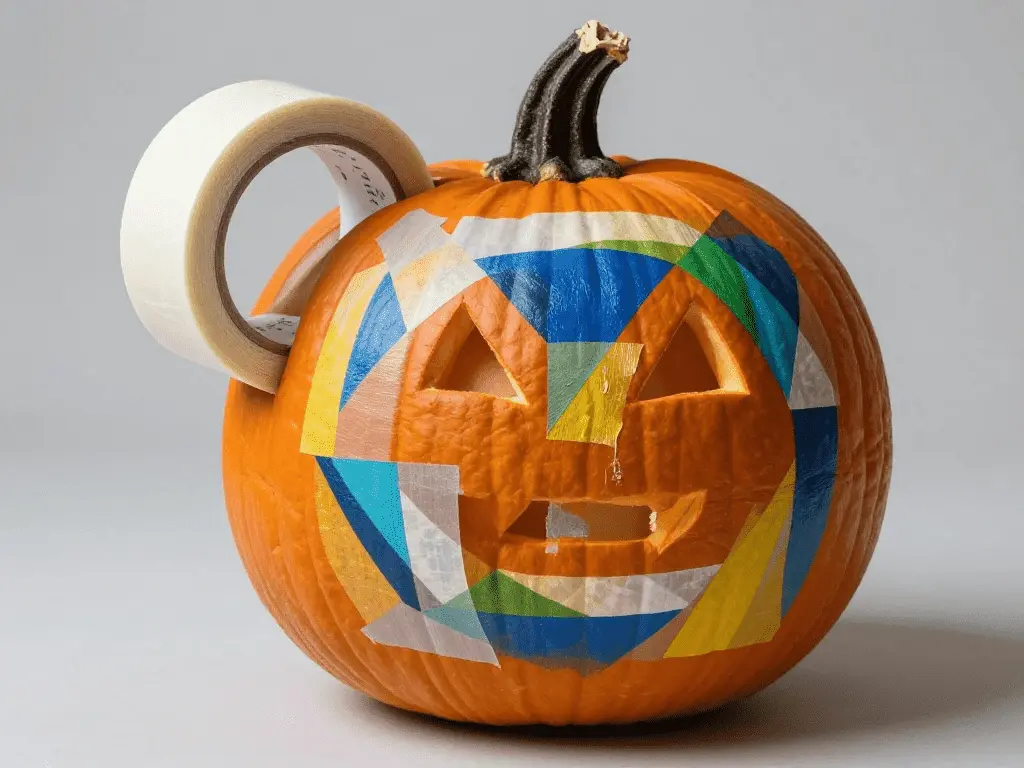
Apply strips of painter’s tape in your desired pattern across the pumpkin. Spray with your first color and let it dry. Add more tape strips to cover the areas you want to protect, then spray with a second color. Repeat as many times as you like. When all tape is removed, you are left with a layered, multi-colored geometric design that catches the eye from across a room.
12. Stone Texture Spray Paint Pumpkins
Stone-texture spray paint, such as Rust-Oleum’s stone-effect range, transforms ordinary pumpkins into pieces that look sculpted from granite or concrete. This is one of the most elegant and unusual spray paint pumpkin ideas for fall decorating.
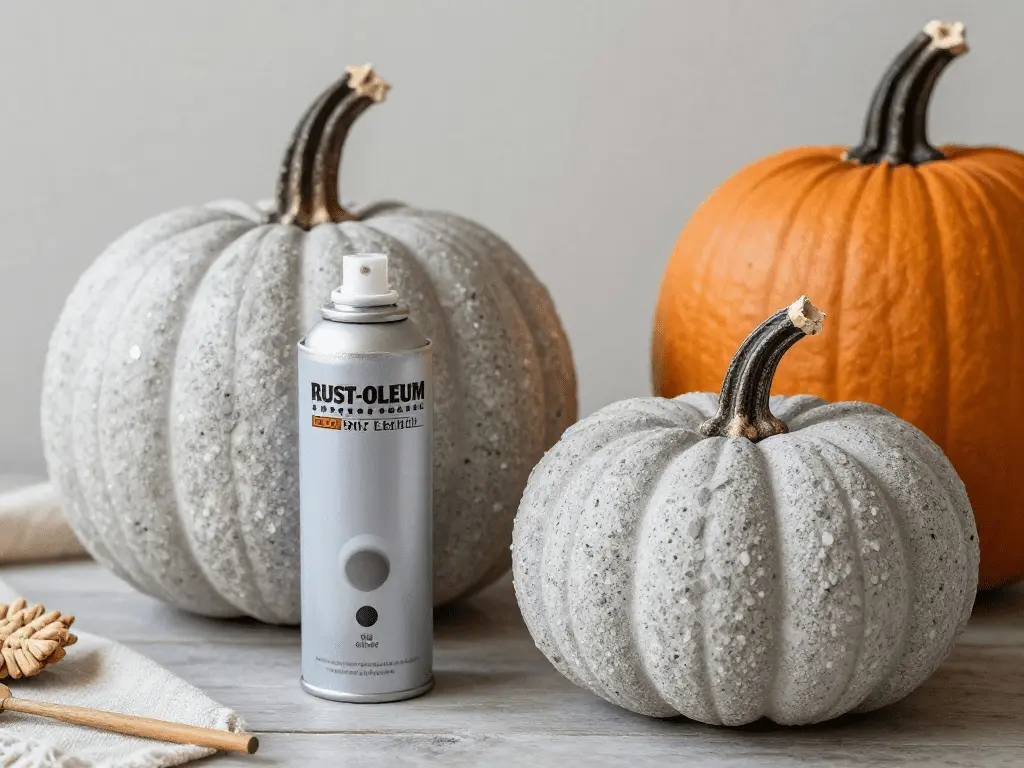
Apply two to three coats of stone texture spray paint, allowing each layer to dry between applications. The textured finish builds up naturally, creating the appearance of depth and weight. These pumpkins pair beautifully with other natural-material decor such as wood, linen, and dried botanicals.
13. Floral Stencil Spray Paint Pumpkins
Floral designs bring a romantic, garden-party feel to fall decorating. Using floral stencils with spray paint, you can create the look of hand-painted botanical illustrations in a fraction of the time.
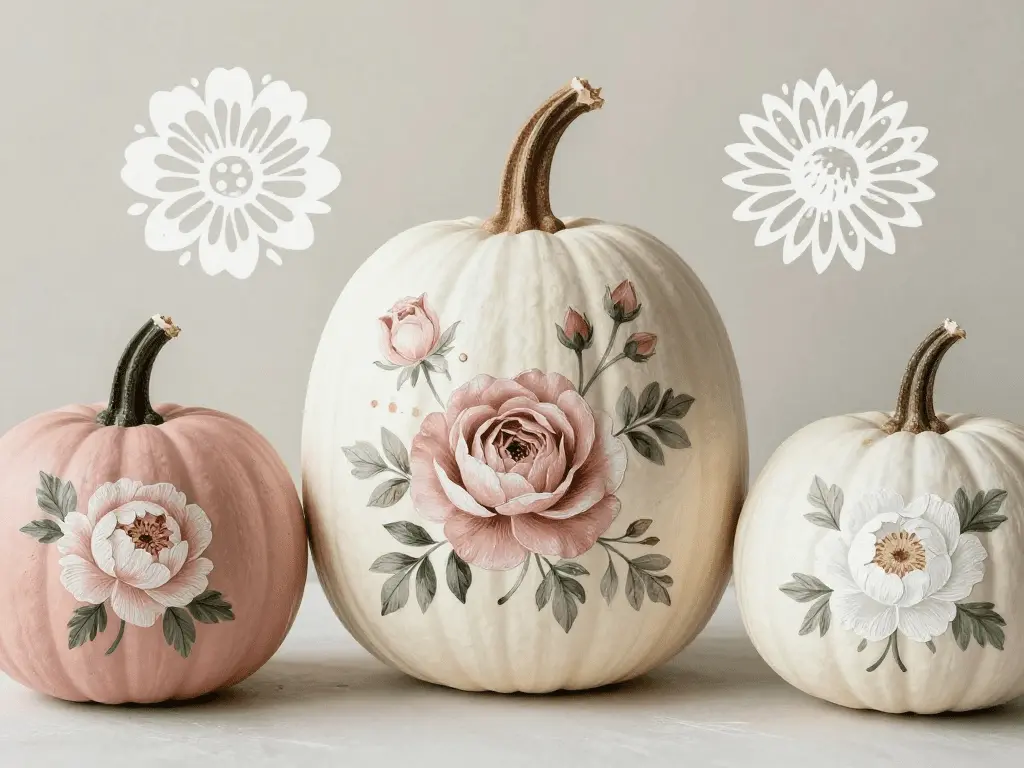
Rose, peony, and chrysanthemum stencils work especially well on pumpkins because their round forms complement the natural shape of the gourd. Use soft, muted tones like dusty rose, sage, and antique white against a cream or slate gray background for a vintage botanical aesthetic that feels refined and seasonal. https://vintagcozy.com/pumpkin-painting-ideas/
14. Dip-Dyed Spray Paint Pumpkins
The dip-dyed look mimics the appearance of a pumpkin that has been partially submerged in paint. It creates a clean, faded gradient along the base that looks effortlessly stylish.
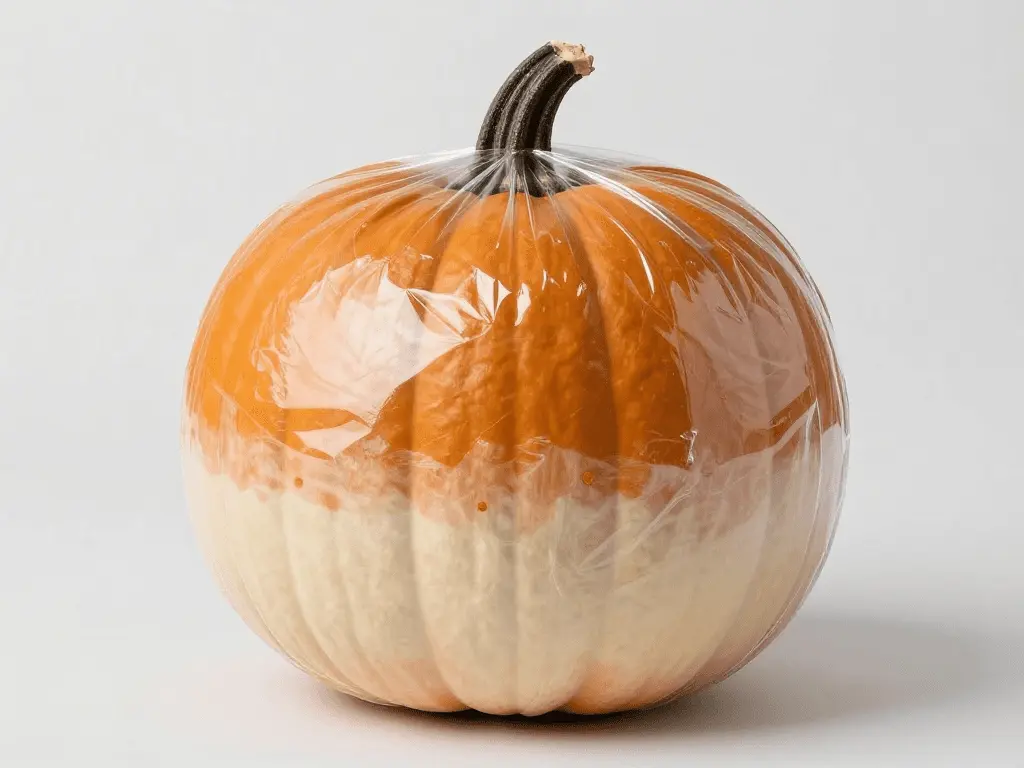
Cover the top portion of the pumpkin with plastic wrap or press-and-seal wrap. Spray the bottom third of the pumpkin with your chosen color, feathering the spray upward to create a natural fade. Remove the protective covering once dry. For extra visual interest, use a metallic spray for the dipped portion against a naturally colored pumpkin.
15. Rainbow Multicolor Spray Paint Pumpkins
For a more playful, festive display, rainbow-colored spray paint pumpkins bring energy and joy to fall decor. These are especially popular for family gatherings where children are involved, and they can be customized to match any color palette.

Work in sections, taping off each zone before applying a new color. This keeps the colors clean and separate. Alternatively, spray colors in quick, sweeping strokes across the pumpkin from different angles to create a vibrant, layered effect where the colors naturally overlap and blend at the edges.
16. Word and Letter Spray Paint Pumpkins
Personalized pumpkins with words, names, or short phrases make meaningful additions to any seasonal display. Whether it says “Boo,” “Harvest,” or a family surname, these pumpkins feel intentional and personal.

Apply letter stickers directly onto the pumpkin surface. Spray over the entire surface with your chosen color. Once fully dry, peel the stickers away slowly to reveal the natural pumpkin color underneath forming the letters. The contrast between the spray-painted surface and the raw pumpkin creates a striking, graphic text effect that is both simple and impressive.
Conclusion
Spray paint pumpkin ideas have redefined what fall decorating looks like. The days of choosing between a carved jack-o-lantern and a plain orange pumpkin on the porch are long gone. Today, the options range from luminous metallics and moody matte blacks to delicate lace patterns and personalized word art.
The beauty of spray painting pumpkins lies in how accessible the process is. You do not need artistic training, expensive tools, or hours of free time. A few cans of quality spray paint, some painter’s tape, a stencil or two, and a dry afternoon are all it takes to create something that genuinely impresses.
Most importantly, spray-painted pumpkins last. When properly sealed, they can remain part of your seasonal display for weeks or even months, unlike carved pumpkins that begin to deteriorate within days. That durability, combined with the enormous range of creative possibilities, makes spray paint the smartest tool in your fall decorating kit.
This fall, pick two or three ideas from this list and experiment. Layer techniques, combine finishes, mix textures and colors. The most memorable displays are always the ones that feel personal, and with spray paint as your medium, the only real limit is your imagination.
Frequently Asked Questions
1. What is the best spray paint to use on real pumpkins?
Rust-Oleum and Krylon both make excellent options for pumpkins. Krylon Fusion All-In-One bonds to almost any surface without priming and holds up well outdoors. Rust-Oleum’s stone-effect and metallic ranges are also popular for decorative finishes. Always use spray paint in a well-ventilated area and apply thin, even coats.
2. Do I need to prime a pumpkin before spray painting it?
For foam or artificial pumpkins, a light primer coat helps the paint adhere better and creates a smoother finish. For real pumpkins, priming is optional, but cleaning the surface thoroughly with a damp cloth before painting is essential. Make sure the pumpkin is completely dry before applying any paint.
3. How do I make my spray-painted pumpkin last longer outdoors?
Once your design is complete and fully dry, apply a clear sealant spray over the entire surface. This protects the paint from moisture, UV exposure, and general wear. Outdoor-formula sealants offer the best protection. Even with sealing, bringing pumpkins indoors during heavy rain extends their lifespan significantly.
4. Can I use spray paint on foam craft pumpkins?
Yes, spray paint works well on foam pumpkins with one important note. Some aerosol spray paints contain solvents that dissolve polystyrene foam. Choose paint specifically labeled as safe for foam or apply a water-based primer barrier coat first before using regular spray paint.
5. How many coats of spray paint does a pumpkin need?
Most pumpkins look their best with two to three thin coats of spray paint. One coat is rarely enough for full, even coverage. Allow each coat to dry completely before applying the next. Applying too much paint in a single coat causes dripping and uneven texture, which is far harder to fix than simply being patient between layers.