
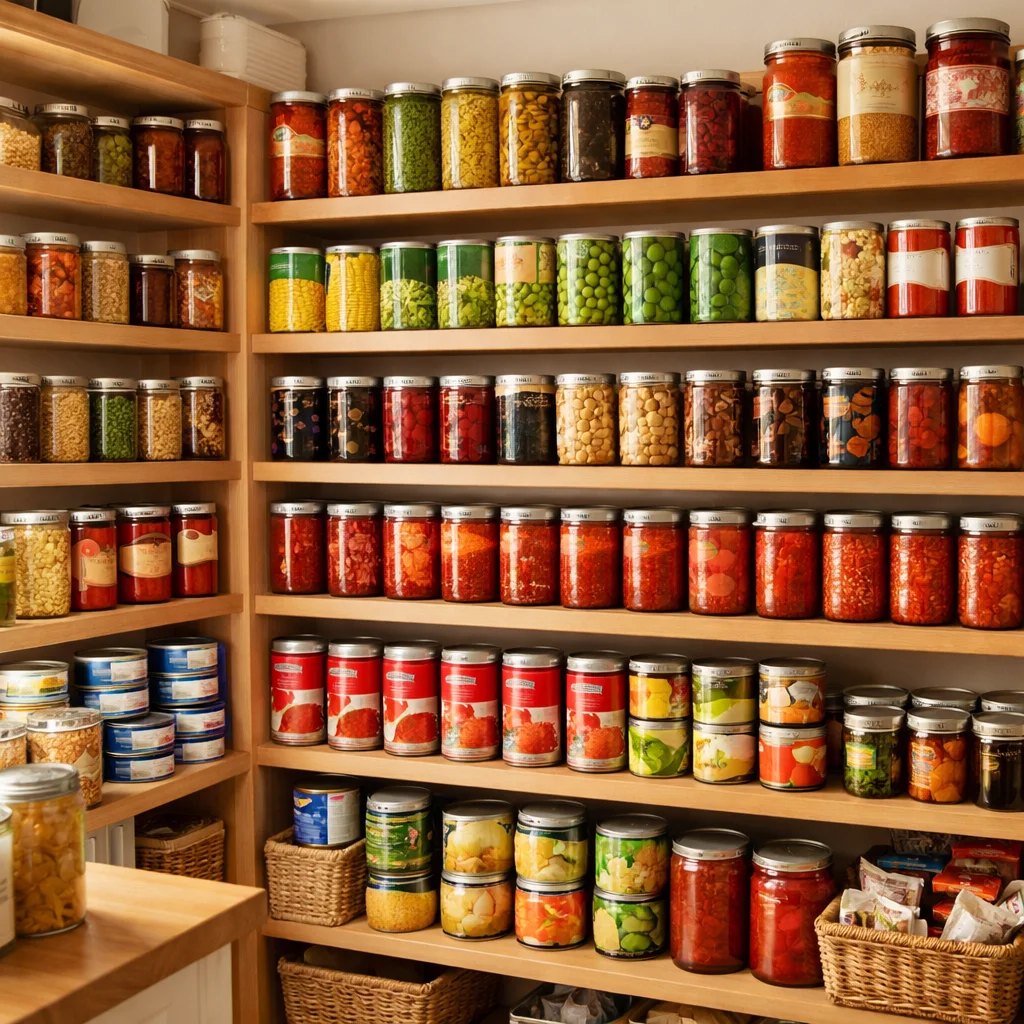
23+ Canning Storage Ideas for an Organized Pantry
A well-organized pantry is one of the most underrated assets in a functional home. When your canned goods are stacked haphazardly, you end up buying duplicates, letting things expire, and wasting time searching for a single can of diced tomatoes buried somewhere in the back. The truth is, most pantry chaos comes down to one problem: a lack of a proper canning storage system.
Whether you preserve your own foods at home or simply stock up on store-bought canned goods, having a designated, thoughtful storage plan changes everything. It reduces food waste, simplifies meal planning, saves money, and gives your kitchen a clean, professional look. The good news is that you do not need an expansive pantry or an unlimited budget to achieve this. With the right canning storage ideas, even the smallest space can be transformed into a model of efficiency.
This guide covers 23 of the best canning storage ideas, from simple shelf upgrades to creative DIY solutions, so you can find exactly what works for your home.
1. Use Tiered Can Racks on Pantry Shelves

Tiered can racks are among the most popular and practical canning storage ideas available. These racks create a stadium-style arrangement where every can is visible from the front. Instead of digging through rows of cans, you can immediately see your entire inventory. Most tiered racks are adjustable to fit different can sizes, making them versatile for both standard and large cans.
2. Install a Rotating Can Dispenser

A rotating can dispenser, sometimes called a can organizer or FIFO rack, is designed so that when you load new cans in from the top, the oldest cans roll to the front for easy access. This automatically enforces proper rotation without any extra effort on your part. These dispensers come in various capacities, from compact 20-can models to large 60-can systems suitable for deep pantry shelves or garage storage.
3. Mount a Wall-Mounted Can Rack

If your pantry shelves are already at capacity, consider moving your canned goods off the shelves entirely and onto the wall. Wall-mounted can racks attach directly to the wall and hold cans in neat horizontal rows. This solution works particularly well in utility rooms, basements, and garages where wall space is abundant. It creates a dedicated storage wall that keeps everything visible and accessible.
4. Add a Lazy Susan to Corner Shelves

Corner spaces in a pantry are notoriously difficult to use well. A large lazy Susan placed in the corner transforms that dead space into one of the most accessible areas in the entire pantry. A single spin of the turntable brings any can right to the front. Oversized lazy Susans measuring 18 inches or more can hold a surprisingly large number of cans, making corners actually useful rather than forgotten.
5. Hang an Over-the-Door Organizer

The back of a pantry door is prime real estate that most people completely ignore. An over-the-door rack with wire basket shelves provides instant additional storage without taking up any floor or shelf space. It is ideal for lighter canned goods such as canned fruit, tomato paste, and tuna. Just make sure the rack you choose is rated for the weight of canned goods, as they can be heavier than they look.
6. Build or Buy a Pull-Out Pantry Unit

A pull-out pantry unit, sometimes called a slide-out pantry, is a slim vertical shelving unit that fits into the gap between your refrigerator and a cabinet or wall. This narrow space is almost always wasted, yet it is perfectly sized for a single row of canned goods. Pull-out pantry units can be purchased ready-made or built as a DIY project, and they are one of the most space-efficient canning storage ideas for smaller kitchens.
7. Use Under-Shelf Baskets

Under-shelf baskets clip onto existing pantry shelves and create an additional storage tier underneath. They are ideal for holding smaller canned goods like single-serving soups, canned beans, or tomato paste without occupying any shelf surface. Adjustable versions are widely available and can accommodate various can heights, making them a flexible and affordable solution.
8. Store Cans in Clear Stackable Bins

Clear, stackable storage bins are excellent for grouping canned goods by category. Placing all your canned vegetables in one bin, soups in another, and beans in a third makes it immediately obvious where everything belongs. The clear design means you never have to open a bin to check its contents, and the stackable feature helps you build upward on deep pantry shelves where vertical space would otherwise go unused.
9. Repurpose a Bookshelf for Can Storage

A standard bookshelf with narrow shelves is an ideal structure for storing canned goods. The shelves are deep enough to hold a single row of cans while keeping everything visible. A freestanding bookshelf can be placed in a pantry, a hallway closet, a basement, or even a corner of a utility room. Label each shelf by category to maintain long-term organization with minimal effort.
10. Try an Over-the-Door Shoe Organizer

The clear pockets of an over-the-door shoe organizer were practically made for smaller canned goods. Each pocket can hold one or two cans of tuna, tomato paste, coconut milk, or other small items. This is one of the most budget-friendly canning storage ideas since shoe organizers are widely available at dollar stores and discount retailers. Hang one on the inside of a pantry door for instant extra capacity.
11. Install a Pegboard Wall in the Pantry or Garage

A pegboard wall gives you a completely customizable storage surface. By adding hooks, bins, and brackets to the pegboard, you can create a tailored system that holds canned goods of various sizes. Pegboards work particularly well in garages, basements, and dedicated food storage rooms. The arrangement can be rearranged at any time as your storage needs change.
12. Designate a Drawer for Flat Can Storage

If you have a deep kitchen drawer that is underutilized, consider converting it into a flat can storage drawer. Lay your cans on their sides in the drawer, arranged by category. Write the can contents on the lid in a permanent marker so that when you open the drawer and look down, you can read exactly what each can is without lifting it. This trick is especially useful for cans with small or hard-to-read labels. For more ideas visit Homeliaa.
13. Create a DIY Wooden Can Organizer

For those who enjoy woodworking or DIY projects, a custom wooden can organizer is both a functional storage solution and a satisfying weekend project. Built from plywood, these organizers can be designed to roll cans from back to front using gravity, functioning as a homemade rotating dispenser. They can be stacked, customized to fit specific can sizes, and finished to complement your pantry’s aesthetic. This option is far more affordable than buying multiple commercial organizers.
14. Use Magazine Holders as Can Organizers

Wide magazine holders, often found at dollar stores or office supply retailers, make surprisingly effective can organizers. A single magazine holder can hold a row of standard-sized cans in an upright position. When arranged side by side on a pantry shelf, several holders create a clean, organized display sorted by category. This is one of the most inexpensive canning storage ideas that requires no assembly.
15. Upcycle Cereal or Soda Boxes

Cereal boxes and soda boxes can be repurposed into DIY can dispensers. By cutting one end lower than the other, you create an open-front box that holds cans in a rolling dispenser configuration. Cover the outside with decorative paper or contact paper for a polished look, and add labels to identify the contents. This is a zero-cost solution that reduces waste while solving a storage problem.
16. Install Adjustable Shelving Inside Cabinets

Standard kitchen cabinets often waste vertical space because their fixed shelves cannot be repositioned. By installing adjustable shelving brackets inside your cabinets, you can add extra shelf levels that perfectly match the height of your canned goods. This small modification can double the number of cans a single cabinet holds without any expansion of the cabinet itself.
17. Use Under-Bed Storage for Overflow Cans

When the pantry is full and you still have canned goods to store, under-bed storage bins offer a practical overflow solution. Flat, lidded bins with wheels can slide in and out from under a bed or large piece of furniture easily. This works well for bulk purchases or emergency food supplies that do not need to be accessed daily. Keep a written inventory on the bin lid so you always know what is stored there.
18. Group Cans by Meal Category

Organization by meal category is a strategy that takes canning storage beyond simple tidying and into genuine meal planning efficiency. Rather than grouping all soups together regardless of how they are used, you might group all Italian cooking supplies together, all breakfast-related canned goods in another zone, and all baking supplies in a third. This means that when you start cooking a specific meal, everything you need is already in one place.
19. Apply a Labeling System Throughout

Labels are the backbone of any lasting organizational system. Without labels, even the most carefully arranged pantry gradually descends back into chaos. Use chalkboard labels for flexibility, since they can be wiped and rewritten as your inventory changes. Alternatively, printed custom labels give a clean, uniform appearance. Color-coded labels by category are particularly helpful in households where multiple people are putting items away, as the color immediately communicates where something belongs.
20. Practice the FIFO Rotation Method

The First In, First Out method is not just a smart habit but an essential one for anyone who keeps a well-stocked pantry. Every time you bring new canned goods home, place them behind the existing stock. The cans closest to expiration always remain at the front and get used first. This simple discipline eliminates expired cans, prevents food waste, and ensures you are always consuming the freshest available stock. A rotating dispenser automates this process, but even without one, the manual habit is straightforward to maintain.
21. Conduct a Monthly Pantry Audit

No canning storage system stays organized on its own. A brief monthly audit, taking no more than five to ten minutes, keeps everything on track. Check expiration dates, pull forward any cans that need to be used soon, note what is running low, and discard anything that is dented, leaking, or compromised. This routine prevents the slow buildup of clutter that eventually overwhelms even the best-organized pantry.
22. Store Mason Jars and Home-Canned Goods Separately

If you practice home canning and store your own preserved foods alongside store-bought cans, it pays to keep these two categories physically separate. Home-canned goods should be stored in a cool, dark location away from fluctuating temperatures and direct sunlight. Dedicated shelving in a basement or cool pantry, with each jar clearly labeled with its contents and canning date, ensures your home-preserved foods remain safe and easy to inventory.
23. Use a Canning Inventory Checklist

One of the most overlooked canning storage ideas is the simple act of keeping an inventory list. A printed or digital checklist that tracks what you have, how many of each item, and when each was canned or purchased takes only a few minutes to maintain but pays enormous dividends. It prevents duplicate purchases, alerts you to items that are running low, and gives you a complete picture of your pantry at any given moment without having to open a single cabinet door.
How to Choose the Right Canning Storage System for Your Space
Not every idea on this list will suit every home. The best approach is to start by assessing your available space, the volume of canned goods you typically store, and your budget. Those with large pantries and a high volume of canned goods will benefit most from full wall-mounted rack systems or large rotating dispensers. Smaller kitchens with limited pantry space will find the greatest value in over-the-door organizers, pull-out pantry units, and under-shelf baskets. Budget-conscious households can achieve excellent results with upcycled boxes, shoe organizers, and DIY wooden racks.
The most important factor is consistency. The most sophisticated storage system will fail if the habits that support it are not maintained. Commit to a rotation method, apply labels from the start, and perform a regular audit. These three habits alone will keep any canning storage system functioning at its best long-term.
Conclusion
Organizing your canned goods is one of the most impactful improvements you can make to your kitchen and pantry. It reduces food waste, saves money, speeds up cooking, and brings a satisfying sense of order to one of the most heavily used spaces in your home. The 23 canning storage ideas covered in this article range from simple shelf adjustments to creative DIY builds, meaning there is a workable solution for every type of home, pantry size, and budget.
Start with one or two ideas that fit your current space and needs. Once you experience the difference a proper storage system makes, expanding and refining your setup becomes a natural next step. A well-organized pantry is not a luxury; it is a practical tool that makes daily life noticeably easier.
Frequently Asked Questions
1. What is the best way to organize canned goods in a small pantry?
For small pantries, over-the-door organizers, under-shelf baskets, and tiered can racks offer the most storage gain without requiring additional space. Prioritizing vertical storage and keeping only what you regularly use will make a significant difference in a compact area.
2. How long can home-canned goods be safely stored?
According to food safety guidelines, properly sealed home-canned goods are generally safe for one to two years when stored in a cool, dark place. Quality begins to decline after this period even if the seal remains intact, so labeling with the canning date is essential.
3. What is the FIFO method and why does it matter for pantry organization?
FIFO stands for First In, First Out. It means placing newer cans behind older ones so that the oldest stock is always used first. This practice prevents expiration, reduces food waste, and ensures your pantry stays fresh and rotation-ready at all times.
4. Can I store canned goods in a garage or basement?
Yes, garages and basements can work well for overflow canning storage, provided the area stays reasonably cool and dry. Extreme heat, freezing temperatures, and high humidity can compromise can seals and food quality, so avoid storing directly on concrete floors or near heat sources.
5. How often should I declutter and reorganize my canned goods?
A brief monthly check is ideal for most households. Take five to ten minutes to pull forward older cans, discard anything expired or damaged, and note what needs restocking. A thorough declutter twice a year keeps the overall system clean and prevents gradual buildup of forgotten items.
One Comment