9+ Creative DIY Fire Pit Shelter Ideas
Transform your outdoor living space into a year-round gathering spot with creative fire pit shelter designs. Whether you want protection from the elements, enhanced ambiance, or a dedicated area for family and friends, a well-designed fire pit shelter combines functionality with style. This comprehensive guide explores innovative shelter ideas that will elevate your backyard experience.
Understanding Fire Pit Shelters
A fire pit shelter serves multiple purposes beyond simply covering your outdoor fire feature. These structures provide weather protection, create defined outdoor rooms, and extend the usability of your backyard throughout different seasons. The key to a successful fire pit shelter lies in balancing safety, ventilation, and design aesthetics.
Before embarking on your project, consider local building codes and fire regulations. Many municipalities have specific requirements regarding fire features under covered structures, including minimum clearance heights and approved fuel types. Consulting with local authorities ensures your shelter meets all safety standards while protecting your investment.
The choice of materials significantly impacts both the safety and longevity of your shelter. Wood pergolas offer natural beauty but require proper treatment and maintenance. Aluminum structures provide heat resistance and durability with minimal upkeep. Cedar brings warmth and character while naturally resisting decay. Each material presents unique advantages depending on your climate, budget, and design vision.
Classic Pergola Fire Pit Shelter
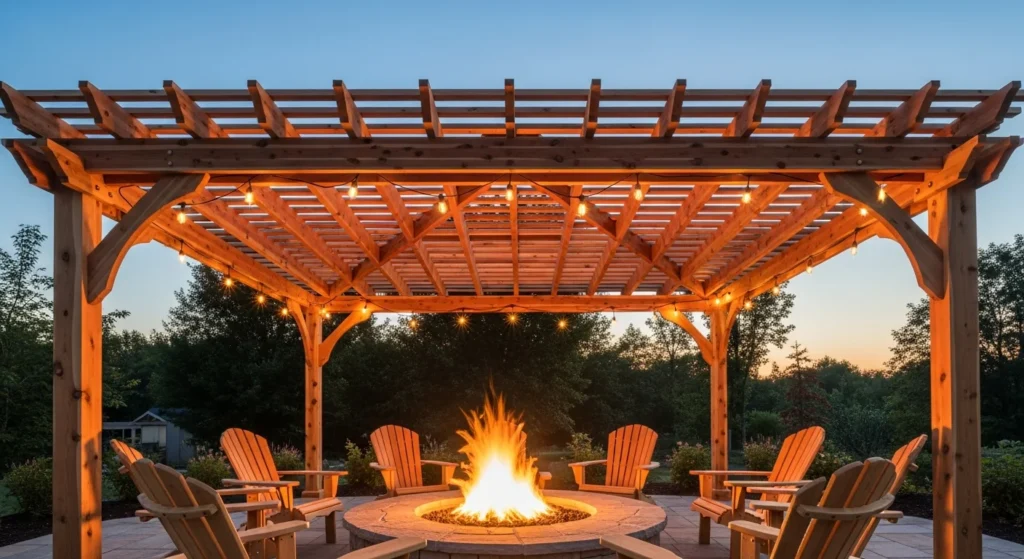
The pergola represents one of the most popular shelter options for fire pits, combining open-air design with structural definition. A properly designed pergola creates an outdoor room while maintaining adequate ventilation for smoke and heat dispersal. The slatted roof allows heat to rise naturally while providing partial shade during daytime use.
For a rustic aesthetic, cedar or redwood pergolas stained in warm earth tones complement natural stone fire pits beautifully. Stack flagstone or rough-cut stone around the fire pit base to create textural contrast with the smooth wood beams overhead. Adding Adirondack chairs, log stools, and wool throws completes the cabin-inspired atmosphere perfect for mountain properties or wooded settings.
Modern interpretations favor white vinyl or painted wood pergolas paired with sleek gas fire tables. This combination creates a refined yet relaxed environment suitable for contemporary homes. The clean lines of a white pergola framework contrast elegantly with dark patio furniture and minimalist fire features. String lights woven through the pergola beams add ambient lighting for evening gatherings.
The structural requirements for pergola fire pit combinations demand attention to clearance and spacing. A minimum height of 10 feet between the fire surface and overhead beams provides safe distance from heat and flames. Position the fire pit centrally within the pergola footprint, maintaining at least 3 to 5 feet of clearance between the fire and any combustible materials or seating.
Gazebo-Style Covered Fire Pit Area
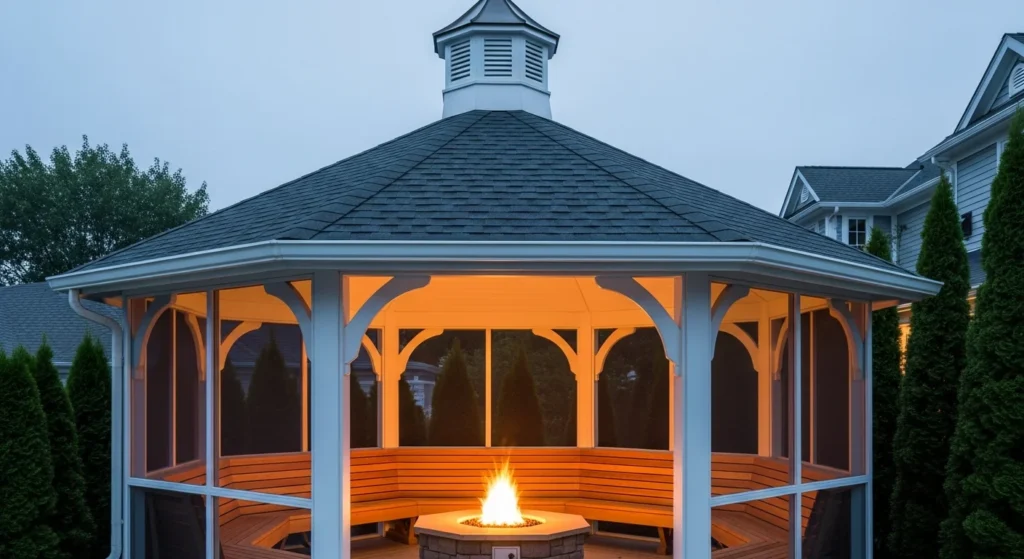
A gazebo offers more substantial weather protection than an open pergola while creating an intimate gathering space. The enclosed sides provide wind protection, making fire starting easier and reducing ember scatter. This design works exceptionally well in regions with unpredictable weather or strong prevailing winds.
Hexagonal or octagonal gazebo designs distribute seating evenly around the central fire pit, ensuring everyone enjoys equal access to warmth. The symmetrical layout encourages conversation and creates a natural focal point. Built-in benches around the perimeter maximize seating capacity while maintaining clear pathways for movement.
Ventilation becomes critical in gazebo designs, particularly with solid roof panels. Installing a cupola or vented roof peak allows smoke and heat to escape efficiently. Some designs incorporate adjustable louvered sections directly above the fire pit, providing control over ventilation levels. When the fire is lit, louvers open to release heat; when extinguished, they close to protect the space from rain.
Custom gazebos can integrate multiple functions beyond fire pit shelter. Adding built-in storage cabinets for firewood keeps fuel dry and accessible. Installing electrical outlets enables string lights, ceiling fans, or outdoor entertainment systems. Some homeowners incorporate outdoor kitchens or wet bars into gazebo designs, creating complete outdoor living rooms.
Half-Wall Shelter Design
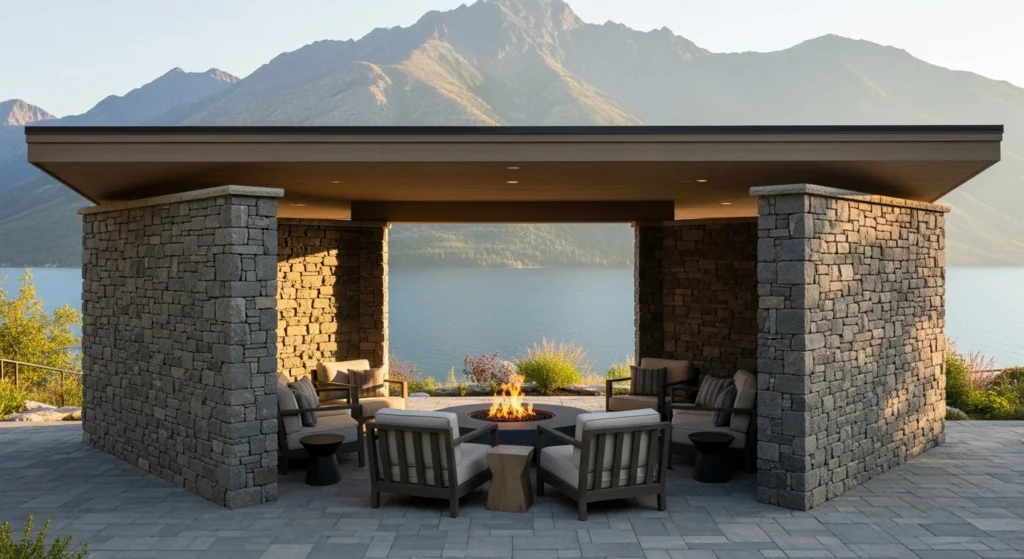
The half-wall shelter concept builds protective walls on three sides of the fire pit while leaving one side open. This configuration blocks wind from multiple directions without fully enclosing the space. The partial enclosure creates cozy intimacy while maintaining good airflow for smoke dispersal.
Construction typically uses stacked stone, concrete blocks, or timber framing to create walls approximately 4 to 6 feet tall. The open side faces away from prevailing winds and toward desired views. A simple sloped roof extends over the enclosed area, providing overhead protection from rain and snow.
Materials for half-wall shelters range from rustic to refined. Reclaimed barn wood creates aged character perfect for farmhouse aesthetics. Stacked natural stone blends seamlessly into wooded or mountainous settings. Modern concrete block walls with smooth stucco finishes suit contemporary properties. Each material choice impacts the overall feel and maintenance requirements of the structure.
This design particularly suits properties with spectacular views or specific wind patterns. Orienting the open side toward water features, mountain vistas, or garden landscapes transforms the shelter into an observation point. The protected seating area allows comfortable fire enjoyment even during breezy conditions that would make open-air fire pits challenging.
Pallet Wood Shelter Construction
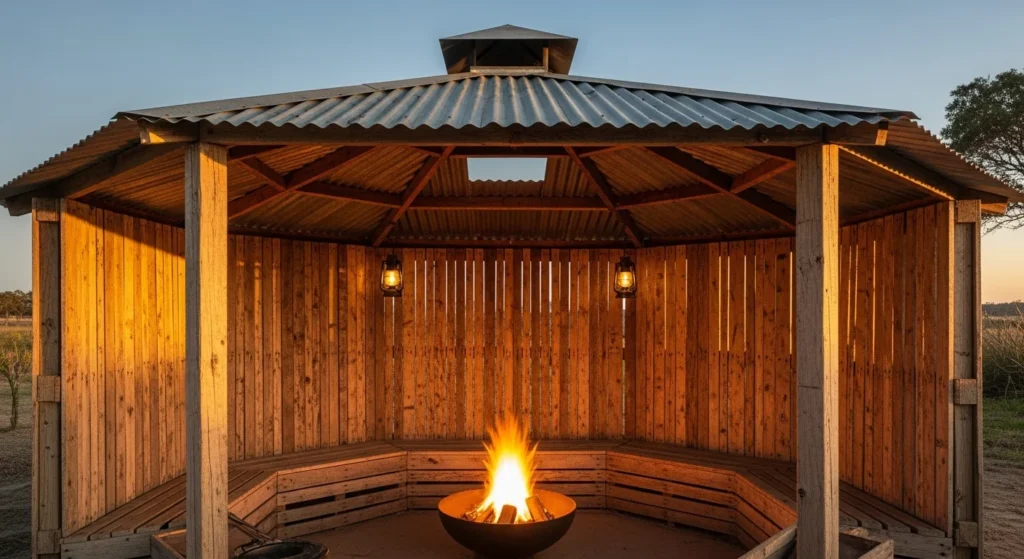
Budget-conscious builders appreciate the versatility and affordability of pallet wood shelters. Reclaimed shipping pallets provide abundant building material at minimal cost while adding rustic charm. The weathered appearance of pallet wood creates instant character without requiring extensive finishing.
A circular pallet wood shelter measuring 15 feet in diameter can accommodate a central fire pit with surrounding seating for groups. Stand pallets vertically to form fence-style walls, creating wind protection and privacy. Leave gaps between pallets for ventilation while maintaining the rustic aesthetic. The irregular spacing creates interesting shadow patterns when lit by firelight.
Roof construction for pallet shelters requires more conventional lumber for structural integrity. Use treated 2×6 or 2×8 boards for rafters, creating either a simple shed roof or pyramidal hip roof design. Cover rafters with corrugated metal roofing for durability and weather resistance. Cut a circular opening in the roof directly above the fire pit, fitting it with a salvaged chimney pot to direct smoke upward.
Enhancing pallet wood structures with thoughtful details transforms basic materials into charming spaces. Adding built-in shelves between wall sections provides display areas for lanterns, plants, or beverage storage. Creating integrated wood storage beneath bench seating keeps firewood dry and readily available. Staining or painting select pallet sections introduces color while maintaining the reclaimed aesthetic.
Scandinavian-Inspired BBQ Hut
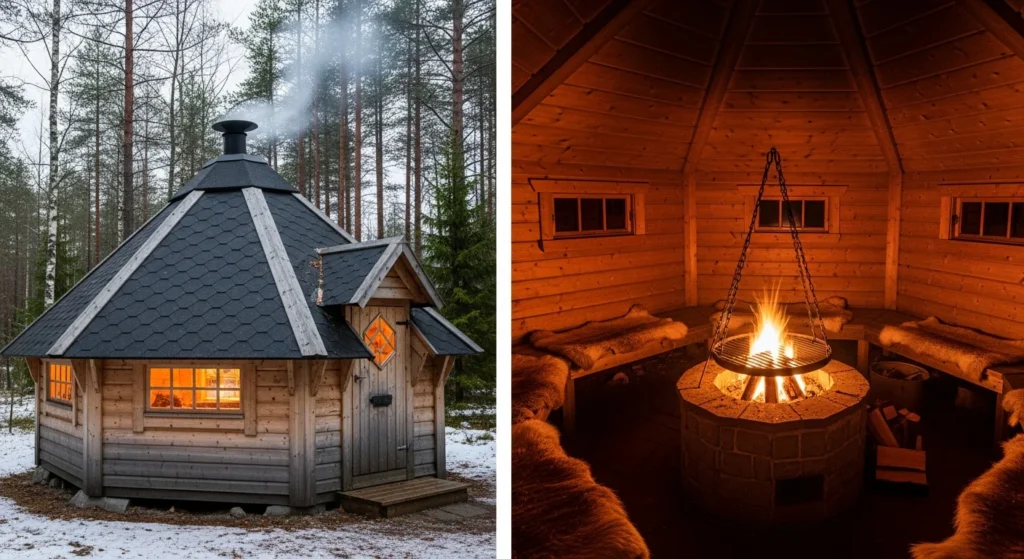
The Scandinavian BBQ hut, also called a grill house or kota, represents the ultimate fire pit shelter for dedicated outdoor enthusiasts. These distinctive hexagonal or octagonal structures feature a central fire pit with built-in bench seating around the perimeter. A steep pyramidal roof with central smoke hole provides excellent weather protection while maintaining traditional aesthetics.
Authentic Scandinavian designs use solid log construction with carefully fitted joints, though modern interpretations often employ conventional framing covered with board-and-batten siding. The steep roof pitch sheds snow effectively in cold climates while creating impressive interior height. Windows positioned around the upper walls provide natural light and scenic views.
Interior benches in traditional kotas pull out to convert into sleeping platforms, creating overnight shelter for camping experiences. Storage compartments beneath benches hold cooking equipment, firewood, and outdoor gear. Some designs incorporate small prep counters or shelving for food service during gatherings.
Building a proper Scandinavian BBQ hut requires significant investment in materials and construction time. However, the resulting structure provides unmatched four-season usability. These shelters enable comfortable outdoor gatherings during snow, rain, or cold weather that would otherwise limit fire pit use. The enclosed environment creates intimate atmosphere perfect for storytelling, meals, and extended conversations.
Portable Canopy Shelter
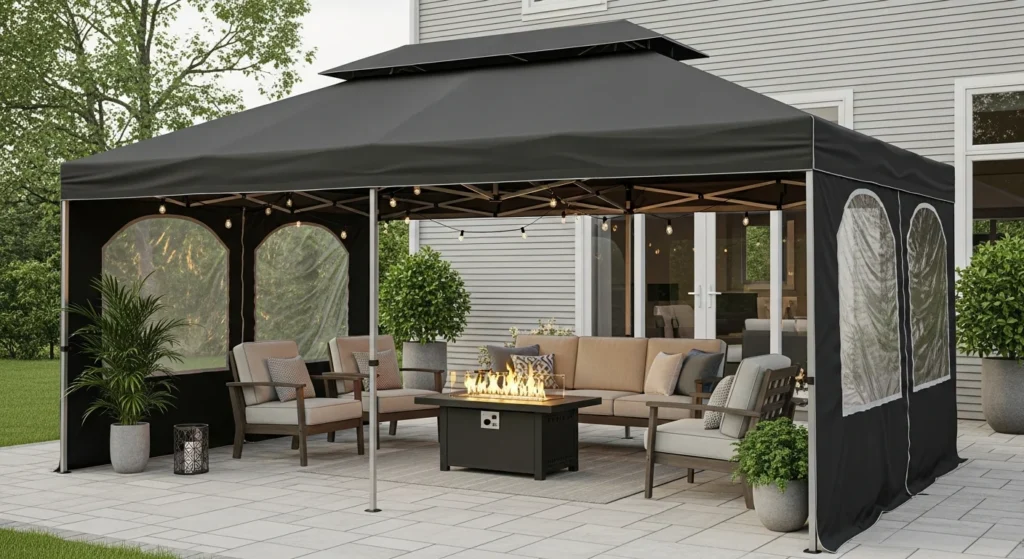
Temporary or portable canopy shelters offer flexibility for renters or those wanting moveable fire pit protection. Heavy-duty pop-up canopies designed for outdoor use provide instant shelter without permanent construction. Position the canopy over a portable fire pit for weather protection during gatherings, then disassemble for storage.
Selecting fire-rated canopy materials ensures safe use over fire features. Look for canopies with flame-retardant fabrics and metal framing. Standard event canopies with polyester tops should not be used over fire pits due to burn risk. Specialized outdoor living canopies feature heat-resistant fabric and increased height for proper clearance.
Enhancing portable canopies with practical accessories improves functionality. Adding sidewalls on two or three sides blocks wind while maintaining ventilation. String lights attached to the canopy frame create ambiance for evening use. Weight bags or ground stakes secure the structure against wind, preventing dangerous movement near the fire.
The portability advantage allows repositioning based on seasonal changes or evolving landscape plans. Move the shelter to follow shade patterns, accommodate growing vegetation, or optimize views. Store the canopy during winter months to extend its lifespan, then redeploy when weather permits outdoor gathering.
Rustic Lean-To Shelter
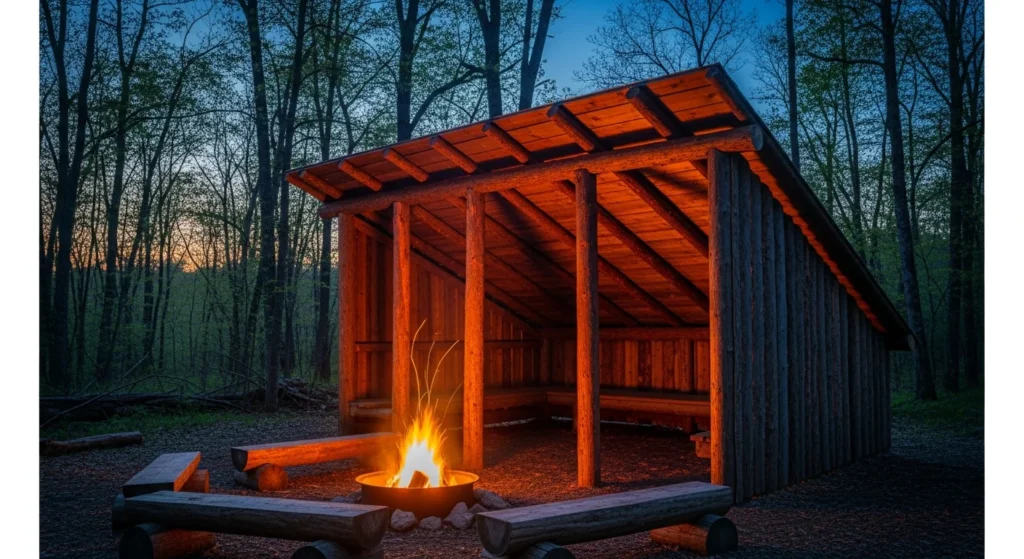
The lean-to represents one of the simplest fire pit shelters to construct, requiring minimal materials and basic carpentry skills. This single-sloped roof design sheds water away from the fire pit while providing overhead protection. Build the shelter against an existing fence, garage wall, or freestanding posts for structural support.
Traditional lean-to construction uses rough-cut lumber or small logs for an authentic wilderness aesthetic. Position a long ridge pole against a support wall or between two tall posts. Lean smaller poles or boards at an angle from the ridge pole to the ground, creating the sloped roof surface. Cover the framework with evergreen boughs, bark slabs, or modern tarps depending on desired appearance and weatherproofing needs.
Modern lean-to interpretations employ conventional lumber with metal or shingle roofing. A 12-foot by 8-foot lean-to provides ample shelter for a medium fire pit with surrounding seating. The simple rectangular design permits straightforward construction without complex angles or measurements. Adding a front post or two creates an overhang extension for additional coverage.
Positioning the fire pit strategically within the lean-to maximizes the shelter’s effectiveness. Place the fire near the open front edge rather than deep under the roof to ensure proper smoke ventilation. Arrange seating in a semicircle facing the fire with the shelter wall at back, creating comfortable protection from rear wind and weather.
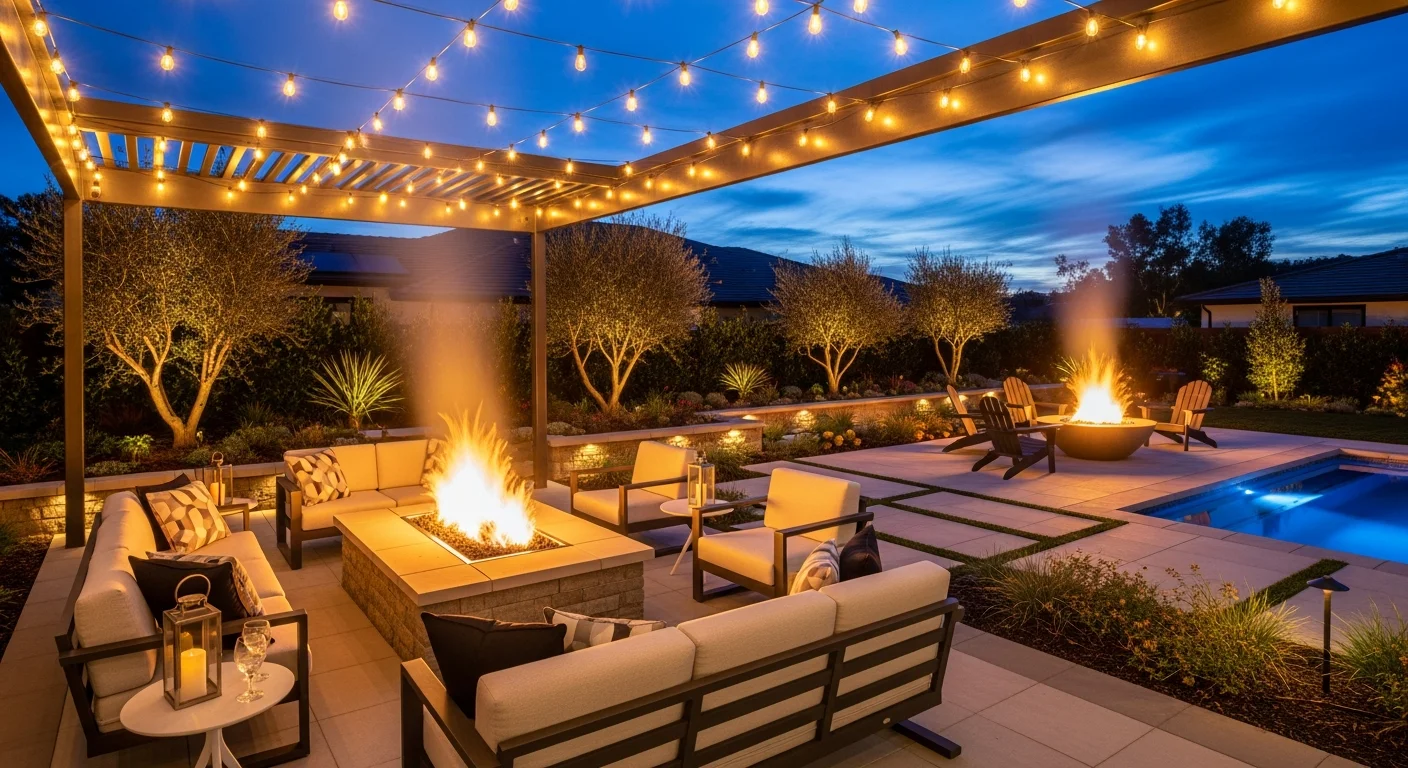
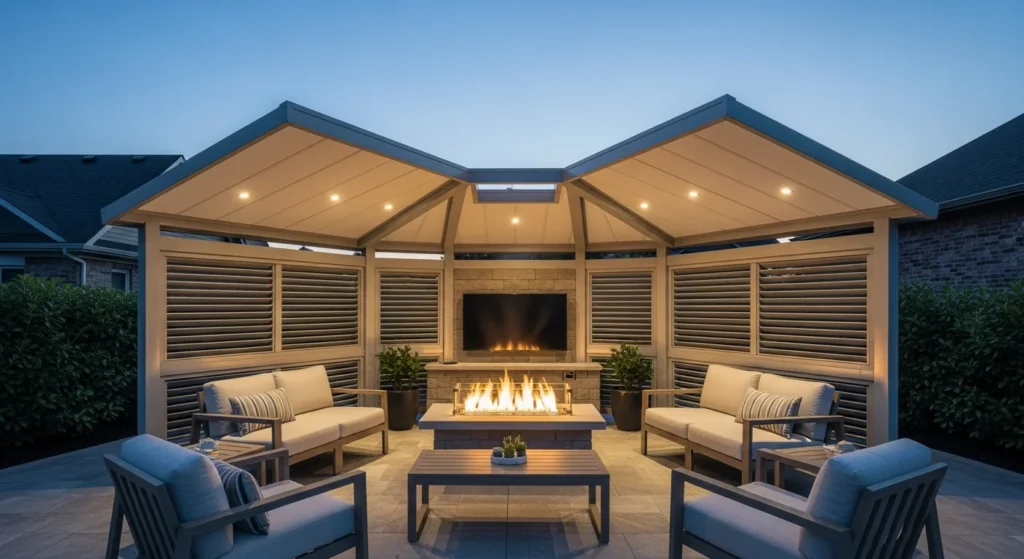
Pavilion-Style Fire Pit Shelter
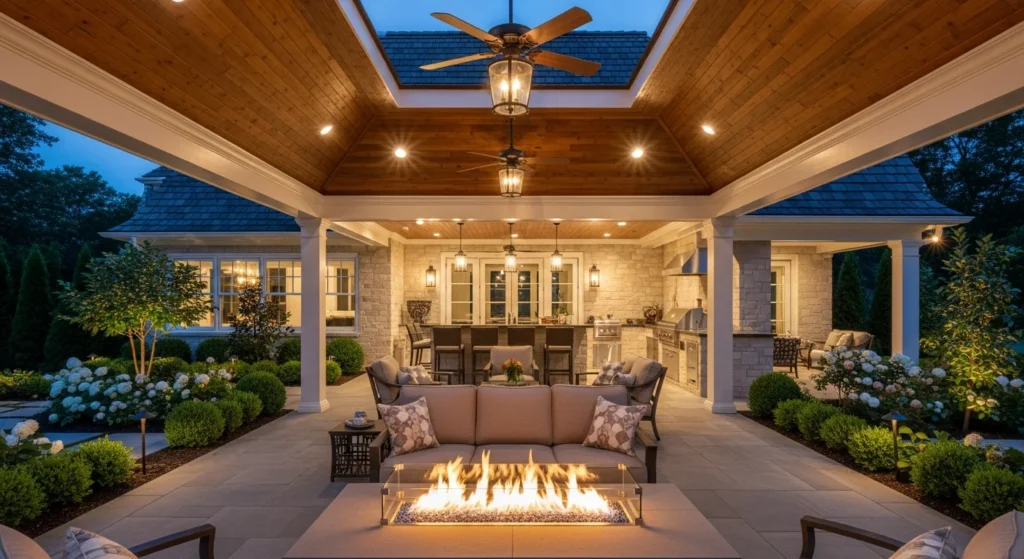
A full pavilion offers the ultimate in fire pit shelter design, creating a dedicated outdoor living room with comprehensive weather protection. These substantial structures feature four-post construction with solid roof panels and optional screening or walls. The generous size accommodates not just fire pits but complete outdoor kitchens, dining areas, and lounge spaces.
Pavilion roofs typically use architectural shingles matching the main house for visual cohesion. Higher-end designs incorporate tongue-and-groove ceiling boards creating finished interior appeal. Ceiling fans mounted between rafters circulate air for summer comfort while helping distribute heat during cooler months. Built-in lighting fixtures enable comfortable evening use year-round.
Integrating the fire pit into a pavilion floor plan requires careful consideration of traffic patterns and heat zones. Position the fire feature away from the primary walkway to prevent accidental contact. Create distinct zones for cooking, dining, and lounging, with the fire pit serving as a natural divider or focal point between areas.
Pavilion construction represents significant investment but adds substantial value to properties. The permanent structure increases usable outdoor square footage more effectively than simpler shelters. Professional designs that complement existing architecture integrate seamlessly with overall property aesthetics. Many pavilions include finishing touches like stone columns, decorative railings, or custom built-ins that rival interior rooms in quality and craftsmanship.
Living Willow Shelter
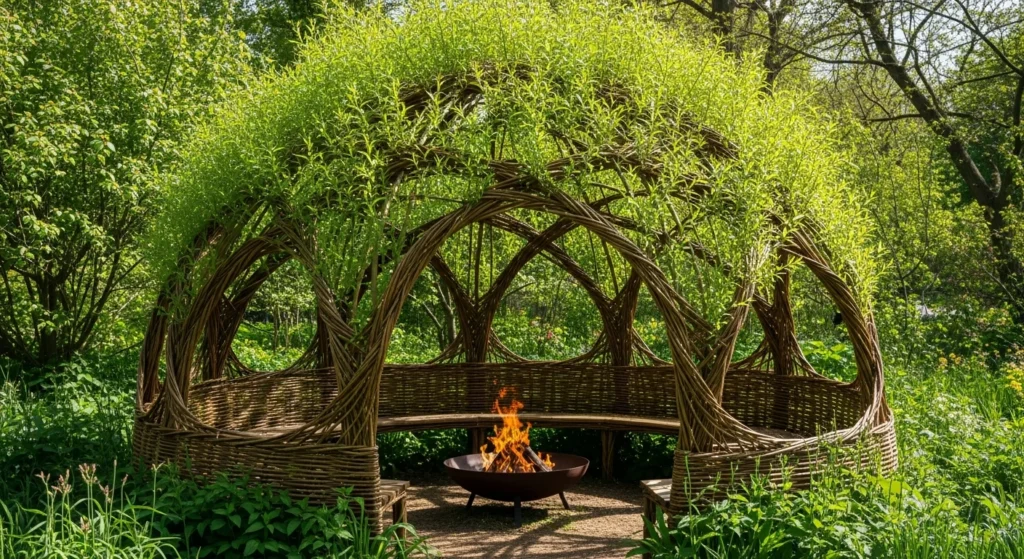
The living willow shelter presents an ecological and artistic approach to fire pit coverage. This technique uses live willow rods woven and planted to create a growing structure that develops over time. The method requires patience but results in a unique, sustainable shelter that strengthens naturally as plants mature.
Creating a willow shelter begins with selecting long, flexible willow rods in early spring when sap is rising. Push thick rods into prepared soil at regular intervals around the fire pit perimeter. Bend and weave these main supports to form dome or tunnel shapes. Interweave thinner willow stems horizontally to fill gaps and create structural stability.
Regular watering during the first growing season establishes the willow plants. New shoots emerge from the planted rods, gradually creating denser coverage. Annual pruning maintains the desired shape while encouraging thick growth. After several years, the interwoven structure becomes strong enough to support additional decorative elements or climbing plants.
The living shelter requires ongoing maintenance as an organic structure. Periodic watering during dry spells keeps plants healthy. Annual weaving of new growth maintains form and increases density. Dead material must be removed to prevent fire hazards. Despite the maintenance requirements, the resulting living architecture creates magical ambiance impossible to achieve with conventional construction.
Combination Roof and Open Design
The combination roof design balances weather protection with ventilation through strategic roof panel placement. This approach creates protected zones around the fire pit perimeter while leaving the center area open for smoke release. The design works particularly well for larger gatherings where some guests prefer shelter while others want open-air experience.
Practical implementation uses independent roof sections that can be customized for specific needs. Fixed roof panels positioned on three sides provide consistent shelter from prevailing weather. The fourth side remains open or uses retractable panels allowing flexibility based on conditions. Directly above the fire pit, either leave the roof completely open or install an adjustable louvered section.
Louvered roof systems above fire pits offer ultimate control over ventilation and weather protection. When the fire is burning, open louvers completely to release heat and smoke. Once extinguished, close louvers tightly to protect furniture and the fire pit from rain. Some systems include motorized controls operating via remote or smartphone app for convenient adjustment.
This versatile design accommodates various fire pit types and sizes. Small intimate fires work well under mostly covered designs with minimal central opening. Larger fire features or wood-burning pits require more substantial ventilation zones. Gas fire tables produce less smoke, permitting more extensive overhead coverage than wood-burning alternatives.
Conclusion
Creating the perfect fire pit shelter transforms your outdoor space into a year-round destination for relaxation and gathering. Whether you choose a simple lean-to or elaborate pavilion, the right shelter design enhances both functionality and ambiance. Consider your climate, budget, and lifestyle when selecting a shelter style that fits your needs.
Safety remains paramount in any fire pit shelter project. Always maintain proper clearances between flames and combustible materials. Ensure adequate ventilation to prevent dangerous smoke accumulation. Comply with local building codes and fire regulations to protect your property and loved ones.
The shelter designs presented offer starting points for customization based on your unique situation. Combine elements from different approaches to create hybrid solutions. Add personal touches through furniture selection, lighting, plants, and decorative elements. Your fire pit shelter should reflect your style while providing comfortable space for making memories with family and friends.
With careful planning and execution, your DIY fire pit shelter will provide years of enjoyment. The investment in time and resources pays dividends through extended outdoor seasons and enhanced property value. Begin with thorough research and preparation, then build your vision into reality. The result will be a treasured outdoor retreat where warmth and togetherness come naturally.
Frequently Asked Questions
What is the minimum safe height for a fire pit shelter roof?
The minimum recommended clearance between a fire pit and overhead structure is 10 feet. This distance allows adequate space for heat dispersal and reduces fire risk to roofing materials. Gas fire pits may permit slightly lower clearances, while wood-burning pits require strict adherence to this guideline. Always verify specific requirements with your fire pit manufacturer and local building codes, as some jurisdictions mandate greater clearances.
Can I use a wood pergola over a fire pit safely?
Yes, wood pergolas can be used over fire pits with proper precautions. The structure must maintain minimum 10-foot height clearance and be constructed from pressure-treated or naturally rot-resistant lumber. Gas fire pits present lower risk than wood-burning options due to controlled flames and lack of flying embers. Apply fire-retardant sealers to wood surfaces for additional protection. Regular inspections for heat damage or charring ensure ongoing safety.
What type of fire pit works best under a shelter?
Gas fire pits generally work best under shelters because they produce minimal smoke, offer controlled flames, and eliminate flying embers. Propane or natural gas models provide convenient operation with instant ignition and adjustable heat output. If you prefer wood-burning ambiance, choose smokeless fire pit designs that improve combustion efficiency. These specialized pits minimize smoke while maintaining authentic fire experience, making them more compatible with overhead structures.
Do I need a building permit for a fire pit shelter?
Building permit requirements vary significantly by location and structure type. Simple open pergolas may not require permits in some areas, while enclosed gazebos or pavilions typically do. Permanent structures with roofs generally need permits regardless of size. Temporary or portable shelters usually avoid permit requirements. Contact your local building department before starting construction to verify specific regulations, zoning restrictions, and required inspections for your project.
How much does it cost to build a DIY fire pit shelter?
DIY fire pit shelter costs range widely based on size, materials, and design complexity. Simple pallet wood shelters may cost under $500 in materials for basic construction. Mid-range pergola designs typically run $1,500 to $3,000 for quality lumber and hardware. Elaborate pavilions with finished roofs and custom features can exceed $10,000 in materials alone. Professional installation adds substantial cost but ensures proper construction. Budget for additional expenses including concrete footings, electrical work, and finishing touches beyond basic structure.