18+ Creative Garden Tunnel Ideas for Your Backyard
Garden tunnels represent one of the most versatile and visually stunning structures you can introduce to your outdoor space. Whether you want to extend your growing season, create a romantic walkway, or maximize vertical space, garden tunnels offer practical benefits wrapped in aesthetic appeal. These structures range from simple protective coverings to elaborate floral archways that transform ordinary gardens into extraordinary landscapes.
The beauty of garden tunnels lies in their adaptability. A home gardener in a cold climate can use them to protect tender vegetables from frost, while someone in a temperate zone might create a breathtaking passage covered in climbing roses. The possibilities extend far beyond traditional applications, offering solutions for small urban gardens, expansive rural properties, and everything in between.
This comprehensive guide explores creative garden tunnel ideas that cater to different needs, budgets, and skill levels. From low-cost season extenders built with basic materials to sophisticated decorative structures that serve as garden focal points, you’ll discover how to implement these features in your own backyard. Each concept addresses specific challenges gardeners face while adding functional beauty to outdoor spaces.
Classic PVC Low Tunnel for Season Extension
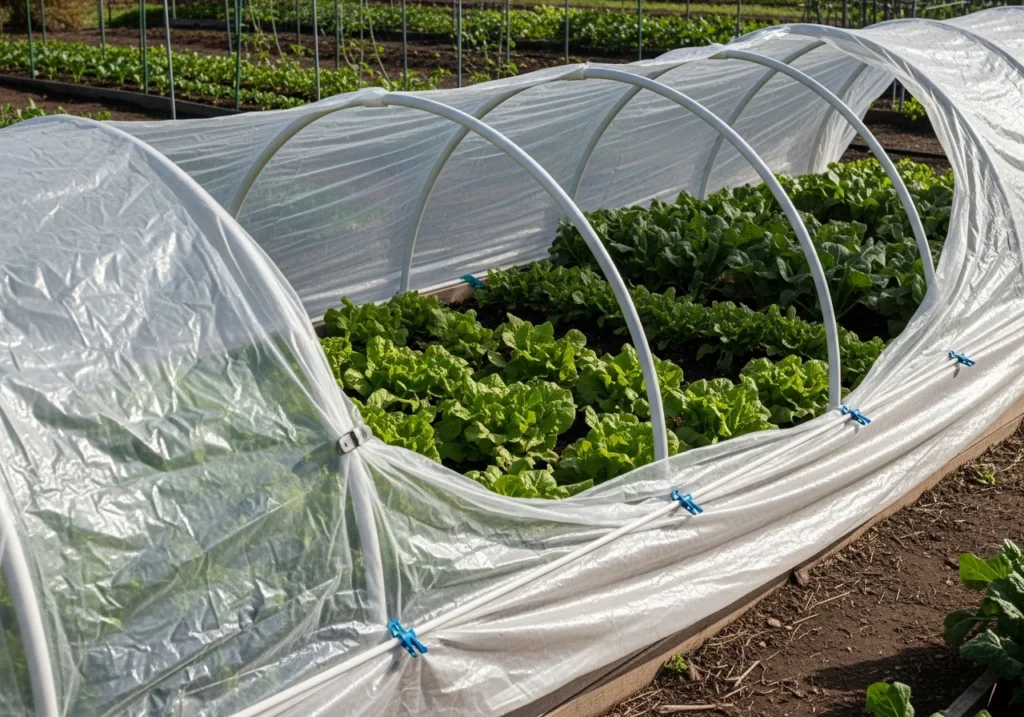
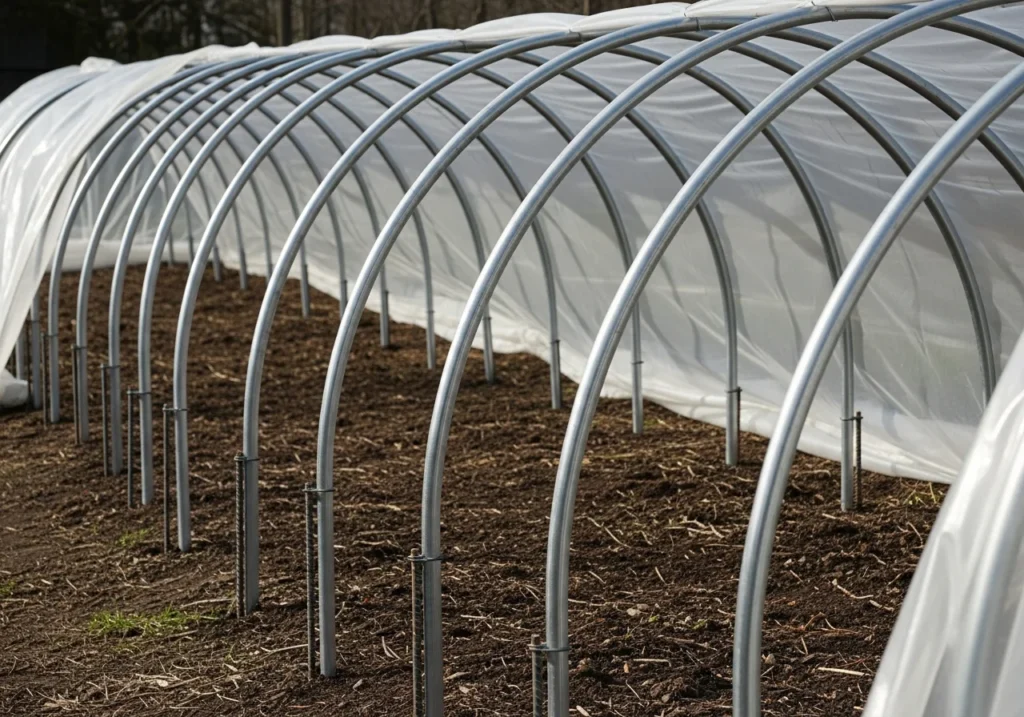
The PVC low tunnel stands as the most accessible entry point for gardeners wanting to protect crops from cold weather. This structure typically rises three to four feet high and spans the width of a standard garden bed. Construction requires minimal investment, usually involving half-inch diameter PVC pipes bent into hoops and secured with rebar stakes driven into the ground.
These tunnels create a microclimate that can be several degrees warmer than ambient temperature. When covered with agricultural row cover or clear plastic sheeting, they trap solar heat during the day while protecting plants from frost at night. The added warmth accelerates growth rates, allowing you to plant earlier in spring and harvest later into fall.
Installation takes just an afternoon. Cut PVC pipes to appropriate lengths, typically eight to ten feet depending on your bed width. Drive rebar stakes about twelve inches into the soil on both sides of the bed, then slip the PVC pipes over the stakes to form arches. Space these hoops every two to four feet for adequate support. Finally, drape row cover or plastic over the structure and secure it with clips, sandbags, or buried edges.
High Tunnel Greenhouse Structure
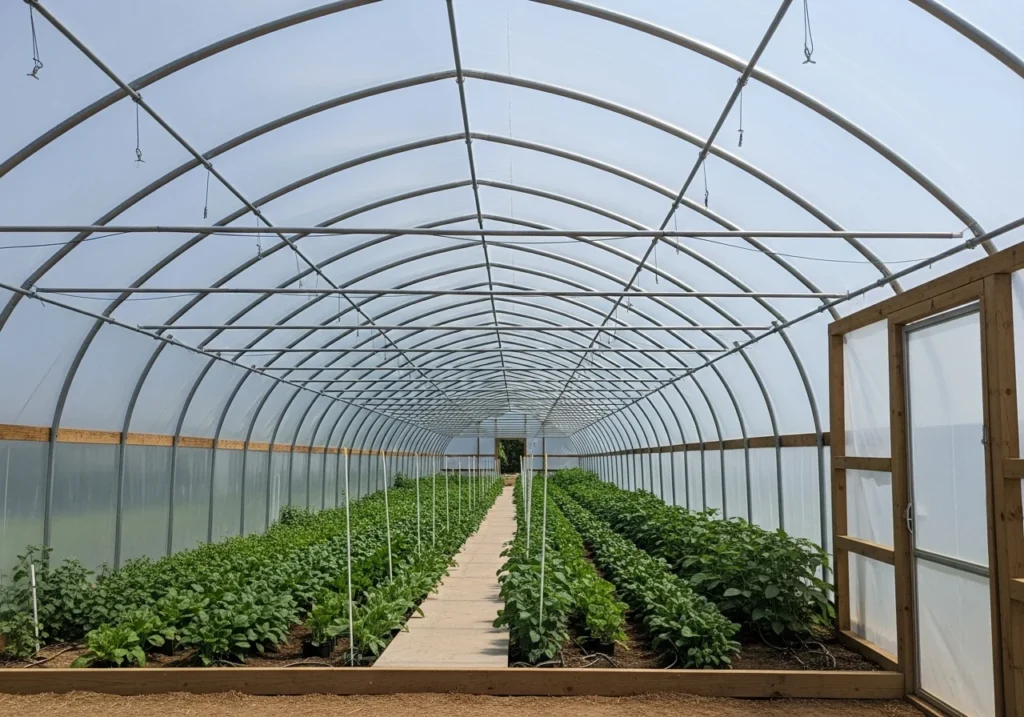
High tunnels represent a significant upgrade from low tunnels, offering walk-in height and substantially more growing space. These structures typically measure six to seven feet tall at the peak, allowing comfortable movement inside for planting, maintenance, and harvesting. While requiring more materials and planning than low tunnels, they provide superior climate control and extended functionality.
The basic framework consists of larger diameter PVC pipes or metal hoops attached to a wooden base, creating a stable foundation that withstands wind and weather. Many gardeners construct end walls with doors for easy access and ventilation. The plastic covering, usually four to six mil agricultural grade, allows light penetration while maintaining warmth inside.
Inside a high tunnel, you gain the ability to start seedlings weeks earlier than outdoor planting dates. Cool-season crops like lettuce, spinach, and kale thrive throughout winter in these protected environments. During summer months, the structure can accommodate heat-loving vegetables or provide shade when covered with appropriate cloth instead of clear plastic.
Cattle Panel Arch Tunnel for Vertical Growing
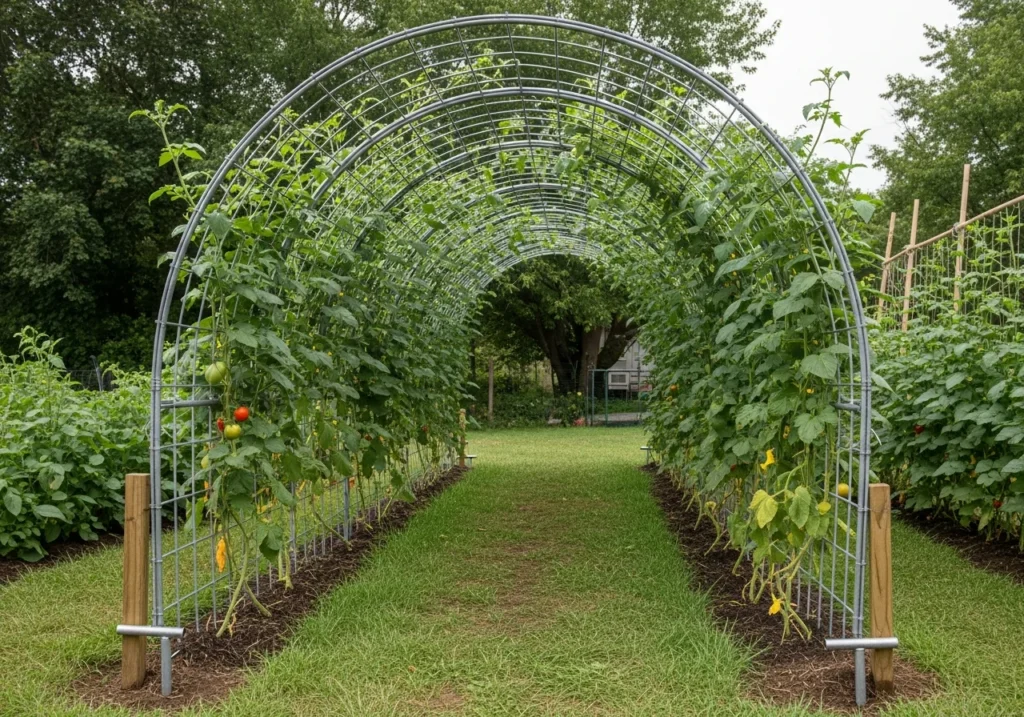
Cattle panels, those sturdy wire grids typically used for livestock fencing, make excellent frameworks for garden tunnels. Their rigid construction requires no additional support beyond anchoring at ground level, and their grid pattern provides built-in climbing surfaces for vining plants. A single cattle panel bent into an arch creates an impressive growing structure.
This tunnel design excels for growing tomatoes, cucumbers, squash, melons, and beans vertically. Plants trained up the sides and over the top produce straighter fruits that are easier to spot and harvest. The elevated growth also improves air circulation around plants, reducing disease pressure from soil-borne pathogens and excess moisture.
Construction involves bending a sixteen-foot cattle panel into a gentle arch, then securing both ends firmly into the ground with rebar stakes or T-posts. Multiple panels can be connected end to end to create extended tunnels that span entire garden areas. The space underneath remains accessible for planting shade-tolerant crops that benefit from the filtered light and cooler temperatures created by the overhead canopy.
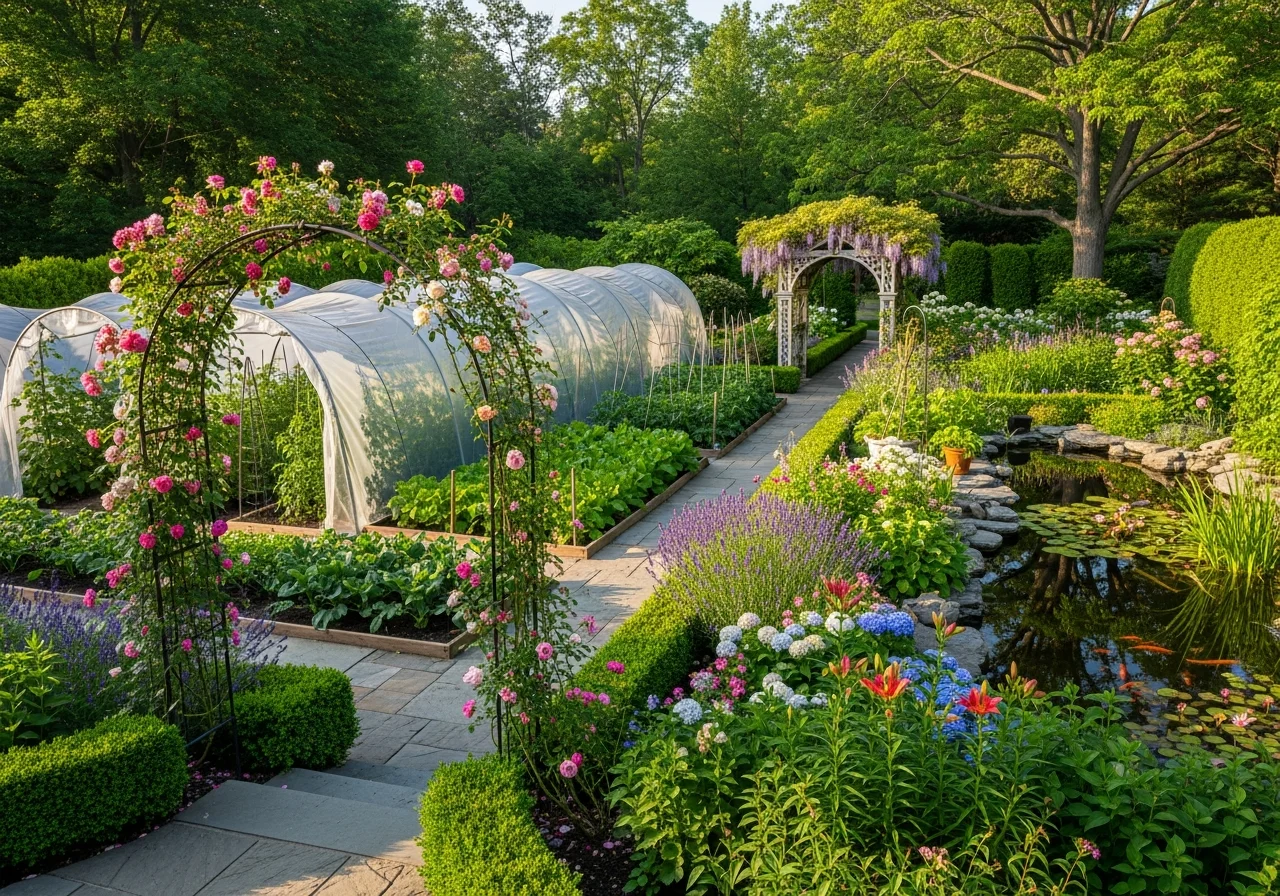
Romantic Flower Tunnel with Climbing Roses
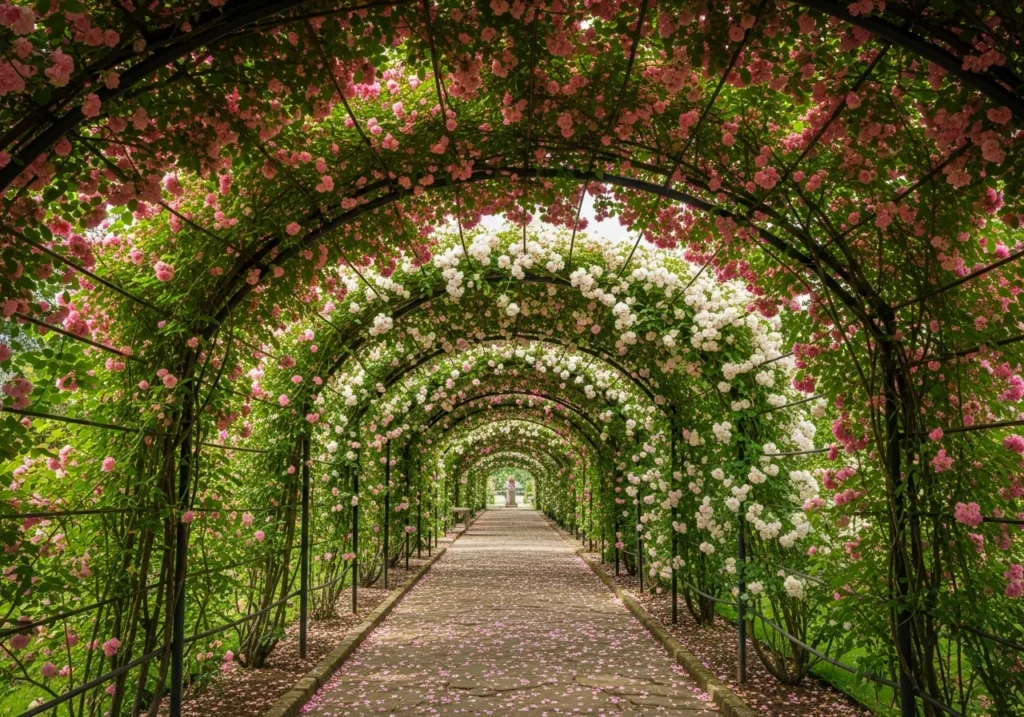
Few garden features rival the enchanting beauty of a flower tunnel covered in blooming roses. This structure transforms a simple pathway into a sensory experience, with petals overhead, fragrance filling the air, and dappled sunlight filtering through leaves. The investment in time and materials pays dividends for years as established roses mature into a living ceiling.
Select climbing rose varieties known for vigorous growth and disease resistance. Popular choices include New Dawn for its pale pink blooms, Iceberg for pristine white flowers, and Eden for romantic pink ruffled petals. Plant roses at the base of sturdy supports, typically metal arches or wooden arbors spaced four to six feet apart to create the tunnel effect.
Training roses requires patience and regular attention. Secure new growth horizontally along supports using soft ties that won’t damage stems. This horizontal training encourages the production of flowering lateral shoots along the entire length of each cane. Prune annually to remove dead wood, shape the structure, and promote vigorous new growth that will carry next season’s blooms.
Living Willow Tunnel for Natural Beauty
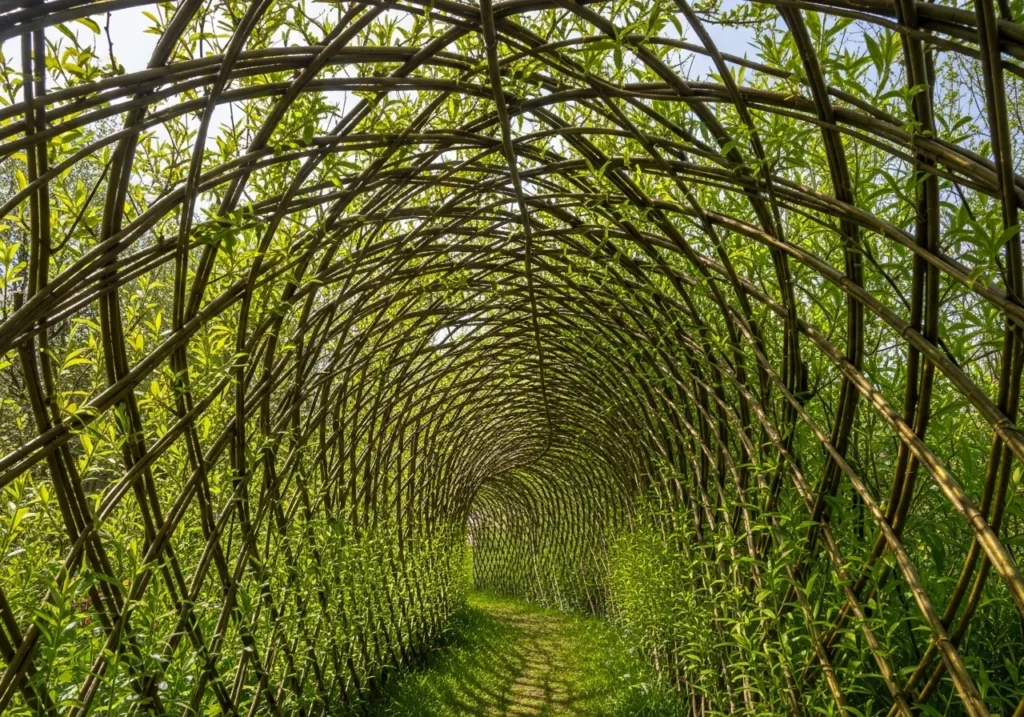
A living willow tunnel creates an entirely organic structure where the framework itself consists of living plants. Willow rods pushed into moist soil readily take root and sprout, allowing you to weave an architectural feature that grows stronger and more beautiful each year. This sustainable approach appeals to gardeners seeking harmony between structure and nature.
Construction begins in late winter or early spring when dormant willow rods are available. Push thick rods deep into the ground on both sides of your intended pathway, then bend and weave them together overhead to form arches. Additional thinner rods can be woven horizontally through the uprights to create more density and pattern. As spring arrives, the rods leaf out, creating a green tunnel that evolves throughout the growing season.
Maintenance involves regular watering during the establishment period and annual pruning to maintain shape and encourage dense growth. The willow responds well to hard pruning, allowing you to refine the tunnel’s form over time. During summer, the leafy canopy provides cooling shade, while winter reveals the beautiful sculptural quality of the woven branches.
Quick Hoop Tunnel with EMT Conduit
Electrical metallic tubing, commonly known as EMT conduit, offers a durable alternative to PVC for constructing garden tunnels. This material bends smoothly into perfect arches and maintains its shape through years of use. The metal construction withstands heavy snow loads better than plastic alternatives, making it ideal for areas with harsh winters.
Half-inch EMT conduit works well for most garden applications. Cut ten-foot lengths, then use a pipe bender or manual pressure to create uniform arches. Slip each end over rebar stakes driven into the ground, ensuring all hoops align at the same height. The metallic surface allows row cover or plastic to slide easily during seasonal adjustments.
This tunnel style works exceptionally well for overwinter protection of hardy crops. Kale, collards, carrots, and leeks can survive extreme cold when covered with multiple layers of row cover over EMT hoops. The structure stays in place year-round, allowing you to simply adjust coverings based on seasonal needs rather than constructing and deconstructing the entire framework.
Decorative Arbor Tunnel for Garden Pathways
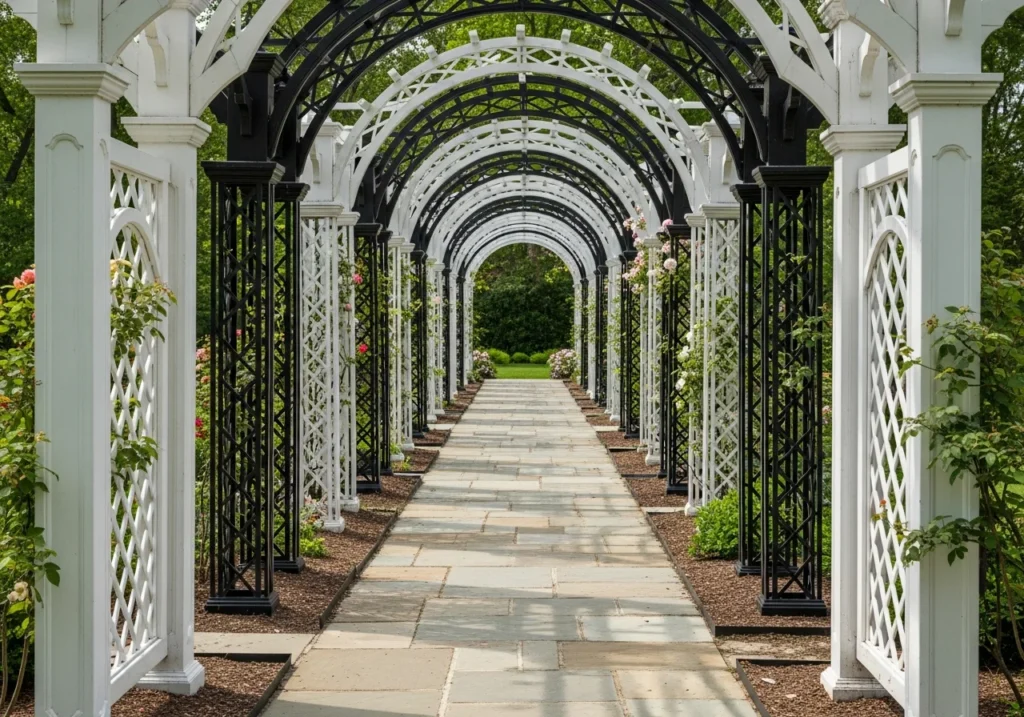
Transform a mundane garden path into a destination by installing a series of decorative arbors that create a tunnel effect. This approach works particularly well in established gardens where you want to add vertical interest without disrupting existing plantings. Arbors come in numerous styles, from simple wooden structures to ornate metal designs, allowing you to match your garden’s aesthetic.
Space arbors six to eight feet apart along the pathway, ensuring adequate clearance for comfortable walking. The repetition of arched openings creates rhythm and draws the eye forward, making gardens feel more spacious and inviting. Paint wooden arbors to complement your home’s exterior or let metal versions develop an attractive patina over time.
Planting choices determine the tunnel’s character throughout seasons. Clematis provides spectacular floral displays in spring and summer, with varieties offering different bloom times for extended color. Annual vines like morning glories or sweet peas fill in quickly for immediate impact. For evergreen structure, consider combining flowering vines with ivy or other persistent climbers that maintain coverage year-round.
Greenhouse Tunnel with Raised Beds
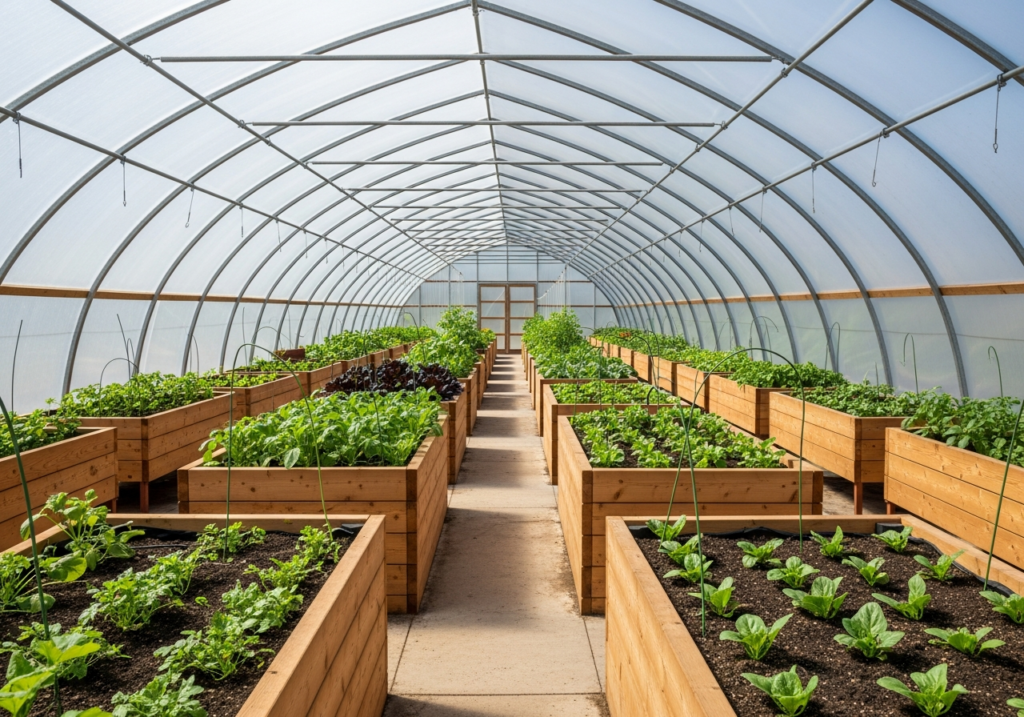
Combining raised bed gardening with greenhouse tunnels maximizes both growing space and ergonomic comfort. This design elevates plants closer to eye level, reducing bending and kneeling while improving drainage and soil warming. The enclosed tunnel environment protects plants while the raised beds provide ideal root zone conditions.
Construct raised beds from rot-resistant wood, concrete blocks, or metal panels, then build a tunnel structure over them. The beds should be narrow enough to reach across easily, typically three to four feet wide. Paths between beds need sufficient width for wheelbarrows and comfortable movement when carrying tools and harvest baskets.
This combination excels for intensive vegetable production. Plant succession crops throughout the season, replacing finished plantings with new transplants to maintain continuous harvests. The raised bed soil warms quickly in spring, while the tunnel covering extends viable growing time on both ends of the season. During peak summer, roll up or remove the tunnel sides for ventilation while maintaining the structural framework.
Shade Tunnel for Heat-Sensitive Crops
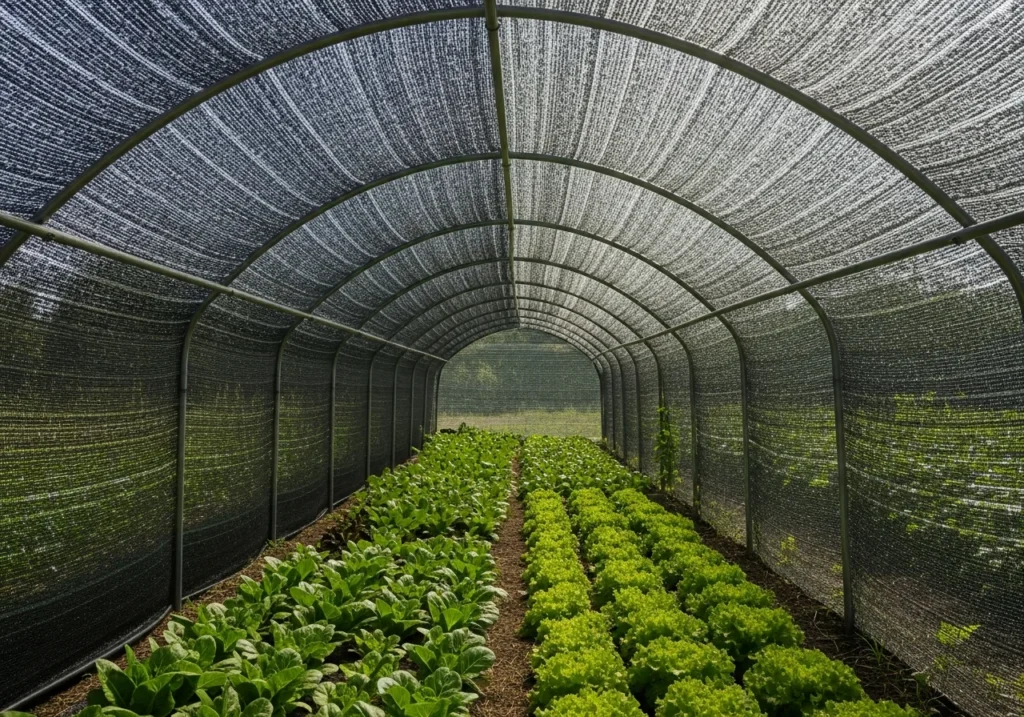
Not all garden tunnels focus on warmth and protection from cold. Shade garden tunnels address the opposite challenge, protecting plants from excessive heat and sun exposure. This structure proves invaluable in hot climates or for growing cool-season crops during warm months. The framework matches standard tunnel construction, but shade cloth replaces clear plastic coverings.
Select shade cloth percentage based on your crops and climate. Thirty to fifty percent shade works well for lettuce, spinach, and other greens that bolt quickly in heat. More delicate plants may benefit from seventy percent shade during the hottest summer months. The cloth filters intense sunlight while allowing rain to penetrate, maintaining natural moisture without irrigation system complications.
Temperature drops of ten to fifteen degrees under shade cloth make previously impossible plantings viable. Grow lettuce through summer, extend cool-season harvests, or protect heat-stressed plants during extreme weather events. The tunnel framework stays in place year-round, with shade cloth added and removed as seasonal conditions dictate.
Insect Exclusion Tunnel for Organic Growing
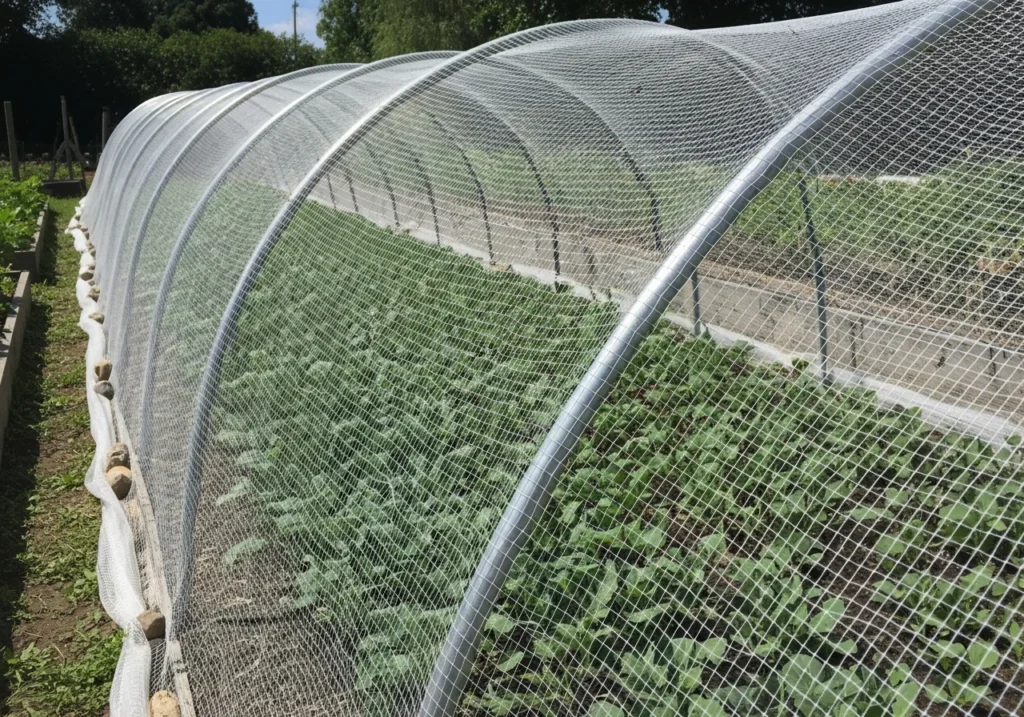
Garden pests represent a constant challenge for organic growers who prefer avoiding chemical pesticides. Insect exclusion tunnels provide a physical barrier that prevents pests from reaching plants while allowing air, water, and light penetration. This proactive approach eliminates many common pest problems before they begin, resulting in healthier plants and better yields.
Construct the framework using any standard tunnel design, then cover it with fine mesh insect netting instead of solid plastic. The netting must exclude target pests while permitting adequate airflow. For general pest exclusion, look for mesh with openings smaller than one millimeter. Secure all edges carefully, as insects will exploit any gap to access plants inside.
This technique works especially well for brassicas plagued by cabbage moths, carrots threatened by rust flies, and any crops targeted by aphids or leaf miners. Install tunnels over young transplants or newly emerged seedlings before pest populations build. The enclosed environment often produces superior quality produce with unblemished leaves and fruits, commanding premium prices at market or providing satisfaction for home gardeners.
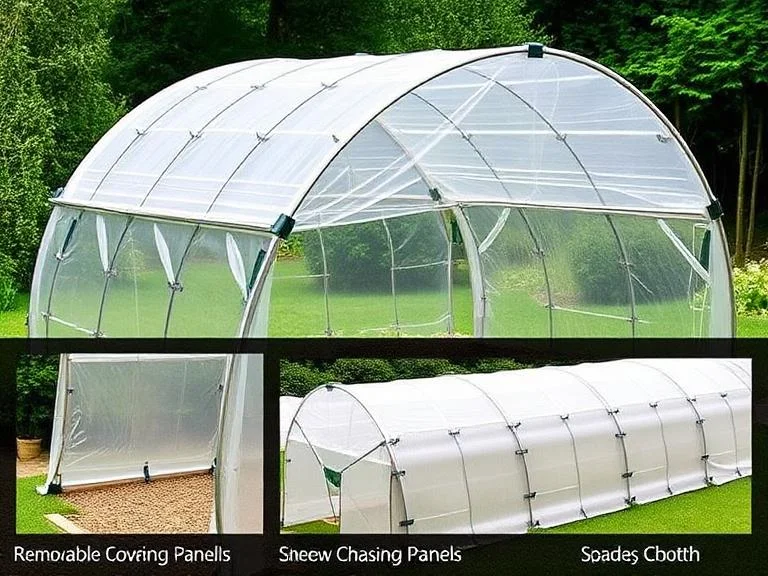
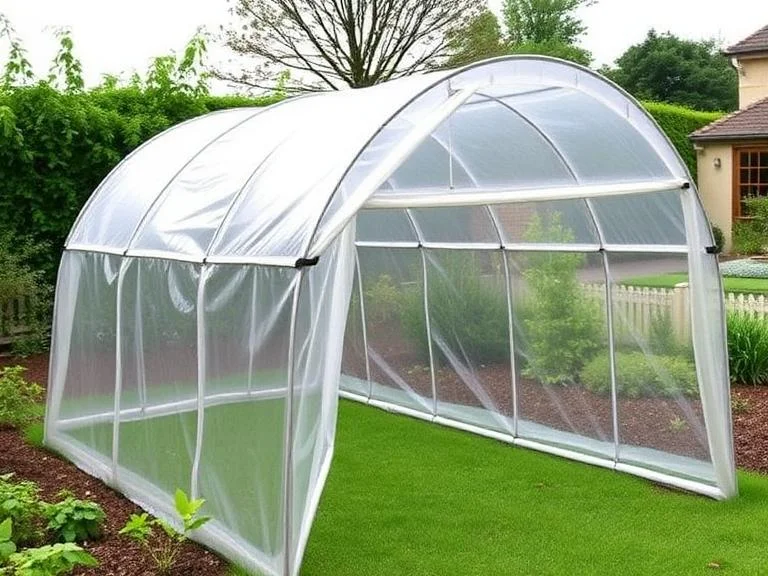
Retrofitted Greenhouse Kit Tunnel

Commercial greenhouse kits offer engineered solutions with professional-grade materials and detailed instructions. While pricier than DIY options, these kits eliminate guesswork regarding structural integrity and weather resistance. Many include features like roll-up sides, vents, and door systems that enhance functionality and ease of use.
Select a kit sized appropriately for your available space and growing ambitions. Smaller eight by ten foot models suit hobby gardeners, while serious growers might invest in structures spanning several hundred square feet. Consider future needs as well, since expanding or relocating a greenhouse requires significant effort once established.
Follow manufacturer instructions carefully during assembly, paying particular attention to foundation requirements and anchoring systems. Proper installation ensures the structure withstands wind, snow, and other environmental stresses over many years. Most kits include plastic covering designed to last several seasons, with replacement sheets available when needed. The investment in a quality kit often proves worthwhile through reliable performance and reduced maintenance headaches.
Multi-Season Tunnel with Removable Panels
Flexibility defines this tunnel design, which allows you to adjust covering based on current weather and crop needs. The framework remains permanent, but side panels can be added, removed, or replaced with different materials throughout the year. This adaptability makes one structure serve multiple purposes across changing seasons.
Build the basic framework from durable materials that withstand year-round exposure. Attach covering materials using clips, snaps, or battens that allow quick changes without tools. During winter, use clear plastic panels for maximum heat retention. Spring and fall might require only row cover for frost protection. Summer could call for shade cloth or insect netting, or the structure might remain uncovered entirely.
This versatility maximizes return on investment by eliminating the need for separate structures dedicated to different purposes. One tunnel can protect cold-hardy crops during winter, start warm-season transplants in spring, provide shade for greens in summer, and extend fall harvests as temperatures decline. The ability to modify configuration quickly means you can respond to unexpected weather events or experiment with new growing techniques.
Heritage Garden Tunnel with Reclaimed Materials

Sustainability-minded gardeners often appreciate creating functional structures from reclaimed or repurposed materials. Old window frames, salvaged lumber, vintage gates, and architectural salvage pieces combine to create charming garden tunnels with character impossible to achieve using new materials. Each structure becomes unique, reflecting the builder’s creativity and available resources.
Source materials from demolition sites, architectural salvage yards, online marketplaces, or your own collection of saved items. Windows work particularly well for end walls, providing light while offering protection from wind. Weathered wood adds rustic appeal, though treating it with non-toxic preservatives extends longevity. Metal elements like old headboards or ornamental fencing pieces create interesting visual texture.
Construction requires adaptability since reclaimed materials rarely conform to standard dimensions. Embrace the organic, asymmetrical nature of these projects rather than seeking perfect uniformity. The resulting tunnel often becomes a conversation piece, demonstrating that functional garden structures need not sacrifice charm for practicality. Plants trained over the framework soften hard edges while adding living beauty to vintage elements.
Edible Landscaping Tunnel with Fruit Vines

Why limit garden tunnels to flowers or vegetables alone when you can combine beauty with edible harvests? Fruit-bearing vines create stunning tunnel displays while producing delicious crops. Grapes, kiwi, and passion fruit all grow vigorously on appropriate support structures, transforming pathways into productive spaces that delight multiple senses.
Grapes require sturdy frameworks capable of supporting considerable weight as vines mature and fruiting canes develop. Space plants ten to fifteen feet apart, training main trunks vertically then encouraging lateral growth along horizontal supports. Annual pruning maintains productivity and prevents tangled overgrowth that blocks pathways. Choose varieties suited to your climate, considering both cold hardiness and heat requirements for fruit ripening.
Kiwi vines produce abundant crops once established but require both male and female plants for pollination. These vigorous growers need strong support and regular pruning to remain manageable. The large leaves create substantial shade, making the tunnel a cool retreat during summer while fruit ripens overhead. Passion fruit thrives in warmer climates, covering structures quickly with attractive foliage and unique flowers followed by flavorful fruit.
Quick-Deploy Seasonal Tunnel System
Some gardening situations call for temporary structures that assemble quickly without permanent installation. Mobile tunnel systems address this need, providing protection and support when required but storing compactly when not in use. This approach suits renters, gardeners working in community plots, or anyone wanting maximum flexibility.
Design the framework to break down into manageable components that stack or nest together during storage. Use lightweight materials like thin-walled PVC or aluminum tubing that one person can handle easily. Create connection points using simple methods like inserting smaller diameter pipes into larger ones or using spring clips that snap together without tools.
Covering materials should fold or roll compactly and resist damage from repeated handling. Consider storage requirements when selecting plastics, row covers, or netting, choosing materials that maintain integrity through multiple seasons of deployment and storage. Label components and create a simple assembly diagram to ensure quick setup without confusion, especially after months in storage.
Integrated Water Collection Tunnel

Water management often challenges gardeners, particularly in arid regions or during drought conditions. Designing tunnels that collect and direct rainwater addresses this need while maintaining all other tunnel benefits. The curved roof naturally channels precipitation toward edges where it can be captured for later irrigation use.
Install gutters along both lower edges of the tunnel, directing water into collection barrels or underground storage tanks. Size your collection capacity based on roof area and local rainfall patterns. A twenty-foot tunnel with a six-foot span captures significant water volume during even moderate rain events. Connect multiple barrels in series to increase storage capacity.
This harvested water, free from chlorine and other municipal water additives, benefits plants while reducing reliance on external water sources. During dry periods, the stored supply supplements irrigation needs. In wet climates, the system prevents water logging around tunnel bases by directing excess moisture away from growing areas. The integration of water harvesting transforms a simple protective structure into a comprehensive resource management system.
Aesthetic Garden Tunnel with Mixed Plantings

Create visual drama by designing tunnels that showcase diverse plant combinations rather than single species. This approach layers different bloom times, colors, textures, and growth habits to maintain interest throughout the entire growing season. The result resembles a vertical garden that visitors can walk through rather than simply view from outside.
Begin with a sturdy framework capable of supporting substantial plant weight as everything matures. Select a backbone of reliable performers like climbing roses or clematis, then interweave annual vines for color variation. Add flowering perennials at the base to complete the composition from ground level upward. Consider foliage plants like ornamental sweet potato vine or vining philodendron for textural contrast.
Plan bloom sequences so something always looks attractive. Early spring bulbs give way to late spring clematis, which overlap with summer roses, followed by fall-blooming vines and late-season annuals. Include plants with interesting seed heads or berries to extend visual appeal into winter. This layered approach requires more planning and maintenance than monoculture plantings but delivers far greater aesthetic reward.
Professional Cut Flower Production Tunnel

Commercial flower farmers have long recognized the value of protected growing spaces for premium cut flower production. Home gardeners can adopt these same techniques on a smaller scale, producing exceptional blooms for personal enjoyment or local market sales. The controlled environment inside tunnels results in longer stems, better color development, and extended harvest windows.
Focus on high-value crops that benefit most from protection. Ranunculus, anemones, and lisianthus produce superior quality under cover, while also being susceptible to weather damage in open fields. Plant in blocks or rows for efficient maintenance and harvesting. Install a basic irrigation system since overhead watering should be avoided once plants begin flowering.
Timing plantings to fill market gaps increases profitability for those selling flowers. Protected space allows earlier spring production and later fall harvests when outdoor flowers have finished. The ability to control environment also enables growing specialty varieties that command premium prices but require specific conditions. Even hobbyists benefit from having perfect blooms available for special occasions regardless of weather.
Conclusion
Garden tunnels offer remarkable versatility for addressing challenges gardeners face while enhancing the beauty and productivity of outdoor spaces. From simple season-extending structures built with basic materials to elaborate floral walkways that serve as landscape focal points, these features adapt to varied needs, budgets, and skill levels. The eighteen ideas presented here represent just the beginning of what’s possible when you combine creativity with practical functionality.
Success with garden tunnels comes from matching design to specific goals and site conditions. Consider your climate, available space, budget, and maintenance capabilities when selecting which type to build. Start with simpler projects to develop skills and understanding before attempting more complex structures. Remember that many tunnels can be modified or expanded over time as your experience grows and needs change.
The investment in garden tunnels, whether measured in time or money, returns dividends season after season. Protected crops grow more reliably, vertical spaces become productive, and previously challenging plantings become achievable. Beyond practical benefits, these structures add architectural interest and create memorable garden experiences. Whether you’re extending your growing season, creating a romantic walkway, or maximizing limited space, garden tunnels transform ordinary backyards into extraordinary growing environments that produce abundance and beauty throughout the year.
Frequently Asked Questions
What is the difference between a low tunnel and a high tunnel?
A low tunnel typically stands three to four feet tall and covers garden beds directly, requiring you to remove coverings to access plants. High tunnels are walk-in structures, usually six to seven feet tall, allowing you to work inside comfortably. Low tunnels cost less and assemble quickly, while high tunnels provide more space and better climate control for extended growing seasons.
How much does it cost to build a garden tunnel?
Costs vary dramatically based on size and materials. A basic PVC low tunnel over a four-foot bed might cost thirty to fifty dollars in materials. Mid-range high tunnels using quality materials run several hundred to a few thousand dollars. Decorative flower tunnels with metal arbors and established plants can cost anywhere from two hundred dollars for simple designs to several thousand for elaborate installations.
What plants grow best in garden tunnels?
Cool-season vegetables like lettuce, spinach, kale, and carrots thrive in covered tunnels during cold months. Warm-season crops including tomatoes, cucumbers, and peppers benefit from early season protection. For decorative tunnels, climbing roses, clematis, wisteria, honeysuckle, and passion fruit create beautiful coverage. Select plants based on your climate, tunnel type, and whether you prioritize food production or ornamental appeal.
Do garden tunnels need ventilation?
Yes, ventilation prevents overheating and manages humidity levels. Low tunnels require opening or removing covers during warm days to prevent heat damage. High tunnels benefit from roll-up sides, vented end walls, or removable panels. Even during cold months, brief ventilation on sunny days prevents excessive moisture buildup that encourages plant diseases. Proper airflow maintains healthy growing conditions year-round.
How long do garden tunnels last?
Framework longevity depends on materials and maintenance. PVC structures typically last five to ten years before requiring replacement. Metal frameworks can endure decades with proper care. Plastic coverings need replacement every three to five years as UV exposure degrades them. Row covers last one to three seasons depending on quality and handling. Regular inspections and prompt repairs extend overall lifespan significantly.