6+ Clever DIY Playground Shade Ideas
Creating a comfortable and safe outdoor play environment for children requires careful consideration of sun exposure. While playgrounds offer endless opportunities for physical activity and social development, prolonged exposure to direct sunlight can lead to overheating, sunburn, and reduced playtime. Building your own playground shade structures presents an affordable alternative to expensive commercial installations while allowing complete customization to fit your specific space and needs.
The challenge many parents and caregivers face is finding shade solutions that balance functionality, durability, and budget constraints. Commercial playground shade structures can cost thousands of dollars, placing them out of reach for many families. Fortunately, with basic materials from your local hardware store and a weekend of work, you can construct effective shade structures that protect children from harmful UV rays while maintaining an inviting play environment.
This comprehensive guide explores practical DIY playground shade ideas that range from simple temporary solutions to more permanent installations. Each approach offers unique benefits depending on your available space, budget, climate conditions, and structural requirements. Whether you need coverage for a small sandbox or an entire backyard play area, these proven methods will help you create comfortable shaded spaces where children can play safely throughout the summer months.
Understanding the Importance of Playground Shade
Before diving into specific construction methods, recognizing why playground shade matters helps inform your design choices. Children’s skin is significantly more sensitive to UV radiation than adult skin, making sun protection during outdoor play essential. Extended exposure to direct sunlight also causes playground equipment surfaces to reach temperatures that can burn skin on contact, particularly metal slides and plastic climbing structures.
Beyond health concerns, adequate shade extends usable playtime during hot weather. When playground equipment becomes too hot to touch or the surrounding air temperature climbs uncomfortably high, children naturally retreat indoors, missing valuable opportunities for physical activity and outdoor exploration. Proper shade coverage can reduce surface temperatures by up to 25 degrees, transforming unusable midday spaces into comfortable play areas.
Effective playground shade also protects your equipment investment. Constant sun exposure degrades plastic components, fades colors, and weakens structural integrity over time. By providing overhead protection, you extend the lifespan of swings, slides, and climbing structures while maintaining their appearance and safety.
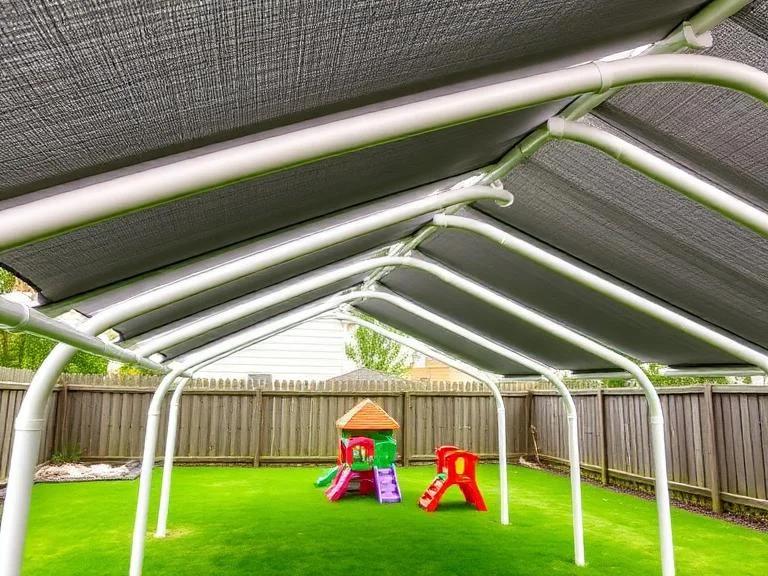
PVC Pipe Arch Canopy with Shade Cloth
One of the most popular and cost-effective DIY playground shade solutions involves creating arched frames from PVC pipe covered with commercial shade cloth. This design offers flexibility in size, easy installation without permanent ground fixtures, and simple disassembly for winter storage.
Start by determining your desired coverage area and measuring the width of the space you want to shade. Purchase 1-inch or larger diameter PVC pipe, as smaller sizes lack the rigidity needed to support shade cloth in windy conditions. Cut four pieces of rebar approximately 15 inches long to serve as ground anchors. Drive these stakes into the ground at the four corners of your shaded area, leaving about 6 inches exposed above ground level.
The PVC pipes slide over the rebar stakes and naturally bend to form arches across your playground space. For added stability, connect multiple arches using horizontal PVC pipes with T-connectors along the length of your structure. This creates a tunnel-like framework that resists twisting and provides consistent shade coverage.
Drape shade cloth over the completed frame, ensuring several inches of overlap on all sides. Secure the fabric using PVC hoop house clips, zip ties, or bungee cords attached at regular intervals. Choose shade cloth rated between 30 to 50 percent density, which blocks intense sunlight while allowing air circulation and maintaining visibility for supervision.
This approach works exceptionally well for covering sandboxes, small play structures, or seating areas. The entire structure can be assembled in a few hours and removed quickly if severe weather approaches. Material costs typically range between 75 and 150 dollars depending on the size of your coverage area.
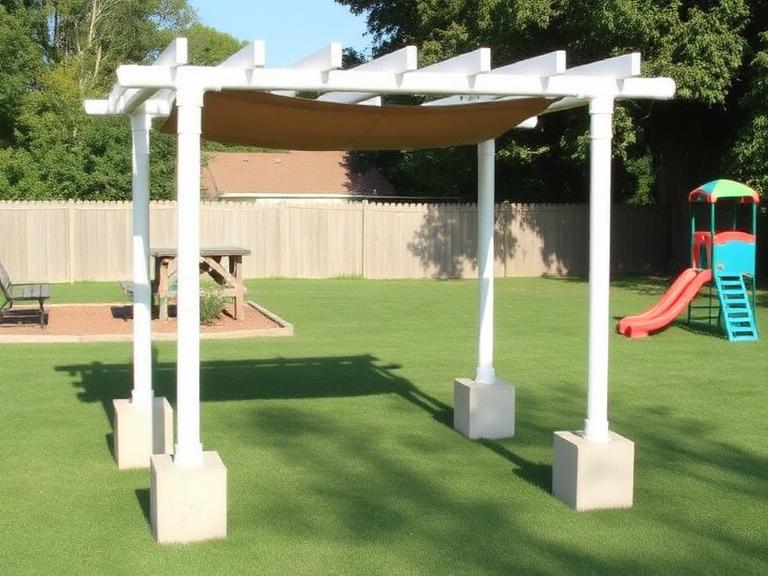
Freestanding PVC Frame Canopy
For playground areas where driving stakes into the ground isn’t practical or desirable, a freestanding PVC frame canopy offers excellent portability and stability. This design uses weighted bases instead of ground anchors, allowing complete flexibility in positioning and easy relocation as your playground layout evolves.
Construct the base supports using large metal cans, buckets, or decorative planters filled with quick-setting concrete. Before the concrete fully cures, insert vertical PVC pipes into each container, ensuring they stand perfectly straight. Use a level during this process to prevent leaning structures. Allow 24 hours for complete curing before proceeding with frame assembly.
Build the overhead frame using PVC pipes and various fittings including T-connectors, 90-degree elbows, and straight couplings. Create a rectangular frame that sits atop your four weighted bases, connecting everything with PVC cement for permanent joints or leaving connections dry for easy disassembly. Add diagonal bracing using additional PVC pipes to prevent the structure from racking sideways during wind gusts.
Attach your shade fabric using velcro strips, grommets with bungee cords, or specialized tarp clips. Consider using outdoor canvas, heavy-duty bed sheets, or commercial shade cloth depending on your aesthetic preferences and budget. This type of structure provides 6 to 8 feet of clearance height, accommodating most residential playground equipment while maintaining adequate sun protection.
The freestanding design proves particularly valuable for renters or families who anticipate moving, as the entire structure can be disassembled and transported. Decorative planters used as base weights also add visual appeal while serving their functional purpose.

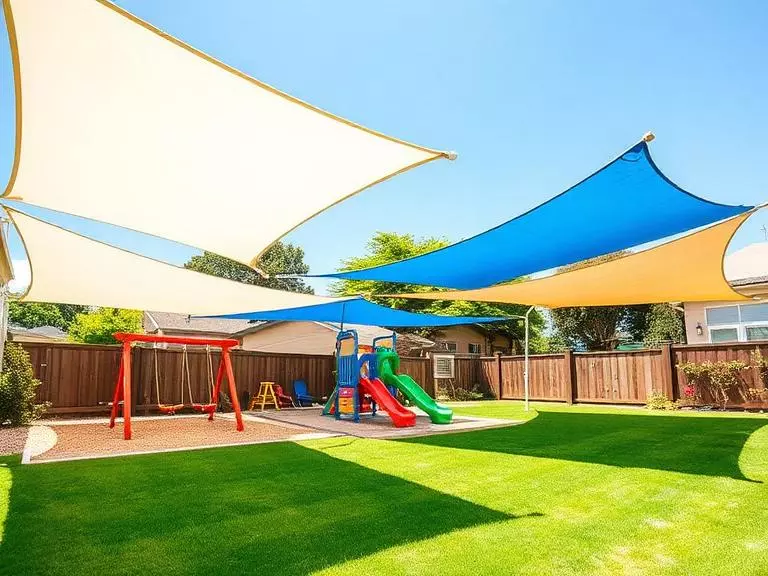
Shade Sail Configuration
Shade sails have gained tremendous popularity in residential landscapes due to their modern aesthetic appeal and exceptional coverage efficiency. These tensioned fabric panels stretch between multiple anchor points, creating striking geometric patterns while providing substantial UV protection.
Installing DIY shade sails requires careful planning of anchor point locations and heights. Identify existing structures like fence posts, deck columns, or building walls that can serve as attachment points. For areas lacking suitable existing anchors, install dedicated posts using concrete footings at least 18 inches deep for stability.
Purchase commercial shade sails in triangular or square configurations, ensuring they’re specifically rated for outdoor use with UV-resistant materials and reinforced corner grommets. Position your anchor points so the sail stretches at angles, creating natural water runoff and preventing sagging. Stagger the heights of mounting points, with at least one corner significantly higher than others.
Use heavy-duty turnbuckles or carabiners at each attachment point to achieve proper tension. The fabric should be taut enough to resist flapping in wind but not stretched so tightly that seams or grommets fail under stress. Most installations require periodic adjustment as fabric naturally stretches during initial use.
Shade sails excel at covering large irregular areas that would prove difficult for traditional rectangular structures. They also create visually interesting overhead patterns and can be layered at different heights for enhanced coverage. Multiple sails in complementary colors transform functional sun protection into striking architectural elements. You can learn more.
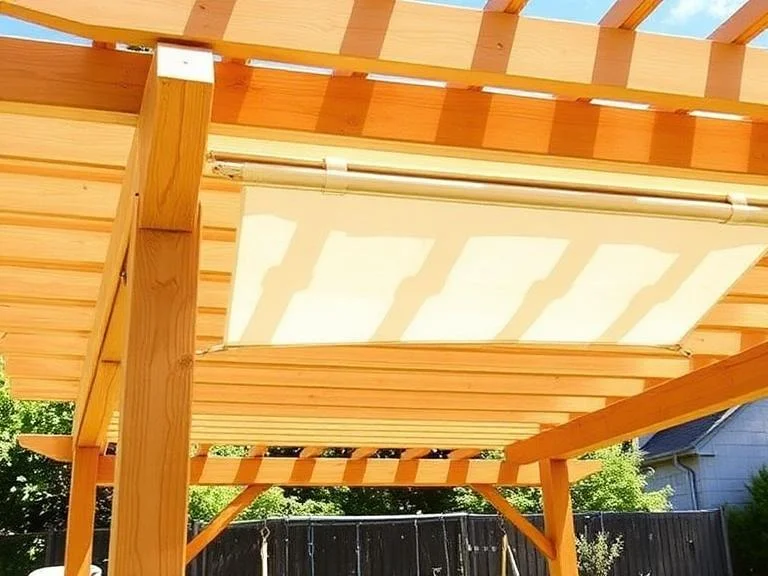
Modified Pergola with Retractable Shade
For families seeking a more permanent and versatile solution, modifying a basic pergola design with retractable shade fabric offers year-round functionality. This approach provides solid overhead structure while maintaining flexibility to expose the play area to sunlight during cooler months.
Build a simple pergola frame using pressure-treated lumber posts set in concrete footings and topped with horizontal beams and cross slats. Space the overhead slats approximately 12 inches apart to support shade fabric while allowing some direct sunlight penetration. This partial shade often proves ideal for playground areas, preventing complete darkness while reducing heat buildup.
Install track systems or curtain rods along the pergola beams to support retractable shade panels. Outdoor canvas drop cloths, commercial shade fabric, or even outdoor curtains can slide along these tracks. Use grommets and hooks for easy removal, or install a pulley system for adjustable coverage throughout the day as sun angles change.
This hybrid structure combines the visual appeal and property value enhancement of traditional pergolas with practical sun protection specifically designed for playground use. The open-sided design maintains supervision sight lines while creating a defined play zone within your yard. Adding climbing vines to pergola posts over time provides additional natural shade and aesthetic integration with your landscape.
Construction requires intermediate carpentry skills and takes a full weekend for most homeowners. Material costs vary widely based on lumber quality and size but typically range between 300 and 800 dollars for a structure covering a 10 by 12-foot area.

Cantilever Umbrella Installation
Large cantilever umbrellas designed for commercial patio use provide instant shade coverage with minimal installation effort. While not traditionally considered a DIY project, selecting and properly anchoring these substantial umbrellas creates professional-quality shade in just hours.
Choose cantilever models with bases that can be weighted with sand or filled with water for stability. Look for options with 9 to 11-foot canopy diameters and crank-operated height adjustment. Quality outdoor umbrellas feature UV-resistant fabric, powder-coated aluminum frames, and wind vents in the canopy to reduce stress during breezes.
Position the umbrella base outside your playground equipment’s use zone to comply with safety standards while maximizing shade coverage. Cantilever designs extend shade horizontally from a single support post, allowing placement several feet away from the actual play area. This eliminates concerns about children running into support structures during active play.
Secure the base using additional weights beyond manufacturer recommendations, particularly in regions with frequent wind. Concrete pavers stacked on the base platform or sandbags draped over the feet provide extra stability. Always retract umbrellas during storms or when not in use to prevent damage.
Multiple umbrellas positioned strategically around a larger playground area create overlapping shade zones that adapt to sun movement throughout the day. While individual commercial umbrellas represent a higher upfront investment than PVC structures, they require no construction skills and provide immediately functional shade.
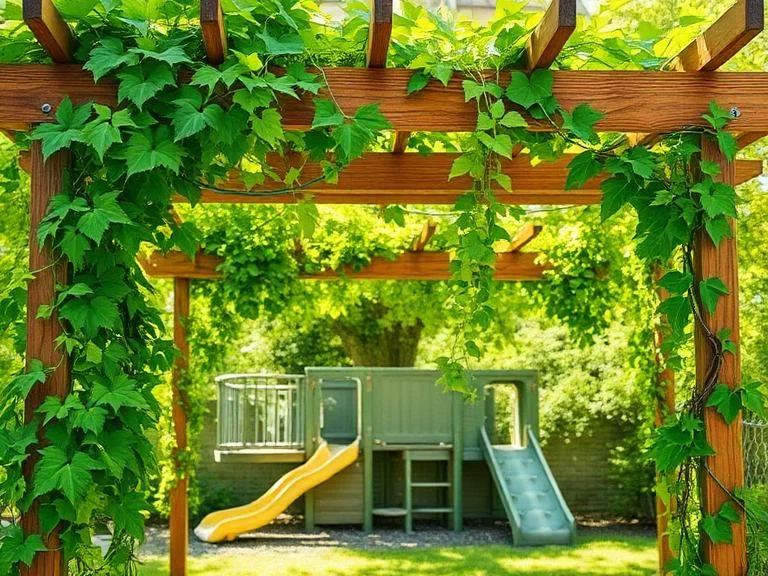
Natural Living Shade with Fast-Growing Plants
For patient families with a long-term vision, establishing living shade through strategic plantings offers sustainable, low-cost coverage that improves with time. Fast-growing trees, climbing vines, and trained plants create natural cooling effects while enhancing your property’s environmental value.
Plant fast-growing shade trees like silver maples, hybrid poplars, or river birches positioned to shade playground areas during peak afternoon sun hours. These species can grow 3 to 5 feet annually under ideal conditions, providing meaningful shade coverage within 3 to 5 years. Consider the mature size of selected trees, ensuring adequate spacing from play structures and underground utilities.
Install sturdy trellises or cable systems adjacent to playground areas for training climbing vines like wisteria, grape, or clematis. These vertical plantings provide filtered shade along playground edges while taking up minimal ground space. Combine multiple vine species for extended seasonal interest and varied shade density.
Build simple arbor structures using pressure-treated posts and overhead lattice work designed specifically to support plant growth. Training vines across these frameworks creates living canopies that cool surrounding air through transpiration while blocking direct sunlight. Position arbors to shade seating areas where adults supervise play or rest areas where children take breaks from active play.
Living shade solutions require 2 to 4 years before providing substantial coverage but offer ongoing benefits including habitat for beneficial wildlife, improved air quality, and property value enhancement. Initial installation costs remain minimal, with ongoing maintenance limited to seasonal pruning and watering during establishment.

Material Selection and Weather Considerations
Choosing appropriate materials significantly impacts your shade structure’s longevity and effectiveness. Commercial shade cloth comes in various densities, typically ranging from 30 to 90 percent light blocking. For playground applications, 40 to 60 percent density provides optimal sun protection while maintaining visibility and air circulation.
Look for shade fabrics with UV inhibitors specifically designed for outdoor use. Generic tarps or indoor fabrics deteriorate quickly under constant sun exposure, requiring frequent replacement. Quality outdoor shade cloth should carry manufacturer warranties of at least 5 years against excessive fading or material breakdown.
PVC pipe selection matters considerably for structural integrity. Use schedule 40 PVC with diameters of at least 1 inch for small structures and 1.25 inches or larger for frames exceeding 8 feet in any dimension. Paint exposed PVC with exterior latex paint to reduce UV degradation and extend service life.
Consider local weather patterns when designing your shade structure. Areas with frequent high winds require additional bracing, lower profile designs, and secure anchoring systems. Regions with heavy snow loads necessitate either removable seasonal shades or reinforced frames capable of supporting accumulated weight. Coastal locations need corrosion-resistant hardware and rinse-able fabrics to prevent salt damage.
Conclusion
Creating effective playground shade doesn’t require extensive construction experience or substantial financial investment. The six approaches outlined here offer proven solutions suitable for various skill levels, budgets, and playground configurations. From simple PVC arch canopies that provide immediate relief to living shade solutions that mature over time, each method delivers meaningful sun protection while accommodating different aesthetic preferences and functional requirements.
The most successful playground shade installations begin with careful assessment of your specific needs including coverage area, typical sun exposure patterns, existing landscape features, and intended longevity. Combining multiple shade strategies often yields better results than relying on a single approach. For instance, a permanent pergola structure supplemented with removable shade cloth panels and strategically planted trees creates adaptable coverage that serves your family through changing seasons and evolving playground configurations.
Remember that playground shade serves multiple purposes beyond mere sun protection. It extends equipment life, reduces surface temperatures, creates comfortable spaces for extended outdoor play, and demonstrates commitment to children’s health and safety. Whether you invest a weekend building PVC structures or plant trees that will shade future generations, the effort you dedicate to playground coverage delivers returns measured in countless hours of comfortable outdoor play, protected skin, and enriched childhood experiences. Start with the approach that best matches your current circumstances, knowing you can always expand or modify your shade coverage as needs change and resources allow.
Frequently Asked Questions
What is the most budget-friendly DIY playground shade option?
The PVC arch canopy with shade cloth represents the most economical choice, with total material costs typically between 75 and 150 dollars depending on coverage area. This approach requires minimal tools, basic assembly skills, and provides immediate shade coverage that can be modified or relocated as needed.
How do I anchor playground shade structures safely without permanent installation?
Use weighted bases made from large planters or buckets filled with quick-setting concrete, ensuring each base weighs at least 40 pounds for stability. Position weighted structures outside equipment fall zones and add supplementary anchoring like stakes or sandbags during high wind conditions.
What shade cloth density works best for playground coverage?
Choose shade cloth rated between 40 and 60 percent density for optimal playground use. This range blocks intense sunlight and reduces heat while maintaining visibility for supervision, allowing adequate air circulation, and providing some filtered light for comfortable play conditions.
Can I leave PVC shade structures up year-round?
PVC structures can remain standing year-round in mild climates but should be disassembled or have fabric removed before winter in regions with snow loads or ice storms. Paint exposed PVC pipes to extend outdoor durability and inspect all connections and fabric attachment points at the beginning of each season.
How high should playground shade structures be installed?
Maintain a minimum clearance of 6 feet above ground level for adequate head room, with 7 to 8 feet preferred for structures covering climbing equipment or swings. Higher installations allow better air circulation underneath while ensuring shade coverage doesn’t restrict equipment use or create collision hazards.