

15+ Unique Embroidery Thread Organizer Ideas for DIY Lovers
Introduction
Embroidery Thread Organizer Ideas, If you have ever spent twenty frustrating minutes untangling a knotted skein of floss before you could even begin stitching, you already understand why a solid embroidery thread organizer system is not a luxury but a genuine necessity. Thread collections have a way of growing faster than expected. One project becomes ten, ten becomes fifty, and before long your craft space looks less like a creative studio and more like a colorful tangle of chaos.
The good news is that organizing embroidery thread can be as satisfying as the stitching itself. With the right system in place, you will always know exactly where every shade lives, your workspace will feel calm and inspiring, and you will spend more time creating and less time searching. Whether you are working with a modest starter collection of DMC floss or an extensive array of silks, metallics, and overdyed threads, there is an organizer idea in this guide that fits your space, budget, and style. Here are 16 unique and practical embroidery thread organizer ideas that every DIY lover will want to explore.
1. Plastic Floss Bobbin Boxes with Numbered Compartments
The plastic bobbin box system is one of the most widely used and genuinely effective embroidery thread organizer solutions available. It involves winding each skein of floss neatly around a small cardboard or plastic bobbin, labeling the bobbin with the thread color number, and storing the bobbins in a segmented plastic box. Boxes with 24 to 48 compartments are available in most craft stores and online, and they stack cleanly on shelves or inside drawers. The real advantage of this system is instant visual access to your entire color range. A quick glance across the open box tells you exactly what you have, what you are running low on, and where every shade belongs.
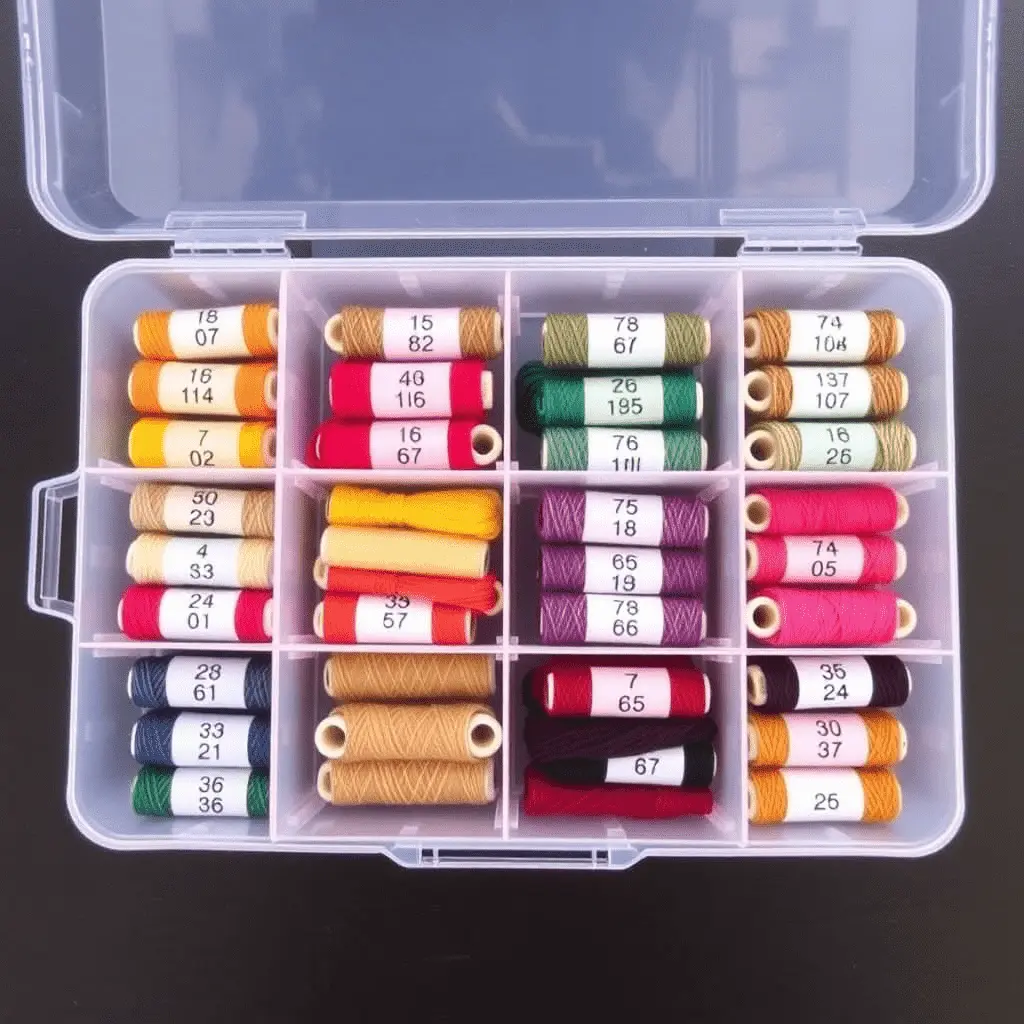
The combination of labeled bobbins and numbered compartments means you can sort by color family, shade progression, or DMC number, depending on how your mind naturally categorizes color. For stitchers who work from kits or patterns that reference specific thread numbers, sorting numerically is the fastest way to pull what you need.
2. Pegboard Wall Display with Spool Pegs
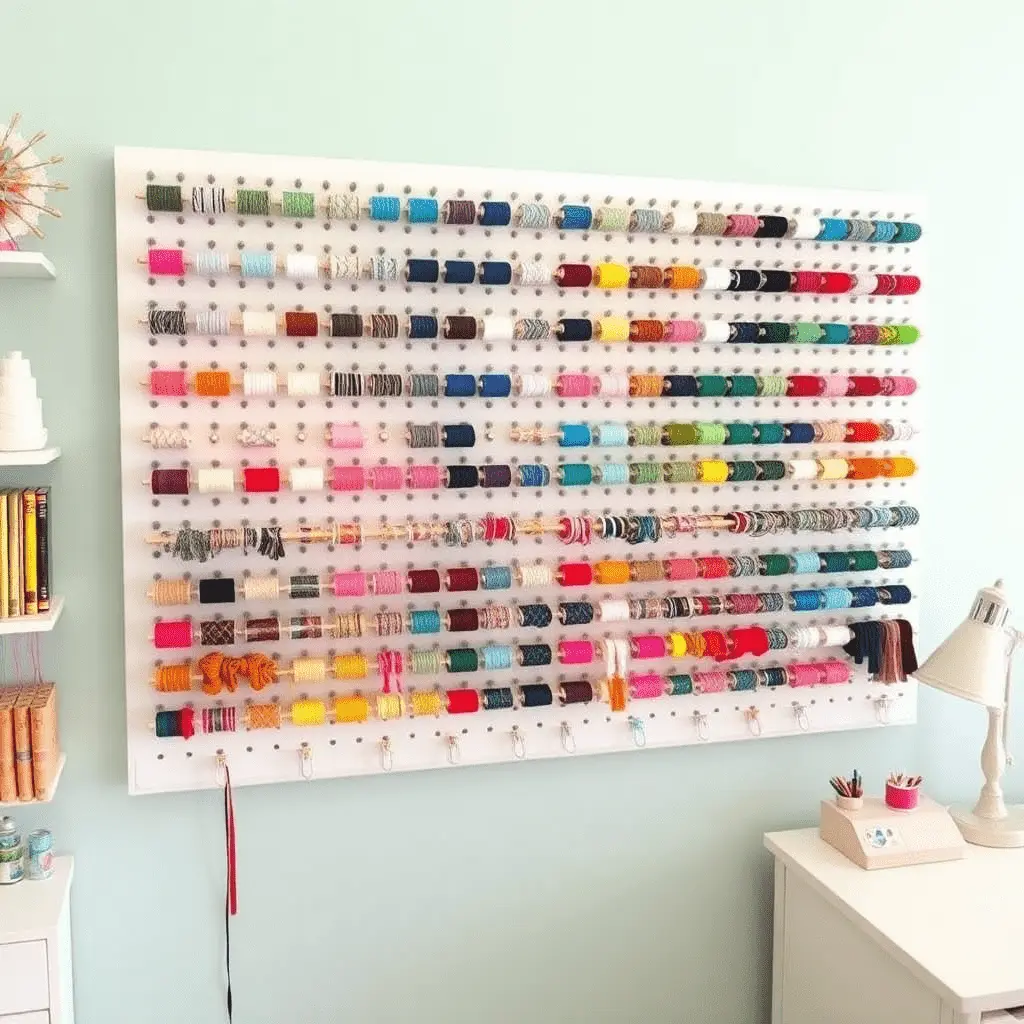
A pegboard mounted on a craft room wall transforms thread storage from a hidden drawer system into a vibrant, functional display. Install a sheet of pegboard on any available wall and fit it with small wooden dowels or metal spool pegs. Cones and large spools of machine embroidery thread sit beautifully on horizontal dowels, while loops of floss can be hung on hooks for easy access. The visual effect of neatly arranged threads sorted by color across an entire wall is genuinely striking, and the practical benefit of being able to grab any color at a glance without opening a single drawer is hard to overstate.
3. Repurposed Tackle Box Organizer
A fishing tackle box is one of the most underrated embroidery thread organizer options for DIY lovers who want a portable, budget-friendly solution. Multi-level tackle boxes feature rows of small adjustable compartments that are perfectly sized for wound floss bobbins. The hinged tray system allows you to view multiple levels of storage at once, and the secure closure keeps everything safe during transport.
If you stitch in multiple locations, work on classes, or travel to embroidery groups, a tackle box organizer is one of the most practical investments you can make for your thread collection.
4. DIY Cardboard Thread Winding Cards
For stitchers who prefer a zero-cost approach, handmade cardboard thread winding cards are a wonderfully simple and satisfying embroidery thread organizer solution. Cut small rectangles of stiff cardboard, notch each end to hold the thread in place, and wind your floss neatly around each card. Write the color number directly on the card with a fine-tip pen.
Store the finished cards sorted into a recipe box, a shoebox, or any container with sections that can keep the cards upright and browsable. This method costs almost nothing, produces no waste, and gives you a tactile, customizable system that can grow as your collection does.
5. Binder Ring System for Project Sorting
The binder ring method is particularly popular among stitchers who like to pull threads for a specific project and keep them organized throughout the working period. Thread the cut lengths or folded skeins through small paper tags or cardboard labels, write the color number and stitch count on each tag, and clip the tags onto a binder ring.
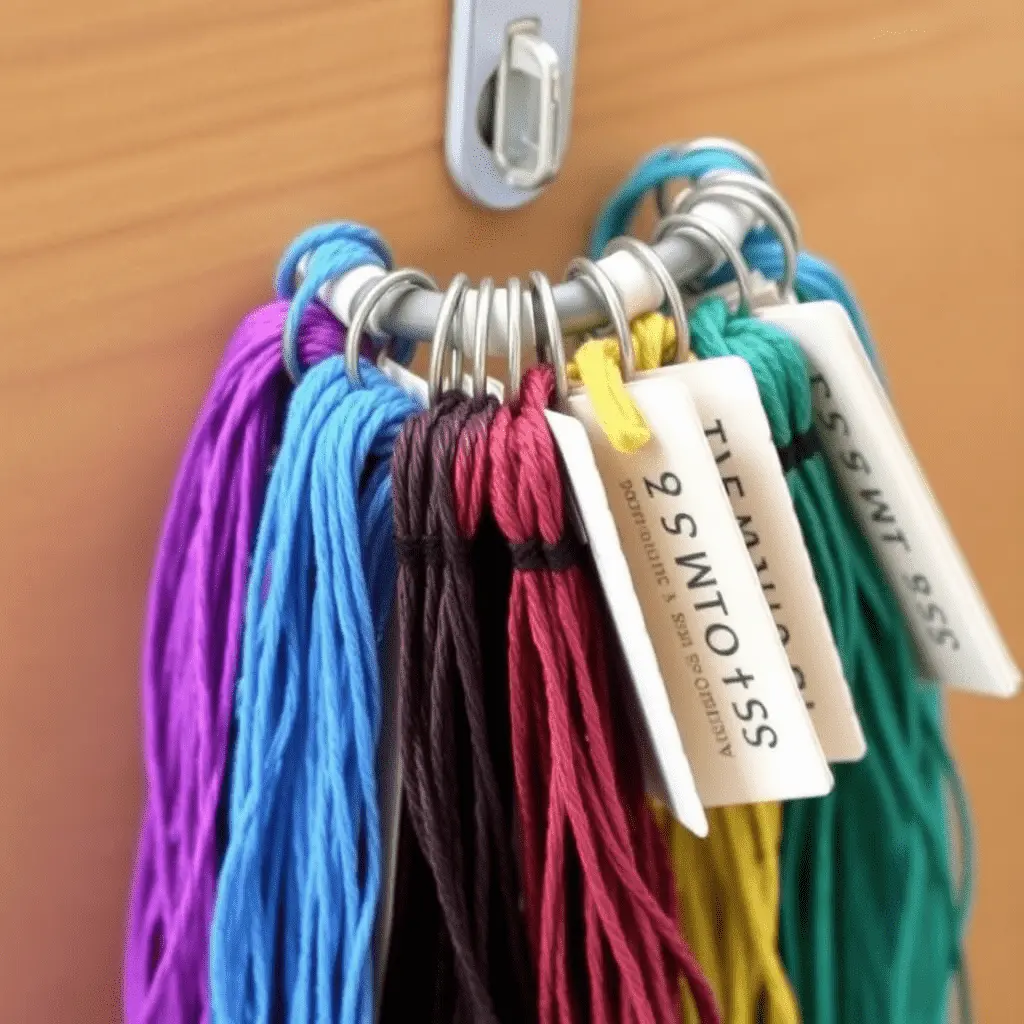
The ring can then be hung on a hook near your work area, keeping all project threads together in one place and eliminating the risk of mixing them with your general storage. When the project is complete, unused thread can be removed from the ring and returned to your main storage system.
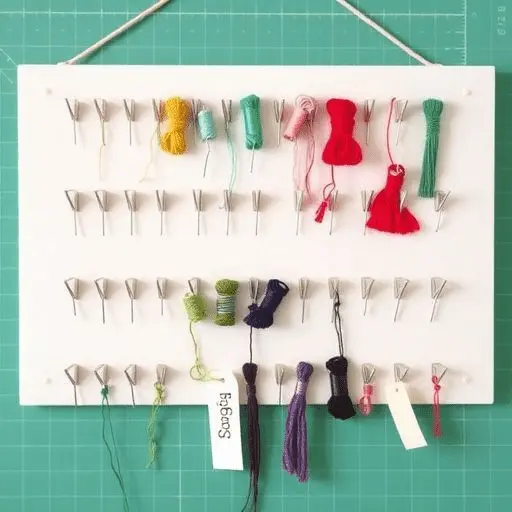
6. Wooden Dowel Thread Rack on a Painted Board
A wooden dowel rack is a beautiful embroidery thread organizer idea that suits craft rooms with a rustic or handmade aesthetic. Sand and paint a piece of plywood or reclaimed wood to your preferred finish, then drill evenly spaced holes and insert short lengths of wooden dowel.
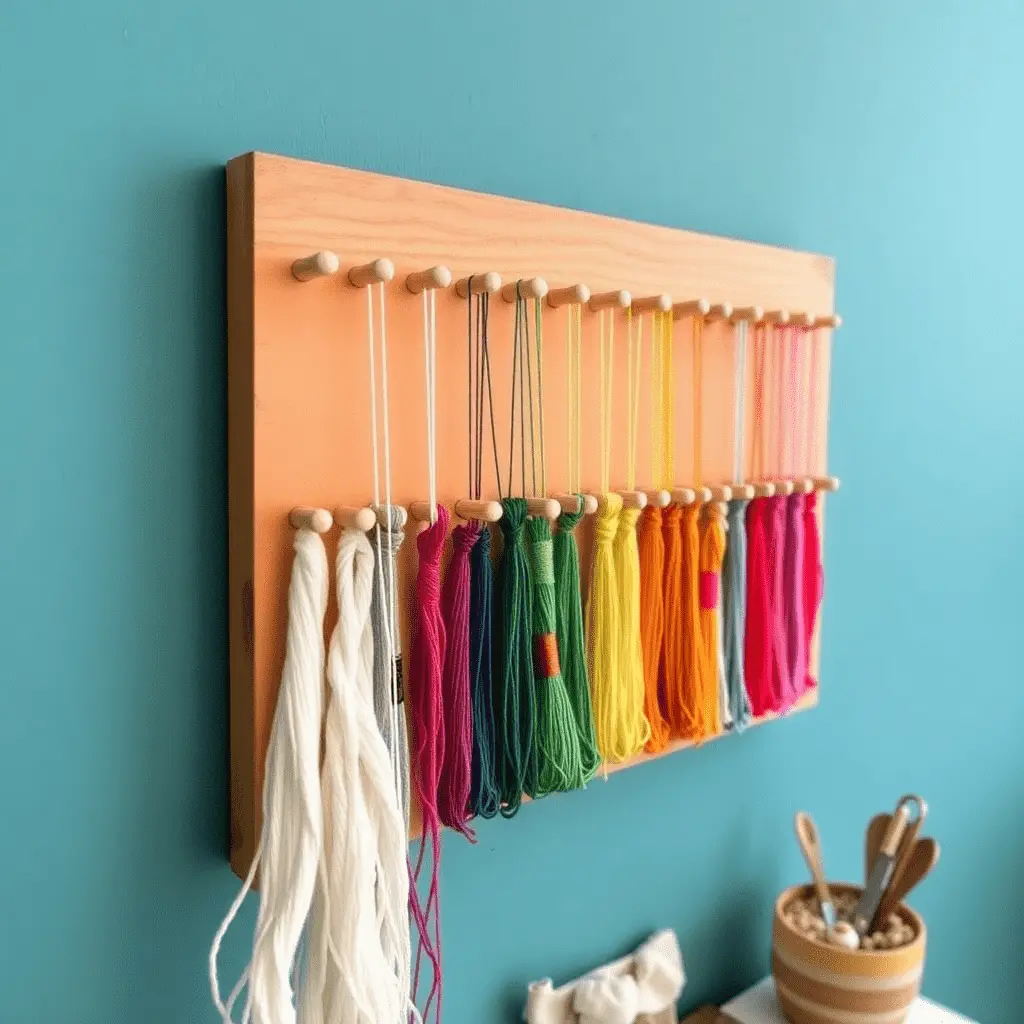
Hang skeins of thread directly over the dowels, sorting them by color family from left to right. Mount the board on the wall or prop it against a shelf for a storage solution that doubles as genuine wall decor. The warmth of the wood against the colors of the thread creates a display that looks deliberately decorative rather than purely functional.
7. Zip-Lock Bag Color Family System
Sorting threads into labeled zip-lock bags organized by color family is one of the most accessible embroidery thread organizer methods for beginners or those with limited craft space. Use one bag per color family, labeling each bag clearly with a marker, and store all bags together in a larger box or tote. For small to medium collections, this system requires almost no investment and takes only minutes to set up.
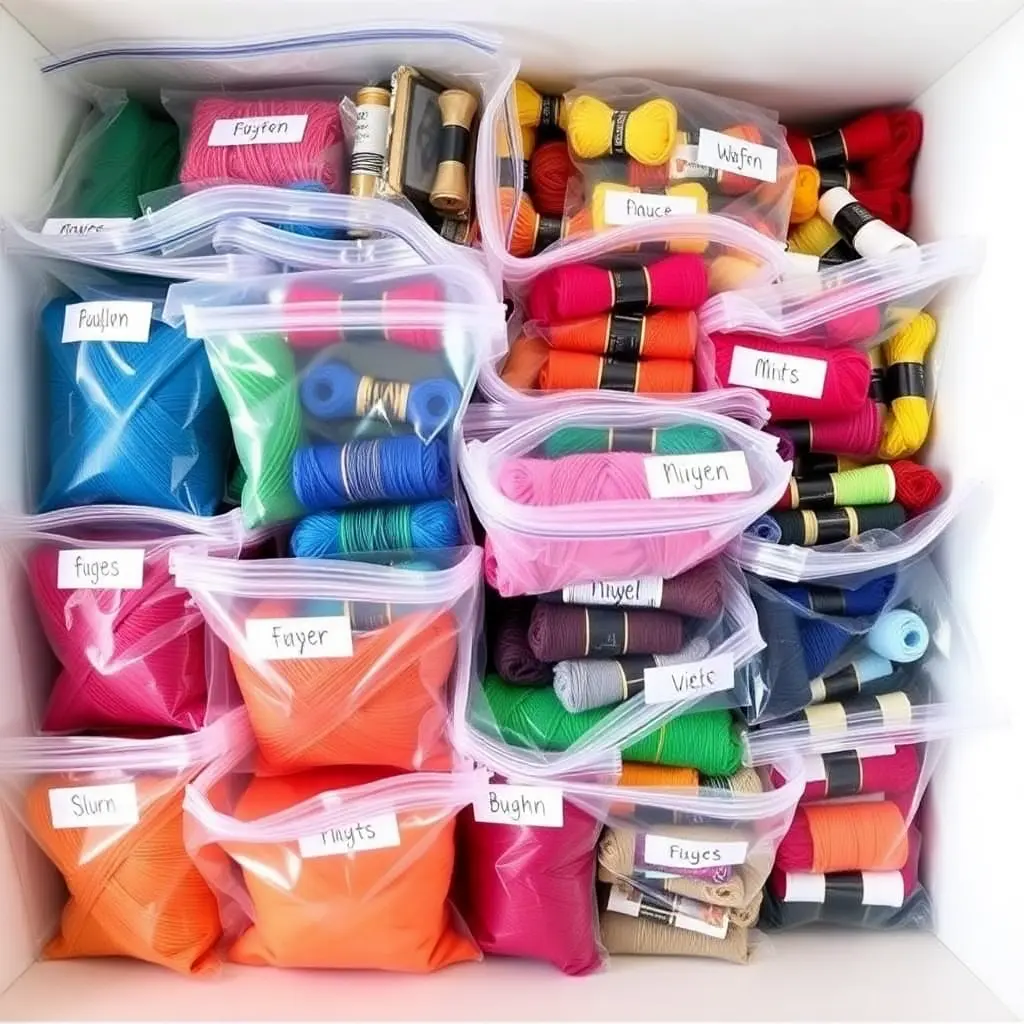
It is also highly portable, easy to expand, and simple to maintain. While it does not offer the visual elegance of a wall display or bobbin box, it is a practical workhorse of a system that genuinely prevents tangles and saves searching time.
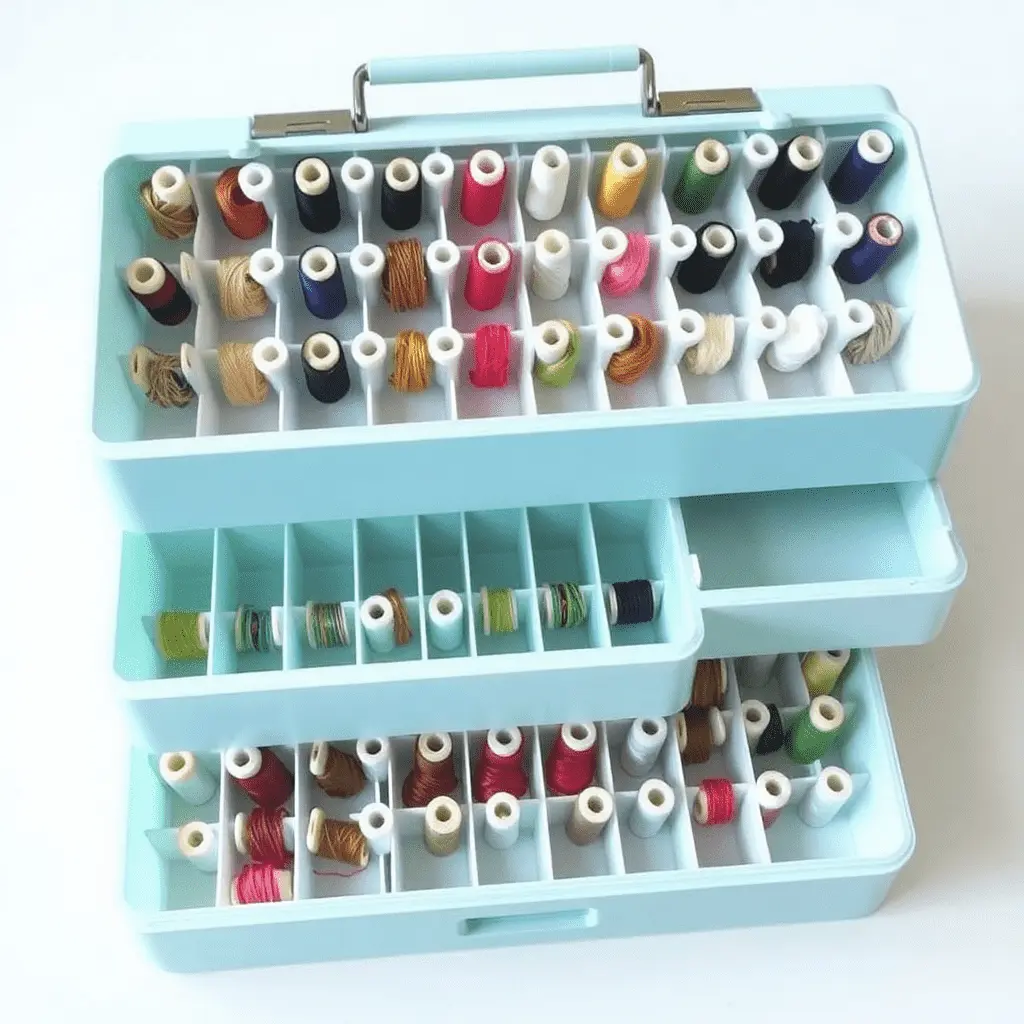
8. Clear Acrylic Stackable Drawer Units
Clear acrylic drawer units designed for cosmetics or office supplies work brilliantly as embroidery thread organizers. Each shallow drawer holds a single-color family of wound bobbins, and because the drawers are transparent, you can see the contents of every level without opening anything.
![]()
Stack two- or three-units side by side on a desk or shelf for a compact, polished storage solution that keeps a large thread collection fully visible and immediately accessible. Label the front of each drawer with a small printed or handwritten color range indicator so anyone helping with a project can locate the right shade instantly.
9. Repurposed Spice Rack for Floss Spools
A wall-mounted spice rack repurposed for thread storage is one of those organizer ideas that is so simple it feels obvious the moment you see it. Small wooden or metal spice racks with three-or-four-tiered shelves hold wound floss bobbins or small thread spools perfectly, and the open-front design keeps every color visible. Mount the rack at eye level in your craft space and sort the bobbins by color family across the tiers.
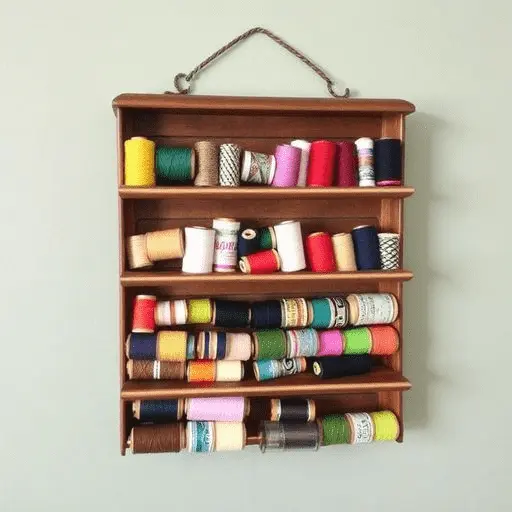
This approach takes up minimal wall space, costs very little if you source the rack secondhand, and gives your craft room the tidy, curated look of a well-considered workspace.
10. Project Pouch System with Labeled Bags
For stitchers who always have multiple projects on the go simultaneously, a project pouch system is an indispensable embroidery thread organizer approach. Dedicate one small zip pouch or fabric bag to each active project, keeping all threads, the pattern, a needle, and any small tools together inside.
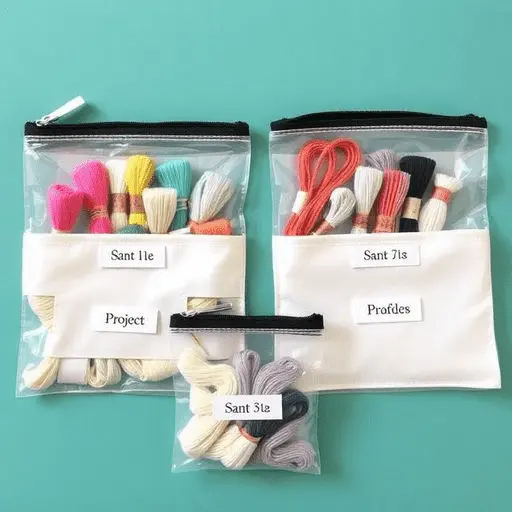 Label each pouch with the project name and date started. When you want to pick up a specific piece, everything you need is in one place with no searching, sorting, or re-threading required. Clear pouches work best for this system because you can identify the project at a glance without opening every bag.
11. Vintage Tin Container Collection
Repurposing vintage tins as embroidery thread organizers brings a charming, nostalgic quality to your craft space while providing genuinely useful storage. Collect decorative tins of varying sizes and use them to store threads sorted by color, project, or thread type. Small tins are ideal for holding a single color family of bobbins, while larger tins accommodate full skeins.
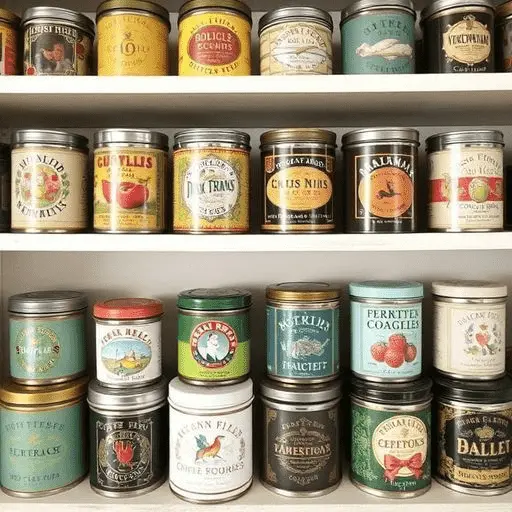
Arrange the tins on open shelving for a display that is as decorative as it is functional. The solid lids keep threads protected from dust and light, both of which can affect thread quality over time.
12. Over-the-Door Shoe Organizer
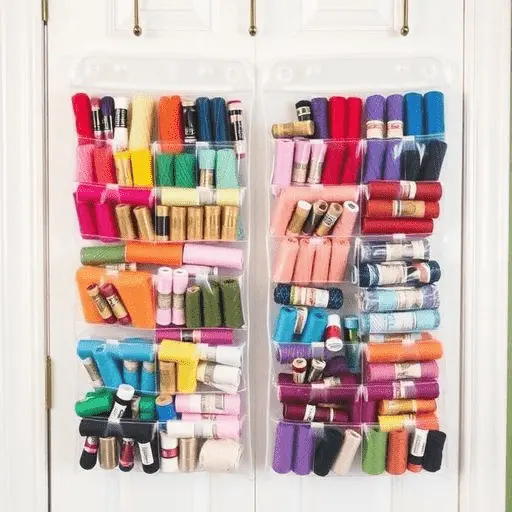
A clear plastic over-the-door shoe organizer is one of the most space-efficient embroidery thread organizer solutions for crafters who work in small rooms or shared spaces. Each pocket holds multiple skeins or bobbins sorted by color family, and the transparent material keeps everything visible. Hang the organizer on the back of a craft room door, a wardrobe door, or even a freestanding clothes rail for a storage solution that uses otherwise wasted vertical space. This approach works particularly well for larger collections and requires no drilling, no shelving, and minimal investment.
13. Labeled Mason Jar Color Display
Mason jars lined up on a shelf or windowsill make a deceptively simple and visually lovely embroidery thread organizer. Fill each jar with skeins of a single color family, using a label on the front of the jar to identify the color range or thread type.
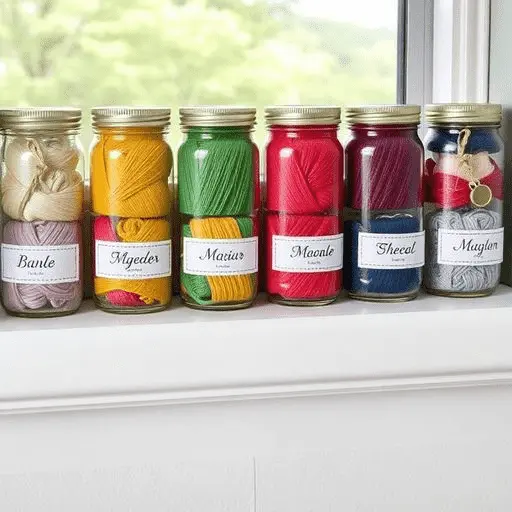
The glass jars allow the full vibrancy of the thread colors to show through, turning your storage into a rainbow display that is genuinely pleasant to look at while you work. Seal each jar lightly to keep dust out, and consider placing your most frequently used color families in the jars closest to your work area for maximum convenience. https://thecrazycraftlady.com/embroidery-thread-storage-ideas/
14. Homemade Foam Board Thread Holder
A foam board thread holder is a quick, inexpensive DIY embroidery thread organizer that you can build in under an hour using materials available at any craft or stationery store. Cut a sheet of thick foam board to your desired size, then push T-pins or large sewing pins into the board in evenly spaced rows. Wind threads around the pins in small bundles or hang wound bobbins from them, labeling each pin with a small sticky tag.
The foam board can be propped against a wall, hung on a hook, or laid flat in a drawer. It is easily customizable and can be rebuilt or rearranged at any time without any tools.
15. Drawer Divider System with Thread Type Sorting
A well-organized deep drawer fitted with adjustable dividers is a wonderfully clean embroidery thread organizer solution for stitchers who prefer a tidy, hidden storage approach. Divide the drawer into sections based on thread type, assigning separate zones to cotton floss, silk, metallic, overdyed, and specialty threads.
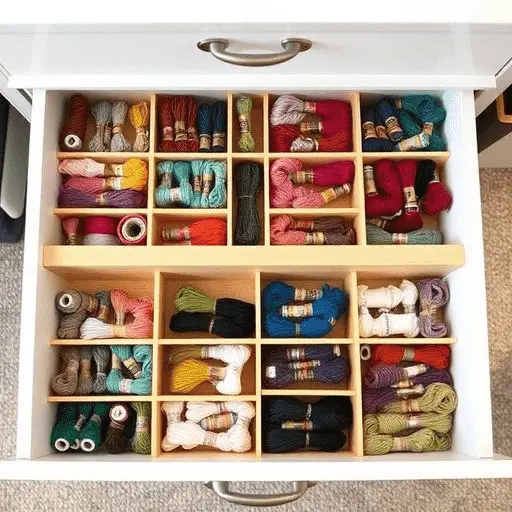
Within each section, arrange wound bobbins or small bundles in color order. This system works particularly well in a dedicated craft desk with multiple drawers, where one drawer can be given entirely to thread storage while others hold tools, patterns, and other supplies. Adjustable bamboo or plastic drawer dividers make it easy to reconfigure the sections as your collection grows.
16. Color-Coded Binder with Thread Sample Pages
A dedicated thread binder is one of the most thorough and satisfying embroidery thread organizer ideas for serious collectors with large thread stashes. Use a three-ring binder fitted with clear plastic sleeve pages, tying a short sample length of each thread to a small card and inserting the cards into the sleeves in color or numerical order. Write the thread brand, color number, and color name on each card for complete reference.
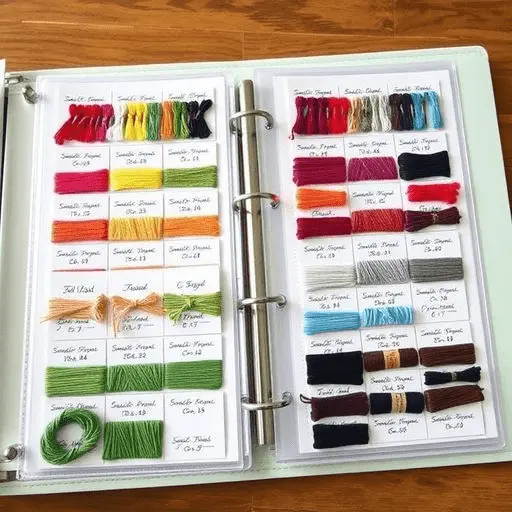
This binder becomes your personal thread library, allowing you to check what you own, identify gaps in your collection, and plan future purchases without having to physically dig through storage boxes. It also travels well to fabric shops when you need to match colors in person.
Conclusion
An organized thread collection is one of the most meaningful investments a dedicated embroiderer can make in their creative practice. When your threads are sorted, labeled, visible, and easy to access, the entire experience of stitching becomes smoother, more enjoyable, and more productive. The 16 embroidery thread organizer ideas covered in this guide offer something useful for every type of stitcher, from the beginner building their first small collection to the experienced needleworker managing hundreds of colors across multiple thread types.
The most effective system is always the one that fits naturally into your existing workflow and space. There is no single correct way to organize your threads, and many stitchers find that combining two or three of these approaches produces the best results. A bobbin box for everyday colors, a project pouch for active work, and a binder for your reference collection, for example, cover all the practical bases beautifully. Start with one idea, build from there, and let your system grow alongside your collection.
Frequently Asked Questions
1. What is the most popular way to organize embroidery floss? The plastic bobbin box system with numbered compartments is the most widely used method among embroiderers of all experience levels. Winding floss onto labeled bobbins and storing them in a segmented box keeps threads tangle-free, visible, and sorted by color number with very little effort.
2. How do I keep embroidery threads from tangling during a project? The binder ring method works exceptionally well for active projects. Thread your cut lengths through small, labeled tags and clip them onto a binder ring kept near your work area. This keeps all project threads together in one place and prevents them from mixing with your general storage.
3. Should I sort embroidery thread by color or by number? Both approaches are valid and suit different working styles. Sorting by color family works well if you often choose threads by eye and work intuitively. Sorting by number is more efficient if you work primarily from patterns and kits that reference specific brand codes such as DMC or Anchor numbers.
4. How do I store embroidery thread long term without damaging it? Keep threads away from direct sunlight, high humidity, and dust. Store them in lidded containers, sealed jars, or zip-lock bags. Avoid storing threads near heat sources or in damp areas such as basements, as this can affect both color and thread integrity over time.
5. Can I organize different types of thread together in one system? It is generally better to separate different thread types such as cotton floss, silk, metallic, and specialty threads into clearly labeled sections of your organizer. Different thread types have different thicknesses, textures, and storage needs, and keeping them together without separation can lead to confusion when selecting threads for a project.
One Comment