17+ Stylish Tank Top Cutting Ideas for Trendy Looks
Introduction
Tank Top Cutting Ideas There is something genuinely satisfying about reaching into your closet, pulling out a shirt you stopped wearing years ago, and turning it into something you would actually choose to buy from a boutique. DIY tank top cutting is one of those rare creative skills that is equal parts practical and expressive. It requires no advanced sewing knowledge, no expensive equipment, and no special training. All it takes is a pair of sharp fabric scissors, a steady hand, and a clear idea of what you want to create.
The appeal of this trend goes well beyond saving money, though that is certainly a benefit. Cutting and refashioning old tank tops and t-shirts has become a genuine style movement, embraced by fashion-forward individuals who want pieces that feel personal rather than mass-produced. When you cut your own top, every detail reflects a deliberate choice. The depth of the armhole, the curve of the neckline, the placement of a knotted hem or a braided back panel, all of it is yours to design.
Whether your goal is a breezy gym top, a festival-ready statement piece, a beach cover-up, or a casual everyday look, there is a cutting technique in this guide that fits exactly what you are after. From the most beginner-friendly crops to more elaborate crisscross and lattice designs, these 18 DIY tank top cutting ideas will transform the way you see every shirt sitting unworn at the back of your wardrobe.
What You Need Before You Start
Before diving into any cutting project, a small amount of preparation goes a long way toward clean, professional-looking results. A pair of sharp fabric scissors is non-negotiable. Dull scissors drag the fabric and create uneven, frayed edges that undermine even the most creative design. A washable fabric marker or piece of chalk helps you mark cutting lines before committing to any cut. A ruler or measuring tape ensures symmetry, particularly when working on designs that require equal spacing. A flat, clean surface to lay your shirt on prevents warping and keeps your lines straight. Washing and ironing the shirt before starting removes any shrinkage potential and smooths out wrinkles that could distort your measurements.
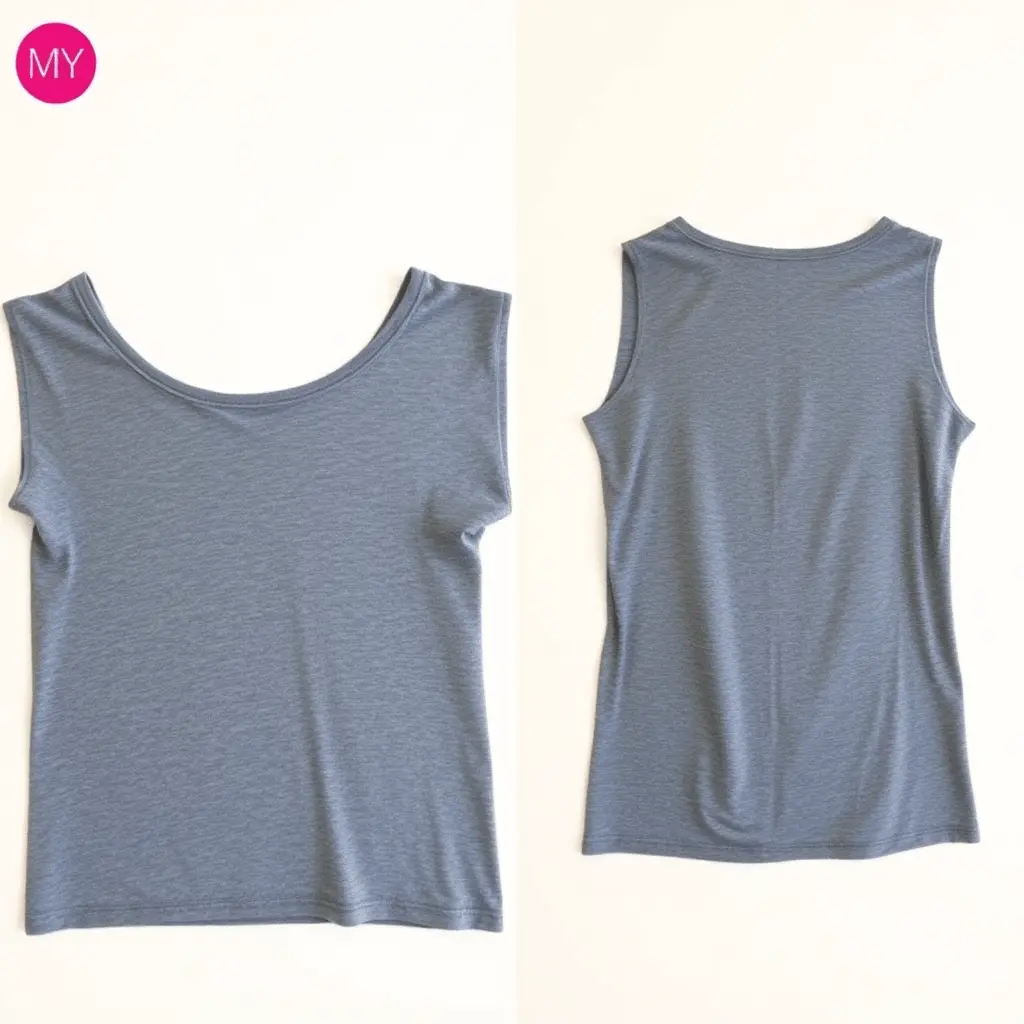
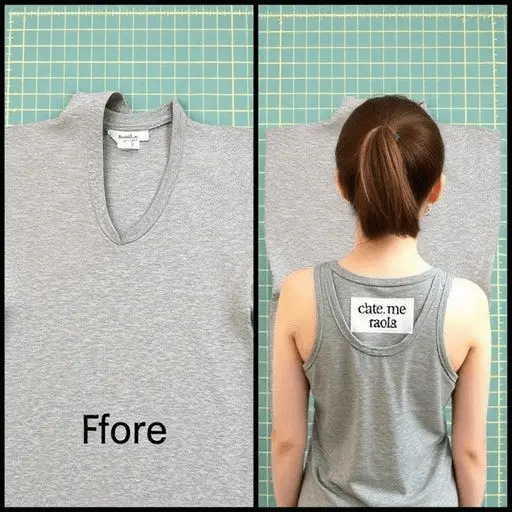
1. The Classic Sleeveless Crop Top
The classic sleeveless crop top is the entry point for almost everyone who begins exploring tank top cutting, and it remains one of the most wearable and consistently stylish results you can achieve. Start by laying your t-shirt flat on a clean surface. Cut along the sleeve seams from the underarm straight up through the shoulder, removing both sleeves entirely. Then decide on your desired length, mark it with a fabric marker, and cut straight across the hem. The result is a clean, versatile crop that works with high-waisted jeans, shorts, or layered over a sports bra.
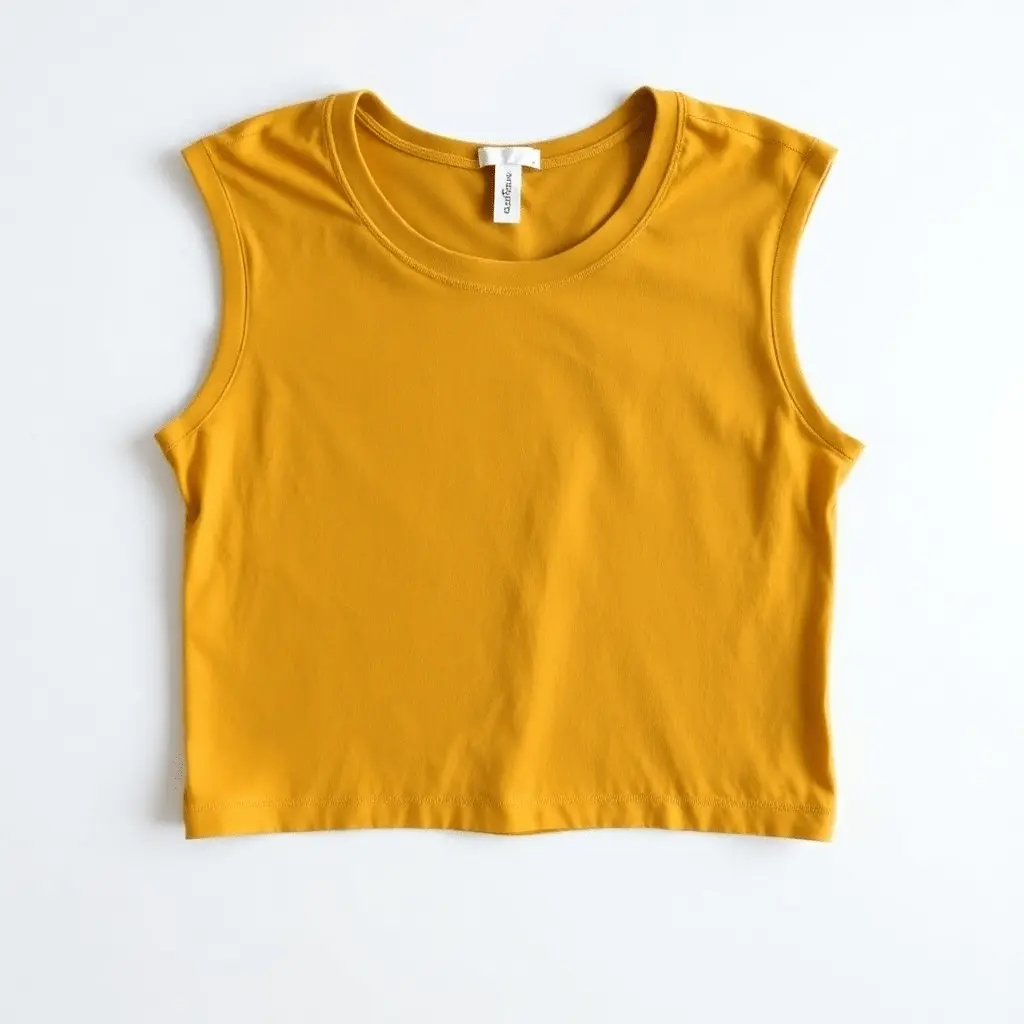
For a slightly more polished version, leave about a quarter inch of extra fabric when cutting, then fold it over and use fabric glue for a finished hem edge. This technique prevents rolling and gives the top a cleaner appearance over time.
2. The Racerback Tank Top
The racerback is one of the most popular DIY cutting styles because it is both functional and flattering. It works beautifully as an athletic top and pairs equally well with casual everyday outfits. Start by laying the shirt face down. Draw a wide Y shape or V shape on the back, with the point of the V sitting at mid-back level and the two arms extending up toward the shoulder seams. Cut along your markings, removing the excess fabric from the back panel. On the front, simply widen the armholes to create a sleeveless silhouette that connects smoothly with the racerback line.

The depth of the racerback V determines how sporty or dramatic the final look feels. A shallow V reads as athletic and understated. A deep V that drops to the mid-back creates a more fashion-forward result that shows off the back beautifully when worn over a colorful sports bra.
3. The Deep Armhole Muscle Tank
The deep armhole muscle tank is the signature style of gym culture, and it is among the easiest DIY cutting results to achieve. Lay your shirt flat and cut generously around the armhole area, extending the cut several inches below and toward the center of the shirt. The goal is to create a large, open armhole that reveals the side of the torso when worn.
This style works best with slightly oversized shirts where the extra fabric creates natural drape. On a fitted shirt, the deep armholes can become restrictive rather than breezy. Try the shirt on after your first round of cutting and assess whether you want to open the armholes further before making any final adjustments.
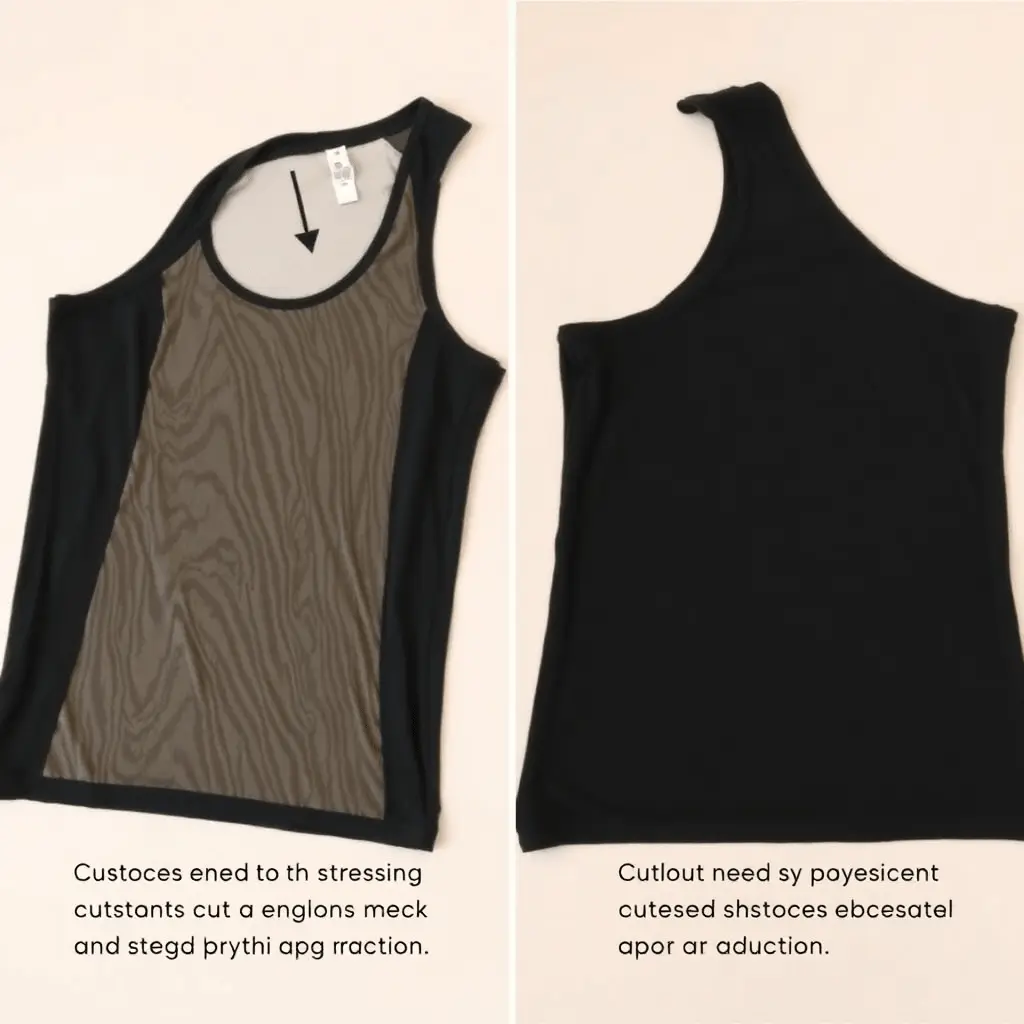
4. The Halter Neck Cut
Converting a regular tank top or t-shirt into a halter neck silhouette is a surprisingly simple process that delivers one of the most noticeable visual transformations in DIY cutting. Lay the shirt flat and cut along both shoulder seams, detaching the front panel from the back at the shoulders. On the back of the shirt, cut down from the neckline in a wide U shape, removing most of the back fabric to create a low-back or backless effect. The front panel retains its straps, which you then tie behind the neck to create the halter silhouette.
This design works with virtually any neckline and looks particularly striking in solid colors or graphic tees where the front print remains intact and visible.
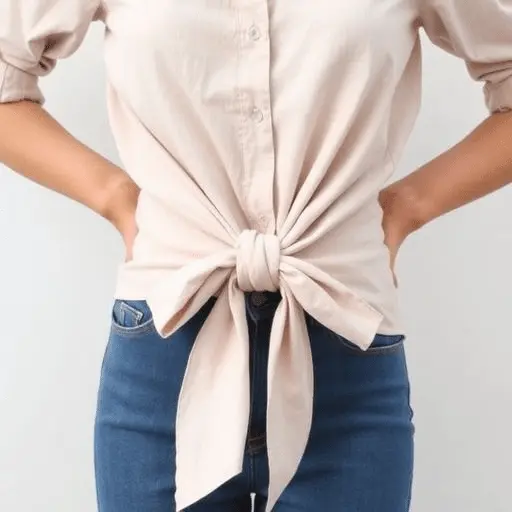
5. The Knotted Crop Top
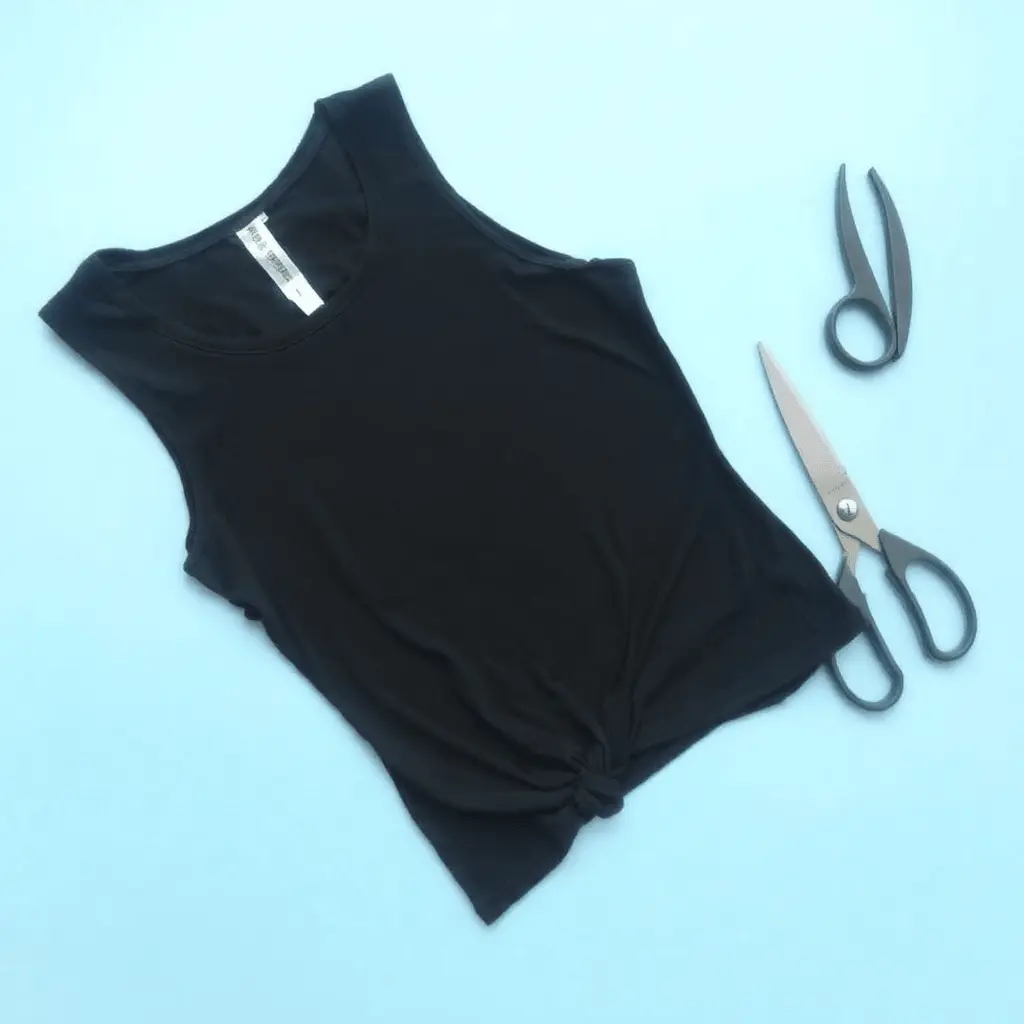
The knotted crop top requires very little cutting but produces one of the most recognizable and consistently trendy looks in DIY fashion. Start with an oversized tank top or t-shirt. Put it on and identify the point at which you want the knot to sit, typically just above or at the natural waist. Remove the shirt, lay it flat, and cut the sides of the hem upward at a slight diagonal toward the front center, leaving a triangular flap of fabric at the center front bottom. Tie this flap into a tight knot and the result is a cropped, knotted silhouette with zero sewing required.
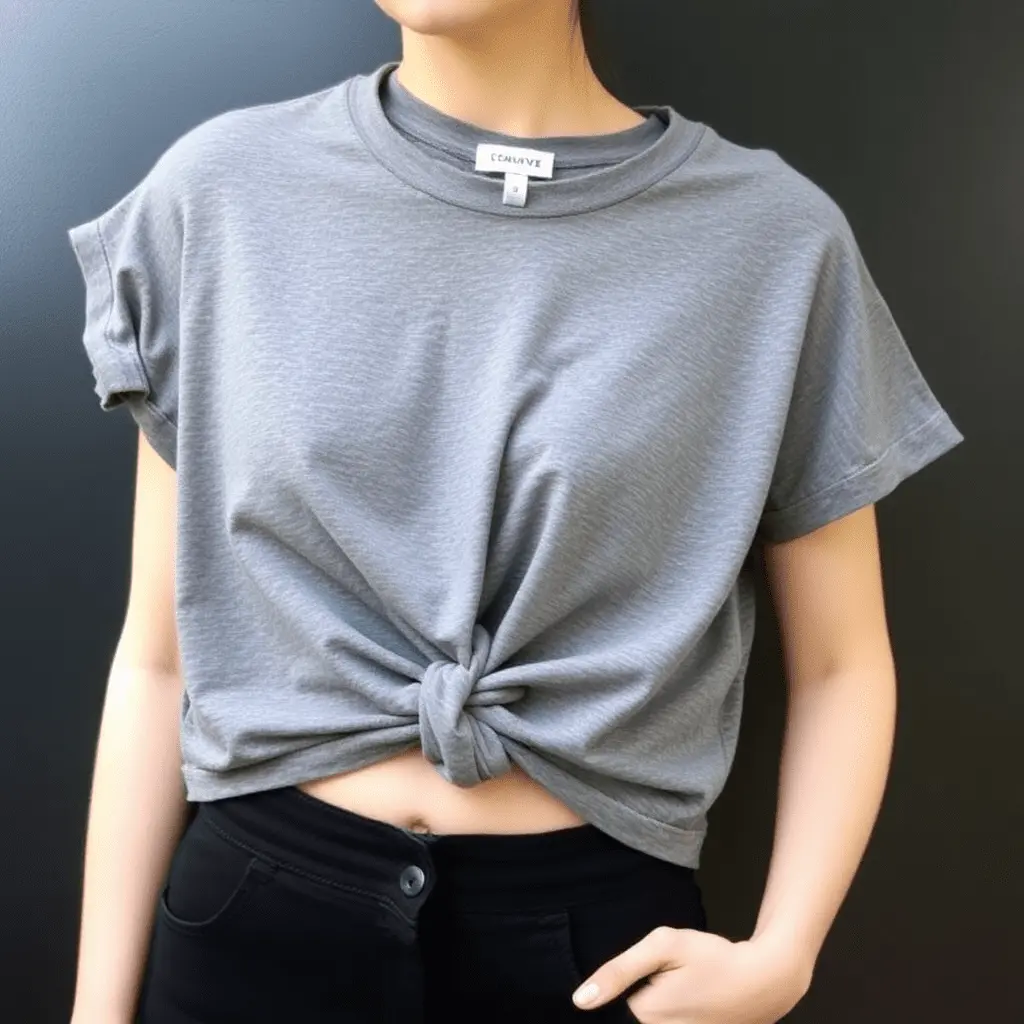
This technique works exceptionally well with oversized graphic tees because the knot draws the waistline in and transforms the overall proportions of the shirt dramatically.
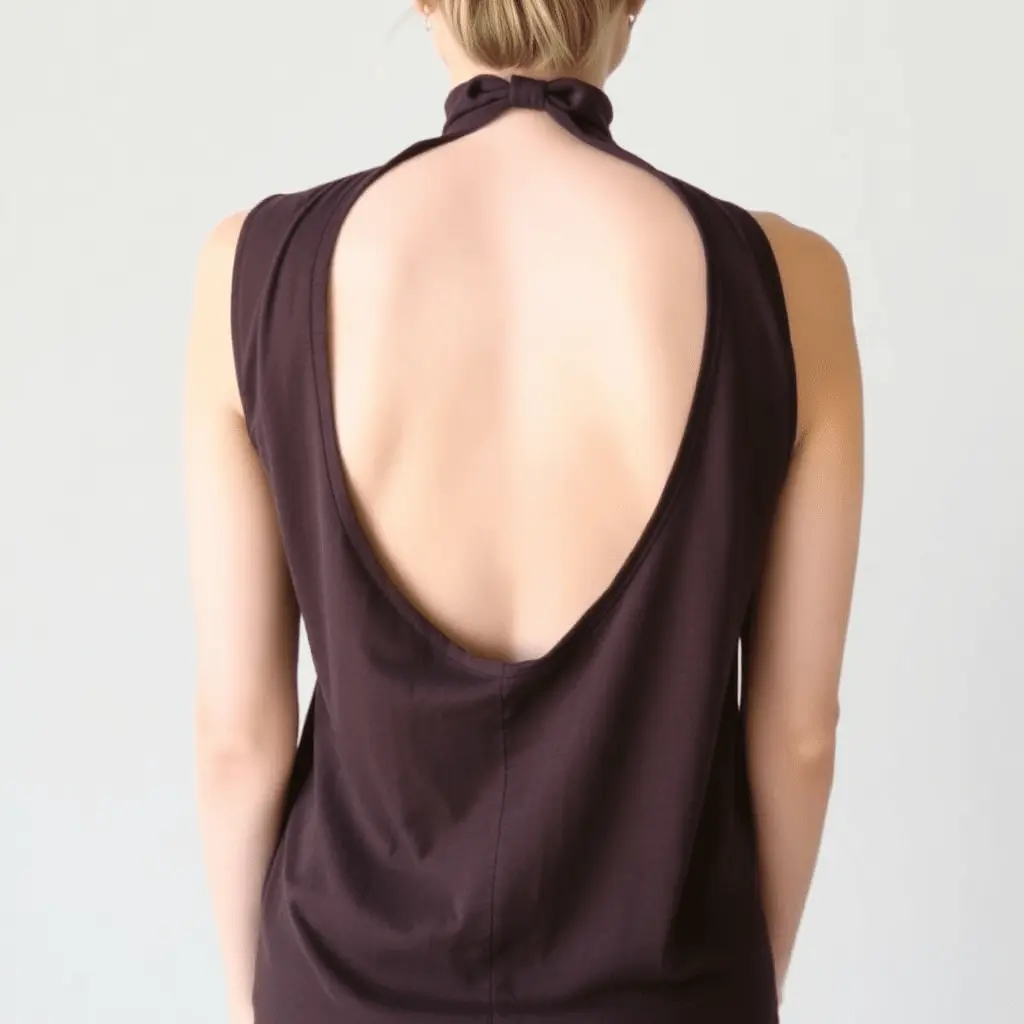
6. The Open Back Cut
An open back tank top is one of the most visually dramatic styles you can create through cutting, and it translates beautifully from gym wear to evening casual wear depending on the fabric and overall design. Turn the shirt inside out and put it on. Mark how low you want the back opening to drop, then remove the shirt and cut a wide U or V shape from the back, cutting through both layers of fabric along your markings.
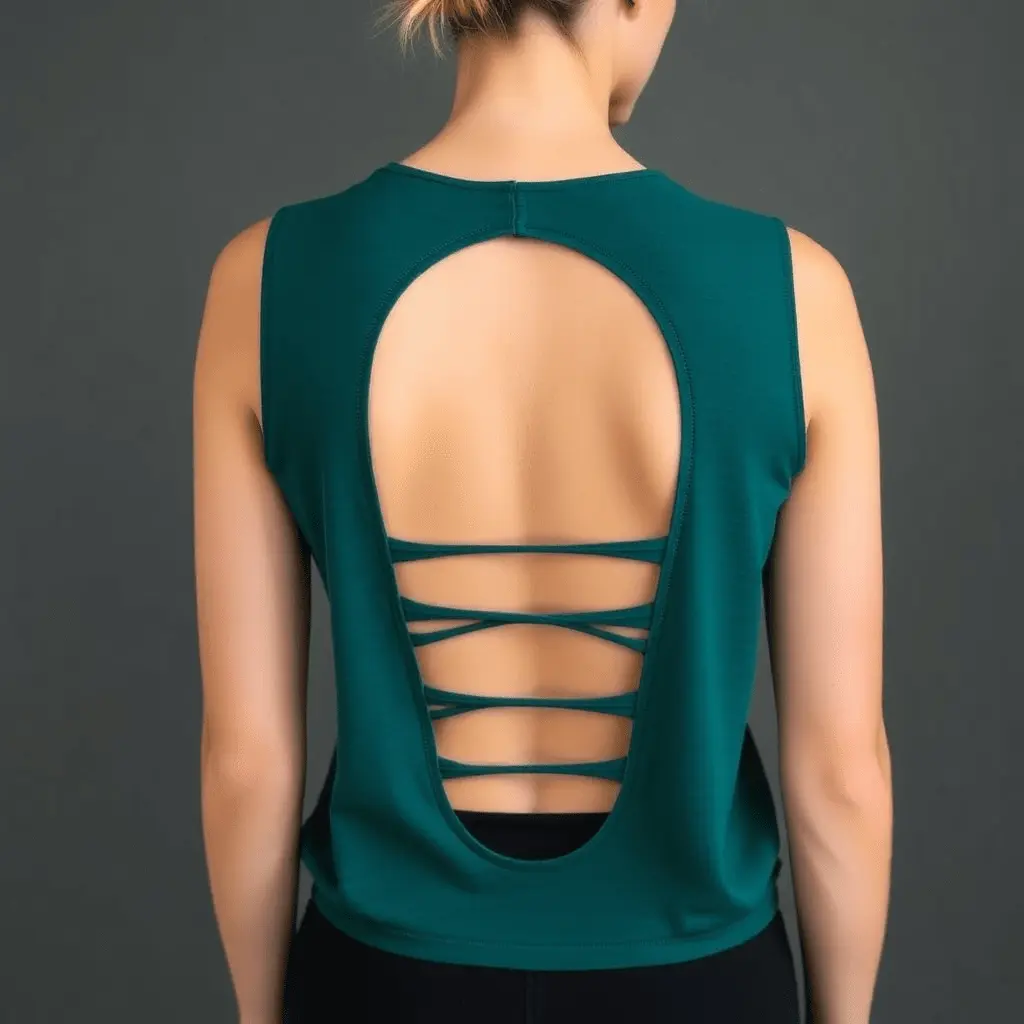
For a more refined version, cut thin horizontal slits across the open back panel before removing it entirely, leaving a series of parallel fabric strips that create a ladder or lace-like effect across the exposed skin. This detail level transforms a simple open back cut into something that feels genuinely architectural.
7. The Crisscross Back Tank
The crisscross back design is slightly more technical than the beginner cuts in this guide but remains fully achievable without a sewing machine. Fold the shirt in half lengthwise and cut down the center back from the hemline to the base of the neckband.
Cut open both shoulder seams to create two separate back panels. Cross each back panel over the opposite side and use fabric glue to secure the shoulder straps to the opposite shoulder seam. The result is a crossover back design that creates a striking visual detail at the back of the top while remaining wearable and secure throughout the day.
8. The Fringe Hem Tank
Fringe adds movement, texture, and a bohemian spirit to any tank top, and creating it requires nothing beyond a pair of scissors and a few minutes of careful cutting. Lay your tank top flat and decide how long you want the fringe to fall. Mark a straight horizontal line across the shirt at that point, then cut upward from the bottom hem to your marked line in evenly spaced vertical strips. Each strip should be roughly half an inch to one inch wide depending on whether you prefer thin or thick fringe.
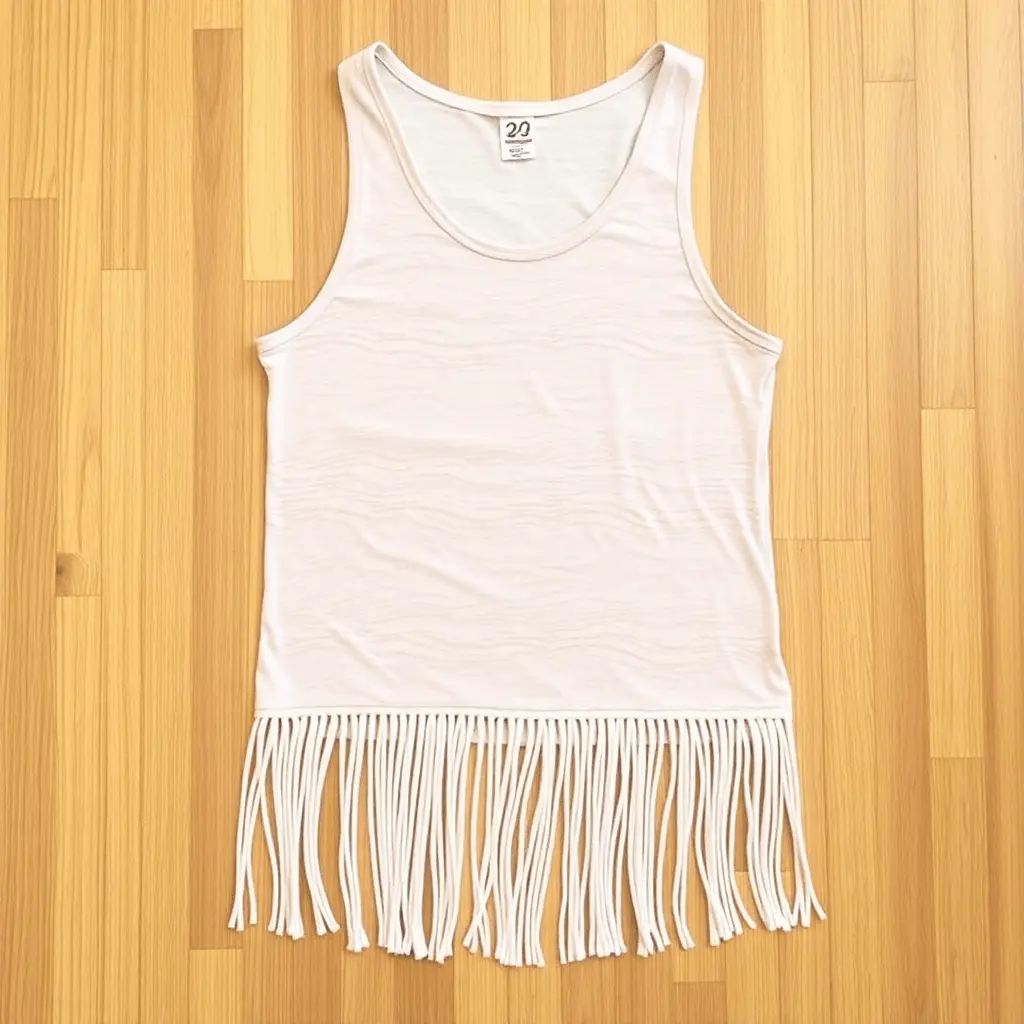
For a more fluid fringe effect, stretch each strip gently after cutting. Jersey cotton fabric rolls naturally at the cut edges, creating rounded, rope-like fringe that moves beautifully. For an even more layered look, cut the fringe at two different lengths across the front and back panels.
9. The Lattice or Woven Back Design
The lattice back design involves cutting a series of horizontal slits across the back panel of a tank top and then weaving a separate strip of fabric through the slits in an alternating over and under pattern, creating a woven or lattice effect that sits elegantly across the back. Mark evenly spaced horizontal lines across the back panel, each line about three quarters of an inch apart. Cut along each line, stopping well before the side seams to keep the shirt intact. Cut a long, thin strip of fabric from a contrasting or matching shirt and weave it through the slits. Knot or tuck the ends to secure it.
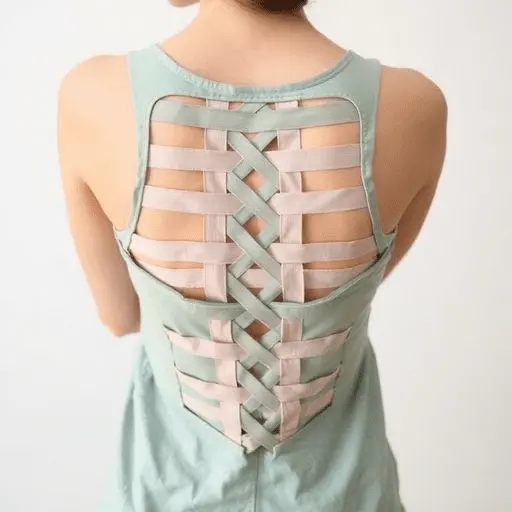
This is one of the most visually impressive DIY tank top cutting ideas in this guide and produces a result that consistently draws compliments.
10. The Twisted Front Knot Tank
The twisted front knot is a contemporary styling technique that transforms a plain tank top into something that feels borrowed from a fashion editorial. Lay the shirt flat and cut a small horizontal slit approximately two to three inches wide at the center of the hemline.
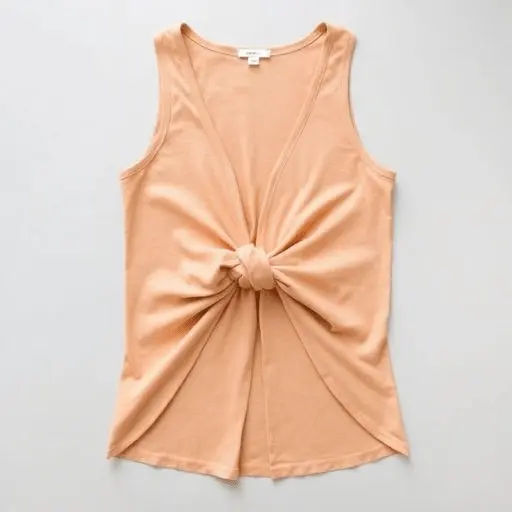
Reach through the slit and grab the front center fabric of the shirt from just below the bust line. Pull it gently through the slit and twist it once before letting it settle. The twist creates a gathered, sculptural knot at the front center of the shirt that draws the eye and creates a flattering focal point at the waist.
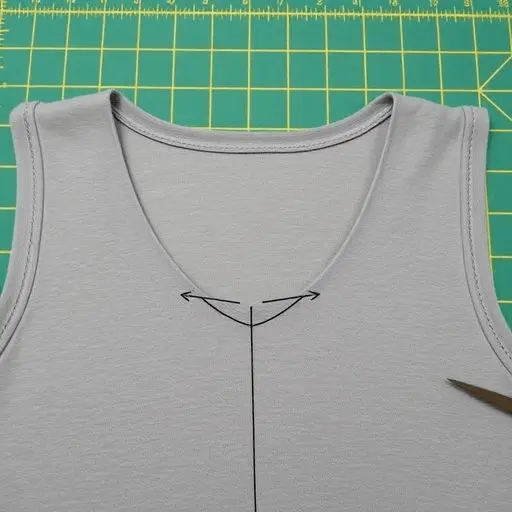
11. The Scoop Neck Enhancement
Sometimes the most effective transformation is also the subtlest one. A basic scoop neck enhancement involves nothing more than cutting the existing neckline lower and wider to create a more flattering and fashion-forward silhouette. Put the shirt on and mark with chalk or a washable marker how much lower and how much wider you want the neckline to drop. Remove the shirt, lay it flat, and cut along your markings in a smooth, continuous curve. The raw jersey edge will roll slightly over time, which actually enhances the soft, casual look of a widened scoop neck.
This technique pairs particularly well with a racerback modification on the same shirt, allowing both the front and back to carry a sense of intentional design.
12. The V-Neck Conversion
Converting a crew neck or round neck tank into a V-neck is a quick transformation that dramatically changes the overall character of the top. Mark the point of the V at your desired depth, typically two to four inches below the original neckline for a subtle effect, or further for a more dramatic result.
Draw two angled lines from the shoulders of the neckline down to your marked V point and cut carefully along both lines. Smooth out the V with small additional snips if the angle is uneven. For a clean finish, use fabric scissors with a very fine blade and cut in one continuous motion rather than several shorter cuts.
13. The Shoulder Slit Tank
Shoulder slits add an unexpected detail to an otherwise simple tank top and create a visual interest that does not require altering the overall silhouette of the shirt. Lay the shirt flat and use a ruler to mark two parallel vertical lines on each shoulder strap, approximately a quarter to half inch apart.
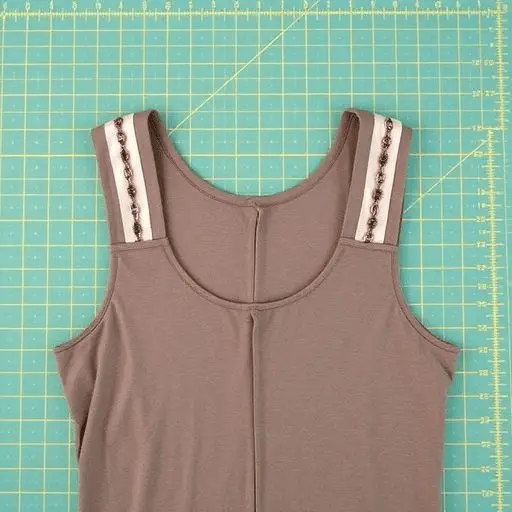
Cut along both lines to create a narrow slit in the strap. For a more elaborate version, cut three or four parallel slits in each strap and layer a thin chain or ribbon through the slits for a decorated detail that elevates the entire look.
14. The Side Cutout Tank
Side cutouts create graphic, geometric detail along the torso of the tank top and produce a look that reads as deliberately designed rather than simply cut. Lay the shirt flat and mark symmetrical rectangular or diamond shapes on both side panels of the shirt. Cut carefully along your markings, removing the marked sections cleanly. When the shirt is worn, these cutouts reveal panels of skin at the sides of the torso that create visual interest and add an element of edginess to what might otherwise be a very simple garment.
For a more complex version, cut two or three cutouts stacked vertically along each side seam, creating a repeated geometric pattern that runs from the hip to just below the underarm.
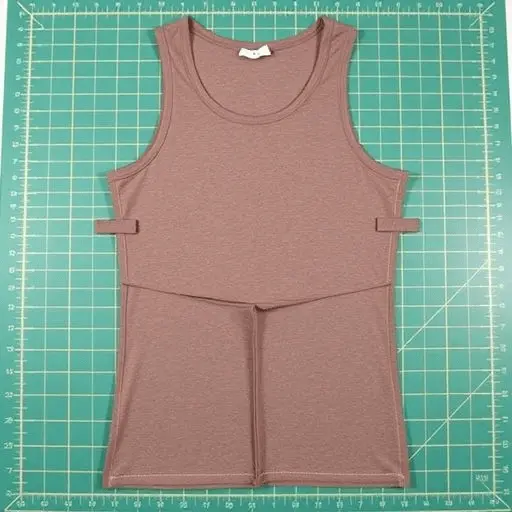
15. The Tie-Side Crop
The tie-side crop is a particularly flattering style because it allows the wearer to adjust the fit each time the shirt is put on. Cut the shirt horizontally at your desired crop length. Then cut vertically up the left side seam from the hem to a point approximately two to three inches above the bottom edge, creating a flap on each side of the cut. Tie the two resulting strips of fabric into a bow or knot at the side of the waist. The knot pulls the fabric in and creates a relaxed, custom-fitted waistline that works for a wide range of body types.
16. The Off-Shoulder Conversion
An off-shoulder tank top requires a wider cut across the neckline to allow the shirt to sit comfortably off the shoulders without tension or pulling. Mark a horizontal line across the shirt approximately two to three inches below the existing neckline and cut straight across, removing the original collar area entirely. Stretch the cut edge gently to relax it, which will allow the fabric to sit naturally across the upper chest and shoulders. The result is a breezy, laid-back silhouette that works beautifully for warm weather styling.
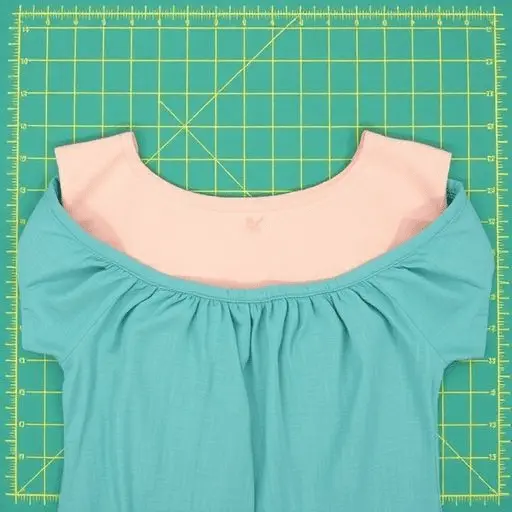
For an even softer result, cut the edge in a gentle curve that sits slightly higher in the front than the back, which keeps the shirt from sliding down during wear. https://www.diys.com/ways-to-alter-t-shirts-and-tank-tops/
17. The Asymmetrical Hem Cut
An asymmetrical hem transforms the bottom edge of a tank top from a standard straight line into a dynamic diagonal or curved shape that adds movement and visual interest to even the most basic design. Lay the shirt flat and mark a diagonal line from one side of the hem at your desired shorter length across to the opposite side at a longer drop. Cut carefully along this line. The resulting hem sits at a sharp diagonal angle that looks deliberately styled and pairs particularly well with fitted bottoms or high-waisted silhouettes.
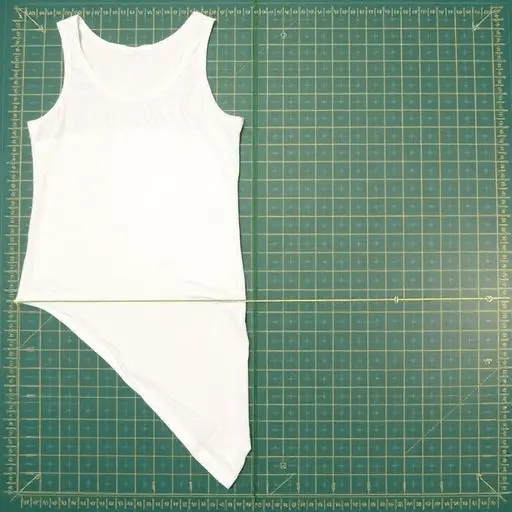
A curved asymmetrical hem, where one side arcs upward in a convex curve rather than a straight diagonal, produces a softer and more feminine variation of the same concept.
18. The Braided Back Panel
The braided back panel is the most technically involved design in this guide, but it produces a result that is genuinely striking and entirely unique. Cut the back panel of the tank top into vertical strips of equal width, approximately one inch each, cutting from the hemline upward to about two inches below the armhole. Leave the top two inches intact so the strips remain attached at the top. Begin braiding the strips in groups of three, working from left to right across the back panel. Secure the ends of each braid with a small knot or a thin strip of fabric tied tightly around the base.
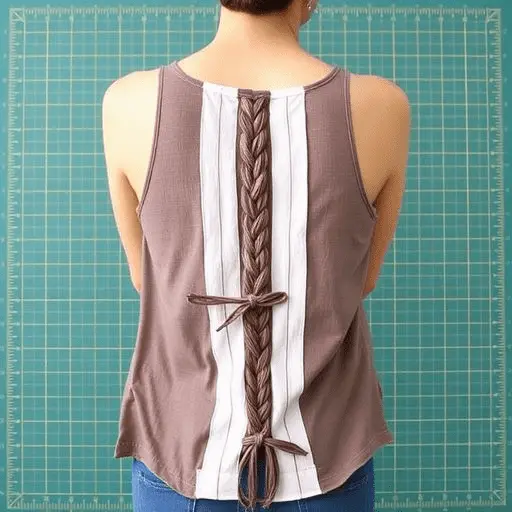
The finished braided back creates a textured, detailed panel that is visible when the shirt is worn and makes the entire piece feel like something that took genuine skill and artistry to create.
How to Style Your DIY Tank Tops
The way you style a cut tank top determines whether it reads as gym wear, casual weekend clothing, or a genuine fashion statement. Pair a deep armhole muscle tank with high-waisted joggers and clean sneakers for a polished athletic look. Layer a knotted crop over a longline sports bra and wide-leg linen trousers for an elevated summer outfit. Style an open back or crisscross back design with a fitted midi skirt for an evening casual look that requires no jewelry to feel complete. A fringe hem tank worn over a bikini top with denim cut-offs is a natural festival pairing that never looks out of place.
The beauty of DIY cut tops is that they integrate naturally into any wardrobe because they already reflect your personal aesthetic in their construction.
Conclusion
DIY tank top cutting is one of the most accessible and genuinely rewarding forms of creative expression available to anyone with a pair of scissors and a few shirts they are ready to transform. The techniques in this guide range from beginner-friendly two-minute cuts to more involved designs that take thirty minutes but deliver results worth every second spent. What unites all 18 of these ideas is the central principle of the DIY cutting movement: your existing wardrobe is full of potential that is simply waiting to be unlocked.
The next time you find yourself standing in front of your closet feeling like you have nothing to wear, consider reaching for the scissors instead of your credit card. A simple cut, a thoughtful design, and a few minutes of creative focus can turn an unworn shirt into the most-complimented piece in your wardrobe. Start with the style that speaks most directly to your aesthetic, practice the technique, and then use that confidence to work your way through every variation in this guide.
Frequently Asked Questions
Q1. Do I need to know how to sew to try DIY tank top cutting ideas?
No sewing knowledge is required for the majority of the techniques in this guide. Most DIY tank top cutting styles are designed to be entirely no-sew, relying only on scissors, fabric markers, and occasionally a small amount of fabric glue for securing edges. Jersey and cotton knit fabrics are particularly forgiving because their cut edges roll naturally without fraying.
Q2. What type of shirt works best for cutting DIY tank tops?
Relaxed-fit or oversized t-shirts in jersey cotton or cotton blend fabrics are the most versatile and beginner-friendly choice. These fabrics stretch and roll at the cut edges in a way that looks intentional rather than unfinished. Avoid stiff woven fabrics like oxford or poplin, as these fray badly and do not drape as naturally after cutting.
Q3. How do I keep my cuts looking even and symmetrical?
Always lay the shirt completely flat on a smooth surface before marking or cutting. Fold the shirt in half along the center line when marking symmetrical cuts like armholes or side cutouts so that both sides mirror each other. Use a ruler and a washable fabric marker to draw your lines before cutting and always cut in one continuous motion rather than multiple short snips for the cleanest edge.
Q4. Can DIY cut tank tops be washed without losing their shape?
Yes, most DIY cut tank tops wash well when handled gently. Turn the top inside out before washing, use cold water, and lay it flat to dry rather than placing it in a dryer. Heat and aggressive tumbling can cause jersey fabric to shrink and cut edges to curl more aggressively than intended.
Q5. Which DIY tank top cutting style is best for beginners?
The classic sleeveless crop top and the knotted hem crop are both ideal starting points for beginners because they require only one or two straight cuts and produce clean, wearable results even on a first attempt. Once you are comfortable with the basic crop and the knotted hem, the racerback and scoop neck enhancement are natural next steps that build cutting confidence without introducing excessive complexity.